
I removed my transfer case over the weekend to resolve some leaks and thought I would post a detailed guide. I searched here prior to doing this and saw a lot of conflicting answers and ambiguity. My truck is a 1987 with a 700R4 and an NP208 transfer case. It really was a pretty simple process and I had it out in an hour and a half or so without any help. This was the first time I'd done this on a square body and really wasn't a big deal. Here's my steps:
I did not have to remove the crossmember or put a jack under the transmission. Everything stayed in place with the exception of the transfer case and associated parts.
1. Drain transfer case. The drain plug is the large 30mm bolt on the rear side of the case.

2. Remove front driveshaft. Remove bolts on flanged end first and then at axle. Be careful not to allow U-joint cap to come off if you're reusing them.
3. Remove rear driveshaft. Remove bolts at rear axle and then slide the yoke out of the transfer case. You'll have fluid coming out of the case at the rear output.
4. Remove 4WD indicator light plug. This is located on top of the transfer case and has a small clip that you'll need to pull out on to release it.
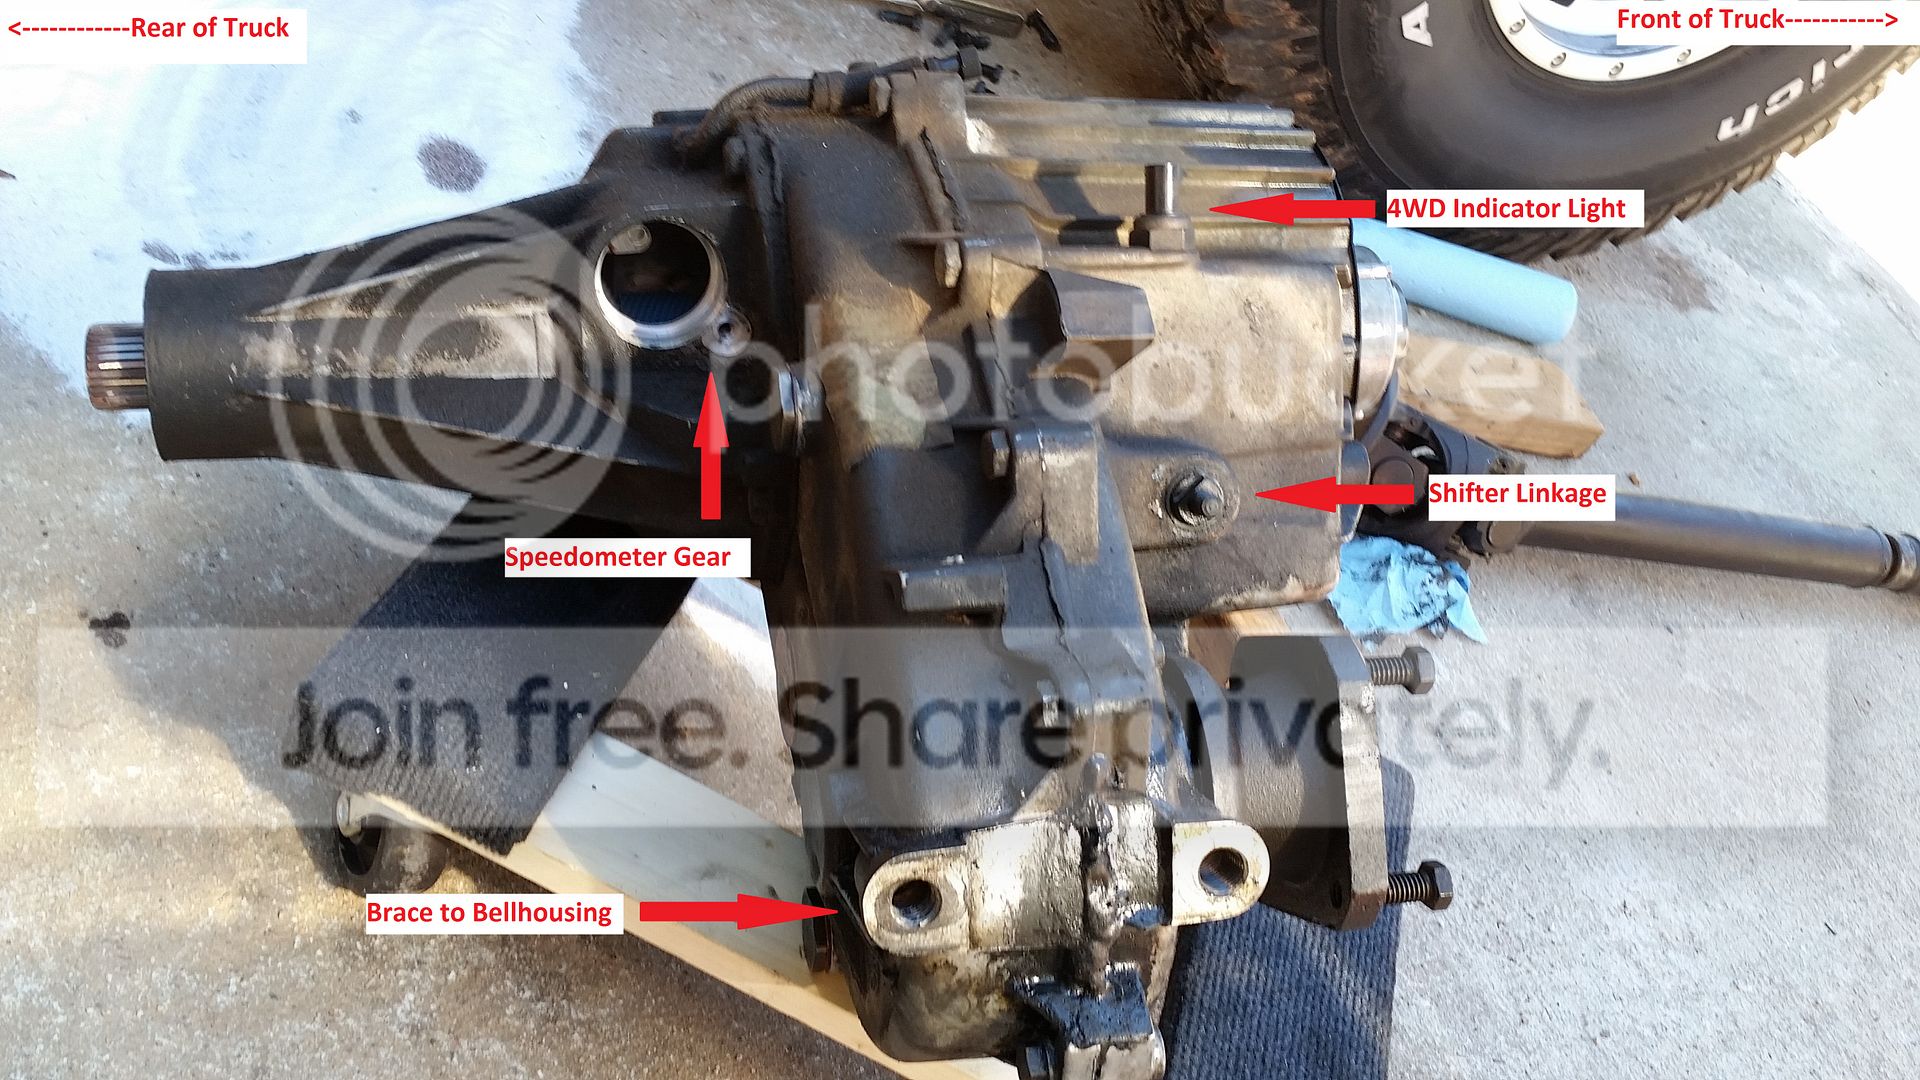
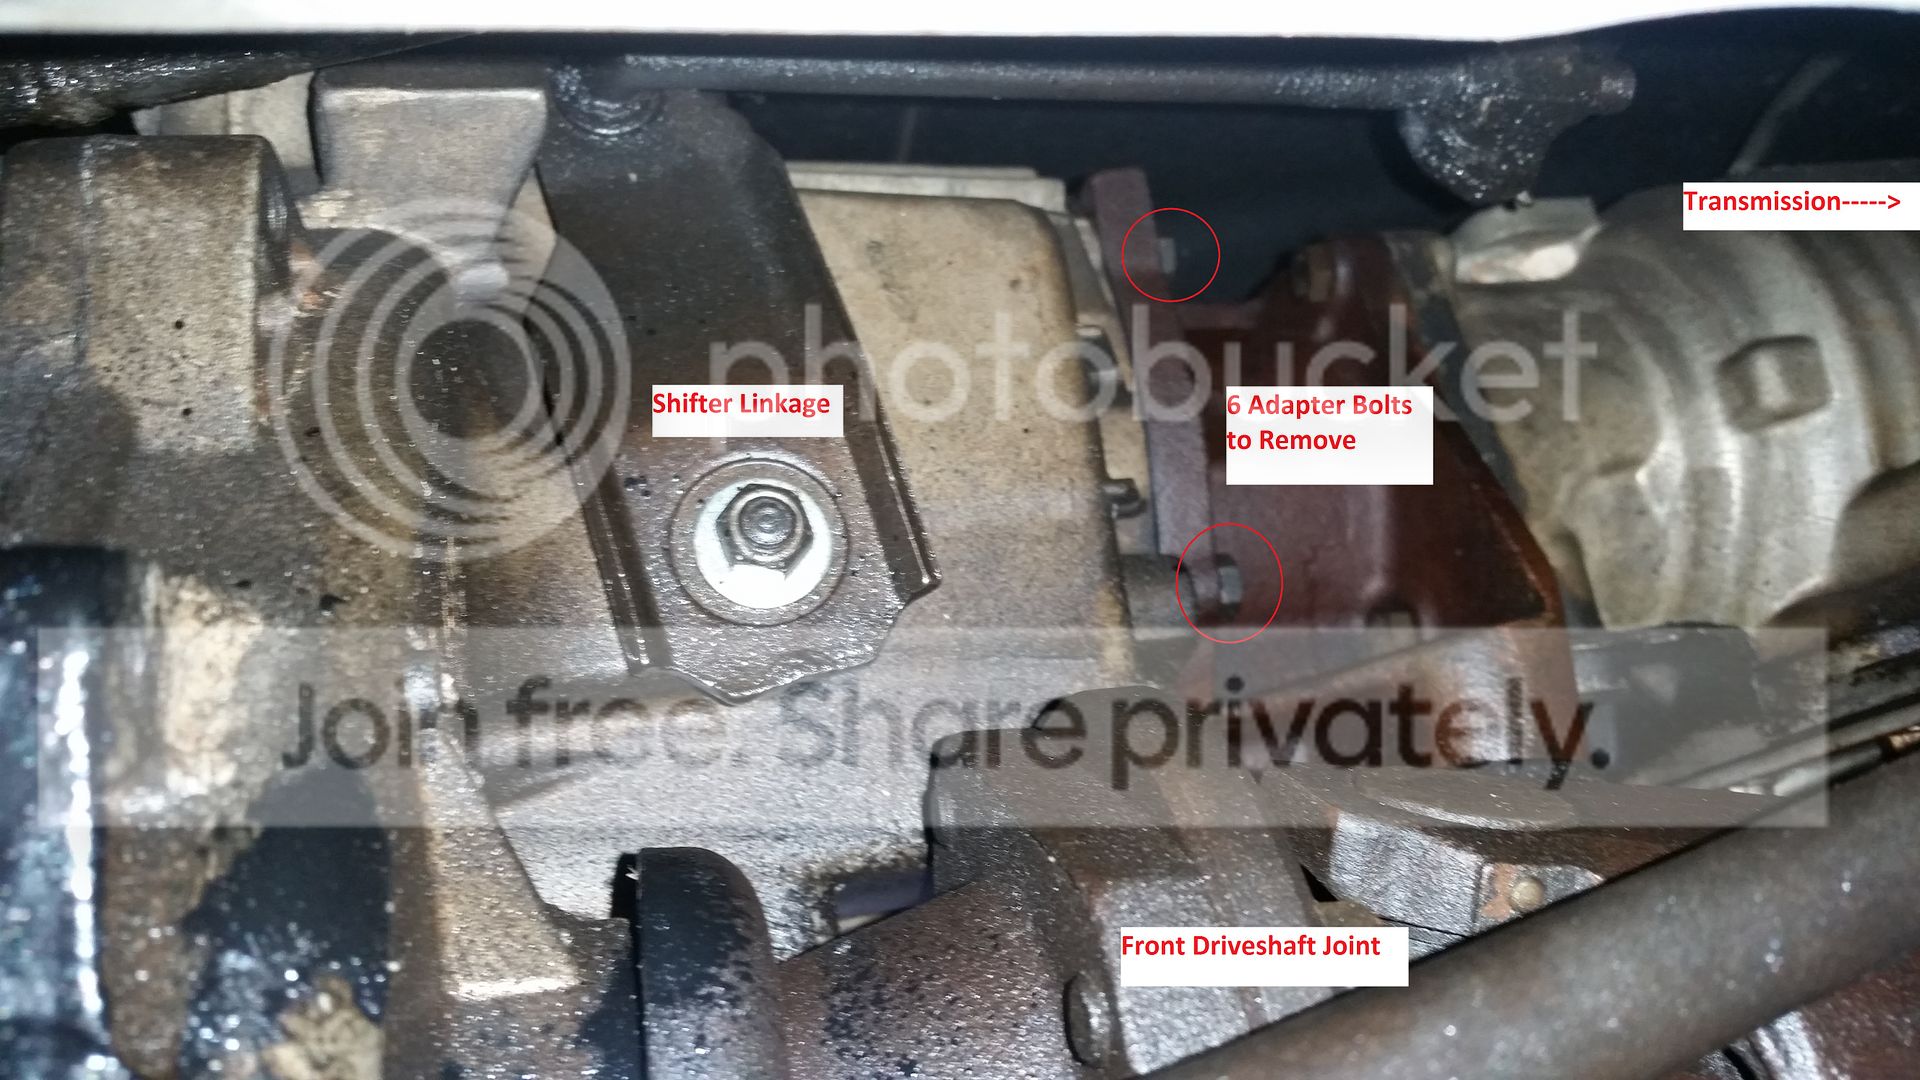
5. Remove nut and washer for shifter linkage. Note that this bracket has a slot that will have to be realigned when you put it back together.
6. Remove two large bolts for brace that goes to bellhousing.
7. Remove bolt holding speedometer gear. The bolt comes out along with a small Y shaped bracket that holds the gear in place. Gently slide the gear out. Note that there are tabs on the gear housing that the bracket seats into. I pulled the gear and housing aside and hung it over my exhaust.
8. Remove six bolts on back of transmission to transfer case adapter. Make sure you have a drain pan below because you're about to make a mess. The transmission output shaft will hold the transfer case up with the bolts removed.
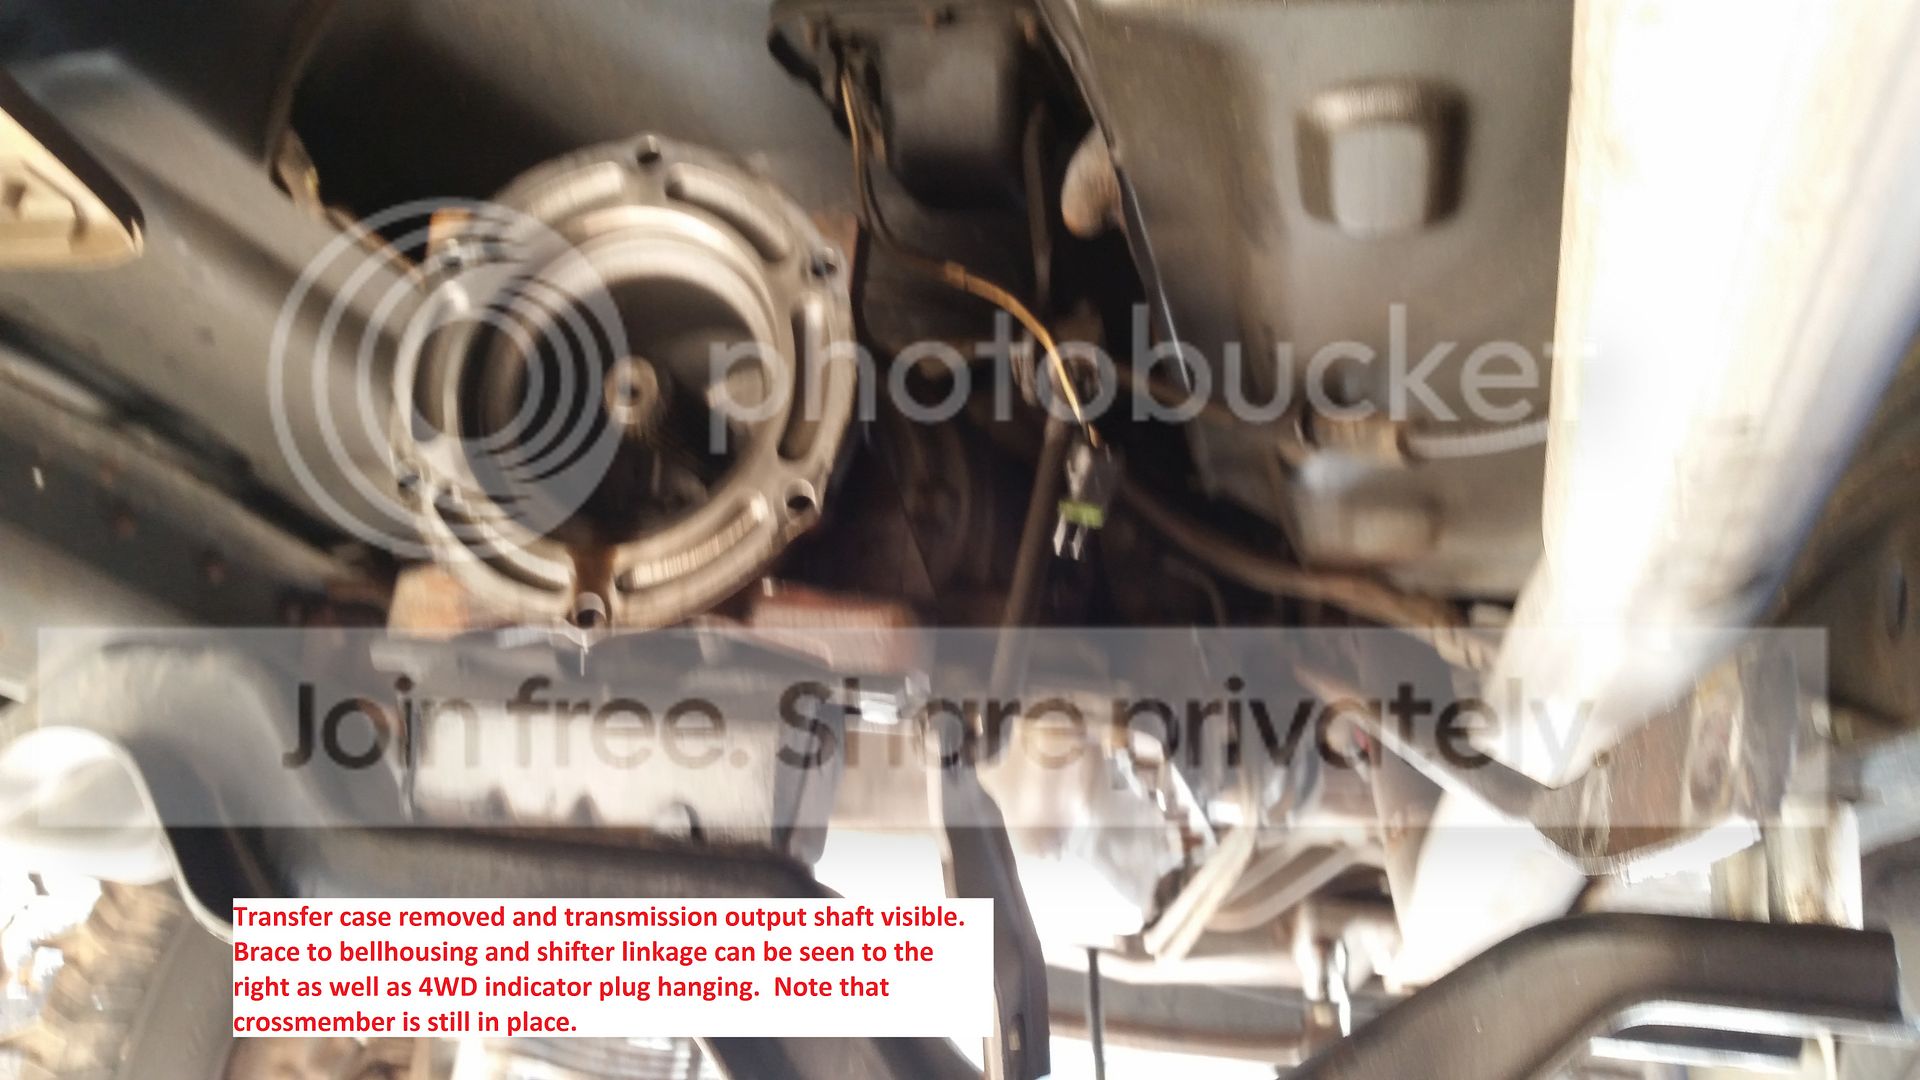
At this point you can slide the transfer case off and out from under the truck. I was on a creeper and just bench pressed it onto my chest and then set it onto a small furniture dolly to move it around and work on it. I did set it upright and blocked it up on 2x4s when I split the case open.
I would suggest working on a tarp or some type of drop cloth. I split the case open and resealed it and then replaced all the rest of the seals while it was out. I made a huge mess on top of a drop cloth and then wrapped it all up and threw it away at the end of the day. If you're doing this, invest a few bucks in a seal puller to make your life easier and avoid marring the surfaces. All of the rest of this can be done with basic hand tools. The only somewhat oddball socket size is the 30mm drain/fill plugs. You can use a crescent wrench if you don't have it. I ordered a seal kit from American Powertrain Warehouse that had almost everything I needed as well as some that I didn't. It did not have the seal for the front output and I had to get that from O'Reillys as well as RTV. I had a rubber gasket between the transfer case and the transmission adapter and chose to clean that up and reuse it as opposed to the paper gasket provided.
Putting it back in place is simply the reverse. I filled mine up with about 5 quarts of ATF (until it starts coming back out the fill plug) and topped off the transmission.
-Steve
I did not have to remove the crossmember or put a jack under the transmission. Everything stayed in place with the exception of the transfer case and associated parts.
1. Drain transfer case. The drain plug is the large 30mm bolt on the rear side of the case.

2. Remove front driveshaft. Remove bolts on flanged end first and then at axle. Be careful not to allow U-joint cap to come off if you're reusing them.
3. Remove rear driveshaft. Remove bolts at rear axle and then slide the yoke out of the transfer case. You'll have fluid coming out of the case at the rear output.
4. Remove 4WD indicator light plug. This is located on top of the transfer case and has a small clip that you'll need to pull out on to release it.
5. Remove nut and washer for shifter linkage. Note that this bracket has a slot that will have to be realigned when you put it back together.
6. Remove two large bolts for brace that goes to bellhousing.
7. Remove bolt holding speedometer gear. The bolt comes out along with a small Y shaped bracket that holds the gear in place. Gently slide the gear out. Note that there are tabs on the gear housing that the bracket seats into. I pulled the gear and housing aside and hung it over my exhaust.
8. Remove six bolts on back of transmission to transfer case adapter. Make sure you have a drain pan below because you're about to make a mess. The transmission output shaft will hold the transfer case up with the bolts removed.

At this point you can slide the transfer case off and out from under the truck. I was on a creeper and just bench pressed it onto my chest and then set it onto a small furniture dolly to move it around and work on it. I did set it upright and blocked it up on 2x4s when I split the case open.
I would suggest working on a tarp or some type of drop cloth. I split the case open and resealed it and then replaced all the rest of the seals while it was out. I made a huge mess on top of a drop cloth and then wrapped it all up and threw it away at the end of the day. If you're doing this, invest a few bucks in a seal puller to make your life easier and avoid marring the surfaces. All of the rest of this can be done with basic hand tools. The only somewhat oddball socket size is the 30mm drain/fill plugs. You can use a crescent wrench if you don't have it. I ordered a seal kit from American Powertrain Warehouse that had almost everything I needed as well as some that I didn't. It did not have the seal for the front output and I had to get that from O'Reillys as well as RTV. I had a rubber gasket between the transfer case and the transmission adapter and chose to clean that up and reuse it as opposed to the paper gasket provided.
Putting it back in place is simply the reverse. I filled mine up with about 5 quarts of ATF (until it starts coming back out the fill plug) and topped off the transmission.
-Steve


