
4xcrazy
3/4 ton status
Great outdoors,,, it's a boat thing, do I post in the great outdoors or in the other rides forum. 
Eh, it's for fun, fishing and family time, so it'll go in here.
Bought this 1992 Bayliner 2000cg Capri for stupid cheap through an auction last year while in SoCal picking up a tri-axle trailer for Jenns dad. HE actually bought it, I worked off the debt by working on his other boats and a vehicle transmission swap.
Anyways, it needed a ton of help after I got it home and started going over it.
I am pretty sure I don't have the proper wood working tools required for ripping up the floor, right at the moment I am just using a sawzall and my hand rip saw, both battery operated, which sucks, just being careful with the depth of cuts and doing smaller sections until I can see where exactly everything is under the deck.
Also noticing once the floor pieces are coming up, the foam under it is holding some moisture, from reading and research this seems to be pretty common as well. That'll be replaced too I guess.
I realize it's a Capri, not really a high dollar boat, but I look at it as a learning experience and once done, it should be in really good condition for many more years of our enjoyment. Looking forward to it.
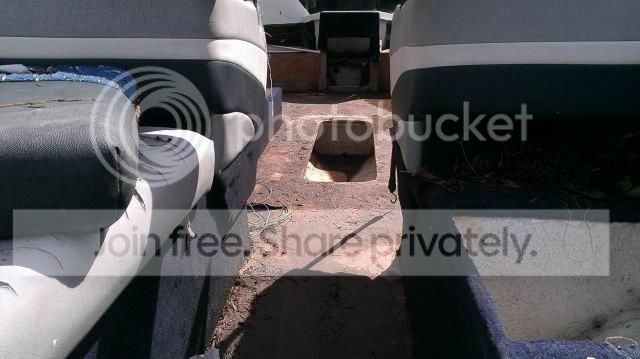
Originally I thought I was just going to replace a section of floor up towards the bow, was soft and cracking when you applied pressure to it, but once I removed all the old worn out carpet I got a good look at the nastiness that was the floor on the entire thing.
We also decided to eliminate the back to back seats and go with a swivel seat of some sorts on both sides, since it's just myself, Jenn and two pre-teens, there's plenty of room with the back to backs and it should add a bit more floor space once done. But that required the removal of those glassed in long pedestal mount things they mount the seats to. One side out,, it was a chore.
A few pics as I'm going along, it's ugly and again, I'm not sure I'm doing it the way a shop would, but it's being removed little by little, which is the way I will be putting it back together too.
The plan is, new floor, Jenn is already designing new color scheme and patterns for the side panels, bow pads and seating that is still part of the boat structure. Complete change of colors. The original carpeting plan is being eliminated and replaced with some sort of floor covering, similar to bedliner material, but something marine grade or whatever they use in them and possibly snap in place carpet panels while out on the water using it for foot comfort. The idea is to make it easier to clean and keep water from sitting in wet carpet, eating away at it.


One window tinted so far :P


After removing most of the box pedestal seat mount, I realized I probably could have left some of the forward sextion in place to allow a platform to mount the new swivel mount seats going in, so now I'll have to rebuild from the hull out, a flat surface for that, eh, oh well, again, learning as I go")


Also got to thinking that night, I wasn't sure why I started to remove THAT area of foam, it wasn't water logged like the rear area is. It flush with where the new deck will be applied.
Seemed like two layers of plywood here.


Eh, it's for fun, fishing and family time, so it'll go in here.
Bought this 1992 Bayliner 2000cg Capri for stupid cheap through an auction last year while in SoCal picking up a tri-axle trailer for Jenns dad. HE actually bought it, I worked off the debt by working on his other boats and a vehicle transmission swap.
Anyways, it needed a ton of help after I got it home and started going over it.
I am pretty sure I don't have the proper wood working tools required for ripping up the floor, right at the moment I am just using a sawzall and my hand rip saw, both battery operated, which sucks, just being careful with the depth of cuts and doing smaller sections until I can see where exactly everything is under the deck.
Also noticing once the floor pieces are coming up, the foam under it is holding some moisture, from reading and research this seems to be pretty common as well. That'll be replaced too I guess.
I realize it's a Capri, not really a high dollar boat, but I look at it as a learning experience and once done, it should be in really good condition for many more years of our enjoyment. Looking forward to it.
Originally I thought I was just going to replace a section of floor up towards the bow, was soft and cracking when you applied pressure to it, but once I removed all the old worn out carpet I got a good look at the nastiness that was the floor on the entire thing.
We also decided to eliminate the back to back seats and go with a swivel seat of some sorts on both sides, since it's just myself, Jenn and two pre-teens, there's plenty of room with the back to backs and it should add a bit more floor space once done. But that required the removal of those glassed in long pedestal mount things they mount the seats to. One side out,, it was a chore.
A few pics as I'm going along, it's ugly and again, I'm not sure I'm doing it the way a shop would, but it's being removed little by little, which is the way I will be putting it back together too.
The plan is, new floor, Jenn is already designing new color scheme and patterns for the side panels, bow pads and seating that is still part of the boat structure. Complete change of colors. The original carpeting plan is being eliminated and replaced with some sort of floor covering, similar to bedliner material, but something marine grade or whatever they use in them and possibly snap in place carpet panels while out on the water using it for foot comfort. The idea is to make it easier to clean and keep water from sitting in wet carpet, eating away at it.


One window tinted so far :P


After removing most of the box pedestal seat mount, I realized I probably could have left some of the forward sextion in place to allow a platform to mount the new swivel mount seats going in, so now I'll have to rebuild from the hull out, a flat surface for that, eh, oh well, again, learning as I go


Also got to thinking that night, I wasn't sure why I started to remove THAT area of foam, it wasn't water logged like the rear area is. It flush with where the new deck will be applied.
Seemed like two layers of plywood here.


