It was weird being banned! (For the record I didn’t do anything to get banned, it was some kind of IP thing that I don’t understand) Not being able to be on here for the first time ever made me want to be on here....look what the cat dragged in!
Morning Travis!

CK5

You are using an out of date browser. It may not display this or other websites correctly.
You should upgrade or use an alternative browser.
You should upgrade or use an alternative browser.
2008 Suburban HD - 8.1L swap (frankenburban 2.0)
- Thread starter fidelity101
- Start date
LolIt was weird being banned! (For the record I didn’t do anything to get banned, it was some kind of IP thing that I don’t understand) Not being able to be on here for the first time ever made me want to be on here....

Glad you got sorted out!
Chief8552
Newbie
Awesome thread! Created an account just to follow this! I have a 2007 3/4 suburban that we are using to tow our new to us 8,000 pound camper. It does ok until there are hills involved. Have been talking about doing this swap and have been having trouble finding information, so coming across this was perfect! You have detailed everything that I had questions about, but while reading I realized that you never mentioned doing anything with the exhaust. Did the 8.1 manifolds bolt up to the factory 6.0 down pipes and cats, or did you have to modify to fit?
again, thanks for taking to time to document your conversion!
again, thanks for taking to time to document your conversion!
fidelity101
1/2 ton status
Its been my daily for the past year, have about 35k miles on the swap. A few bugs to workout left but I'll provide some updates I am overdue on!
The trans noise is gone, that was just me low on fluid.
The trans noise is gone, that was just me low on fluid.
fidelity101
1/2 ton status
Awesome thread! Created an account just to follow this! I have a 2007 3/4 suburban that we are using to tow our new to us 8,000 pound camper. It does ok until there are hills involved. Have been talking about doing this swap and have been having trouble finding information, so coming across this was perfect! You have detailed everything that I had questions about, but while reading I realized that you never mentioned doing anything with the exhaust. Did the 8.1 manifolds bolt up to the factory 6.0 down pipes and cats, or did you have to modify to fit?
again, thanks for taking to time to document your conversion!
I learned a lot about the 8.1 from this place when I was tempted to put in my old CK5 suburban but I began to realize I wanted more of a modern truck and to swap all of those extra bits over was going to be a bigger project I went with a 2008 suburban, unfortunately the engine didn't pan out that well and I used my knowledge from here and other swap sites to piece it together. The only non GM part I used was the throttle body adapter essentially but you need a friend who can tune or pay a shop to do it.
Yes the factory 6.0 downpipes/exhaust bolt up to the exhaust manifold.
Got a bit distracted from the PCV stuff for a while and needed to add some comfort and storage for camping and race events.

So with a few small hardware store runs, I managed to make a false floor that was strong enough to hold the required rally totes or for sleeping on road trips...
I got tired of taking a lot of things with me but only to have to put them back in so often I made some drawers for them and used some latex paint to clean it up and toughen it up a bit, 0 smell linger so it was quite nice compared to a varnish or oil paint.

Now instead of having a tub of stuff in the back I have them stored in these drawers nicely. I need to put a front on them for easier grabbing just haven't had the time.

The one on the right is longer so I can stash a 10x10 pop up and my folding camp chairs, misc tools...

The other side has a shorter drawer because I have cubed off some space to provide real estate for an inverter, high amperage 12v leads, air compressor. (TBD at the moment of that right now)
So the 2nd row seats can function flawlessly with no interference, which has the added benefit of being able to reach the rear easily still.

a big air mattress fits in there in the back great too but I prefer a small infaltable one as its not so thick and doesn't feel like you are sleeping in a coffin.
The short drawer has a cubby hole now where I have a 4k watt inverter that I still need to wire up and mount... but its strong enough to run an angle grinder
ontop of that with all the increased rally and a lack of desire to repair my existing open trailer, I sold that and upgraded with some additional cash to this!

to add to the comfort and winter towing events (less salt spray) I went with a 2nd hand 20' enclosed trailer. 7klbs capacity and I'm damn near it with the spare tools/tires/parts and a 2600lb car. Trailer weighs ~3000lbs
fidelity101
1/2 ton status
So the trailer started to get organized, after painting the inside white, in efforts to make service less hectic and less of a mess.

simple, and effective its a tight squeeze but it works and the car fits with some room to spare! Still need to make an exterior tire mount as well as find a way to store the truck spare (factory attachment rusted out and failed) then eventually have the toolbox raised off the floor allowing for more storage spaces underneath for totes.
after that some lights will go up potentially as the front of the trailer has a battery box and is wired in a way that receives alternator voltage, so need to finish the box and add some permanent lighting in here.

not too shabby, more updates on that likely in the future but the truck needs the attention now.
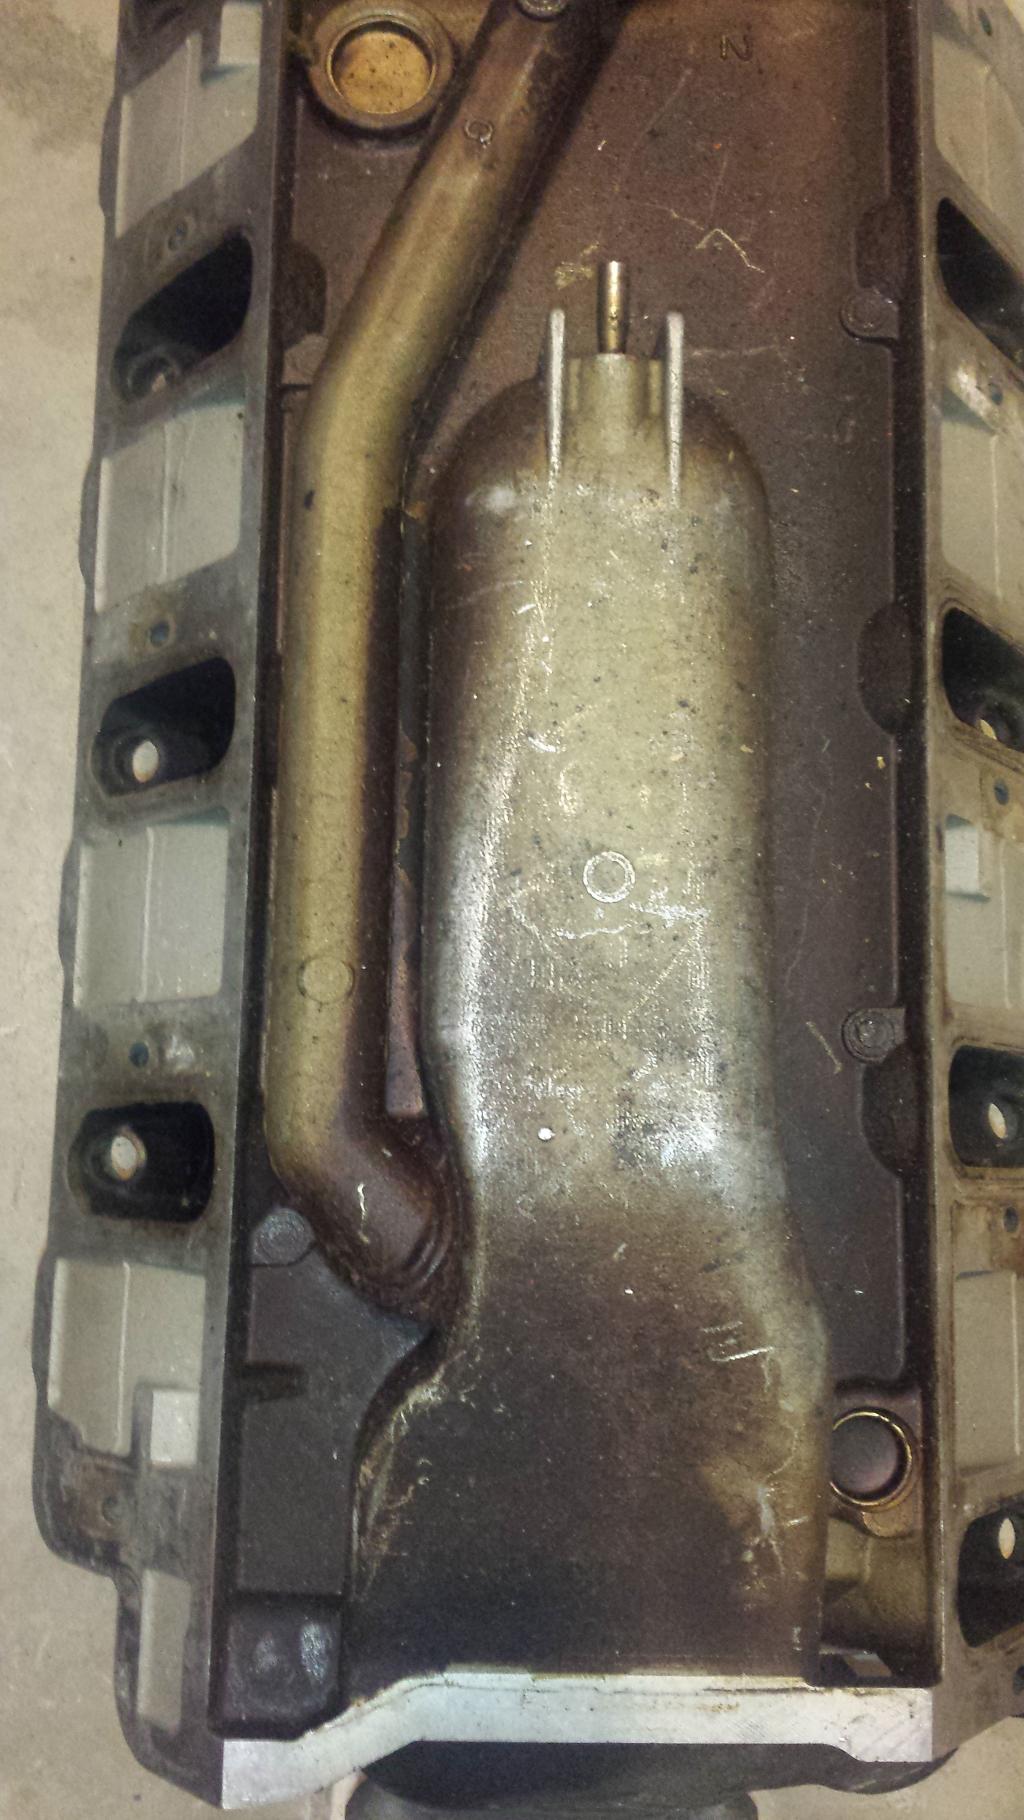
Need to do the PCV fix so I grabbed a spare manifold from the junkyard and went about slowly making the required mods...

We all know this story, shitty vent at the bottom of the intake manifold is the PCV system for the big block but a proper one will be installed with catch can.

I really like the raylar GIF that explains this mod:

tada! (midway progress)


sandblasted and cleaned, ready for a dozen layers of clear coat to help keep dirt from packing in all the crevasses.

Got the manifold re welded up and ready to rock, vented crank case was first option but its not ideal as I needed that crank vacuum to slow my timing cover leak which I found may not be my fault, apparently the tool wore out on this component and was having a lot of casting porosity so oil would leak through the cover itself, which is frustrating...
so back to oil catch can and PCV routing it is...

this will mimic the factory LY6 setup except adding in a catch can to trap some of the garbage.
so with the intake mod done and the new manifold installed I needed (wanted) to re-do the intake plumbing.

I have lots of room for an air compressor now in the old airbox space which was not feasible before due to very high current leads running the long distance to the trunk from the engine bay, 00 gauge wire did not sound fun for the ARB twin compressor. Still need to take some exact measurements but I am open to going to the single for space/cost reasons too. That will happen before summer when I actually need compressed air for tires and some air tools.

The valve covers are already plumbed with ports ready for the PCV system, I just need to weld a bung onto this aluminum tubing for the fresh air part and then it will be ready for a touch up on the engine/trans tune.
simple, and effective its a tight squeeze but it works and the car fits with some room to spare! Still need to make an exterior tire mount as well as find a way to store the truck spare (factory attachment rusted out and failed) then eventually have the toolbox raised off the floor allowing for more storage spaces underneath for totes.
after that some lights will go up potentially as the front of the trailer has a battery box and is wired in a way that receives alternator voltage, so need to finish the box and add some permanent lighting in here.
not too shabby, more updates on that likely in the future but the truck needs the attention now.
Need to do the PCV fix so I grabbed a spare manifold from the junkyard and went about slowly making the required mods...
We all know this story, shitty vent at the bottom of the intake manifold is the PCV system for the big block but a proper one will be installed with catch can.
I really like the raylar GIF that explains this mod:
tada! (midway progress)
sandblasted and cleaned, ready for a dozen layers of clear coat to help keep dirt from packing in all the crevasses.
Got the manifold re welded up and ready to rock, vented crank case was first option but its not ideal as I needed that crank vacuum to slow my timing cover leak which I found may not be my fault, apparently the tool wore out on this component and was having a lot of casting porosity so oil would leak through the cover itself, which is frustrating...
so back to oil catch can and PCV routing it is...
this will mimic the factory LY6 setup except adding in a catch can to trap some of the garbage.
so with the intake mod done and the new manifold installed I needed (wanted) to re-do the intake plumbing.
I have lots of room for an air compressor now in the old airbox space which was not feasible before due to very high current leads running the long distance to the trunk from the engine bay, 00 gauge wire did not sound fun for the ARB twin compressor. Still need to take some exact measurements but I am open to going to the single for space/cost reasons too. That will happen before summer when I actually need compressed air for tires and some air tools.
The valve covers are already plumbed with ports ready for the PCV system, I just need to weld a bung onto this aluminum tubing for the fresh air part and then it will be ready for a touch up on the engine/trans tune.
I thinking you new air filter and intake tube is a bit of at step backwards... Your IATs will be much higher and in the summer it could start pulling timing due to the higher temps. The factory air box is actually a pretty good setup and not many aftermarket cold air intakes are as effective at getting cold air into the intake.
Also I'm kind of lost, what exactly did you do to the intake manifold?
Also I'm kind of lost, what exactly did you do to the intake manifold?
fidelity101
1/2 ton status
I thinking you new air filter and intake tube is a bit of at step backwards... Your IATs will be much higher and in the summer it could start pulling timing due to the higher temps. The factory air box is actually a pretty good setup and not many aftermarket cold air intakes are as effective at getting cold air into the intake.
Also I'm kind of lost, what exactly did you do to the intake manifold?
Yeah the factory airbox is really good I agree, I didn't really plan on doing the intake tubing setup but I had no where else to place a 12v air compressor without paying 100's for extremely thick wiring. Running an air hose to a tank is much cheaper for the length of the vehicle. I'm sure on hot days it will pull some warm air but its not going to be the end of world. 400ft lbs at 1000RPM does the job pretty good.
the factory intake manifold has a huge casting wall that inhibits flow, so I took that down, ported the area so it has a smooth larger transition from the throttle body to the runners. More details on it here:
http://www.raylarengineering.com/intake_manifold.html
this is a common 8.1 DIY mod commonly known as "the intake mod"
I also plugged the PCV port on there so I can run a proper PCV system involving a catch can.
fidelity101
1/2 ton status
Also, something I did a while ago that I forgot about was utilize a good spare battery, it was very easy to hook up a 2nd battery, it has a tray ready for it already many 2500hds come with the 2nd battery but mine did not.
A simple battery isolator and ta'da!

it is very common to need the use of an angle grinder or dremel or some other power tool when you are in the middle of a field for rally service, not to mention with the inverter hard mounted it will be a very self sustaining rig.
I have a 12x11x6" space for an air compressor on the other side now. I plan to mount an air tank where the spare tire used to be underneath and eventually have a swing arm for the spare tire.
A simple battery isolator and ta'da!
it is very common to need the use of an angle grinder or dremel or some other power tool when you are in the middle of a field for rally service, not to mention with the inverter hard mounted it will be a very self sustaining rig.
I have a 12x11x6" space for an air compressor on the other side now. I plan to mount an air tank where the spare tire used to be underneath and eventually have a swing arm for the spare tire.
Ah so anything you might have lost with the hotter IATs you'll make it back and then some with the intake mod.Yeah the factory airbox is really good I agree, I didn't really plan on doing the intake tubing setup but I had no where else to place a 12v air compressor without paying 100's for extremely thick wiring. Running an air hose to a tank is much cheaper for the length of the vehicle. I'm sure on hot days it will pull some warm air but its not going to be the end of world. 400ft lbs at 1000RPM does the job pretty good.
the factory intake manifold has a huge casting wall that inhibits flow, so I took that down, ported the area so it has a smooth larger transition from the throttle body to the runners. More details on it here:
http://www.raylarengineering.com/intake_manifold.html
this is a common 8.1 DIY mod commonly known as "the intake mod"
I also plugged the PCV port on there so I can run a proper PCV system involving a catch can.
Are you going to adjust the tune now?
Also Raylar mentioned upgrading the throttle body from 76mm to 80mm. Is it true that the 8.1 uses the same 76mm throttle body as say a 4.8? That seems insane. I'd definitely be upgrading the throttle body.
fidelity101
1/2 ton status
Ah so anything you might have lost with the hotter IATs you'll make it back and then some with the intake mod.
Are you going to adjust the tune now?
Also Raylar mentioned upgrading the throttle body from 76mm to 80mm. Is it true that the 8.1 uses the same 76mm throttle body as say a 4.8? That seems insane. I'd definitely be upgrading the throttle body.
I'm not sure what the factory 8.1 throttle body size is. I am using the factory LY6 (LS3), which is why a 4" hose intake system works really well, if you wanted to get the full advantage of it it would require cutting the flange off and welding on a new throttle body flange for the 4 bolt style so you can use the whole diameter. I am still stuck with the largest opening on the manifold which is about 3" diameter. For the GMT900 swap I need to use the GMT 900 electronics, the MAF/throttle body are different between the GMT800s.
Once I finish the PCV update I can get it re-tuned.
I forgot you used the 4 bolt LY6 throttle body. It should be 87mm.
fidelity101
1/2 ton status
Don't need the compressor at the moment so I moved onto more urgent matters, I have hard mounted my dual battery fuse so its much safer now, the PCV plumbing is done and works - the catch can should arrive Friday and its an easy install. Got the misfire issue fixed, but the tune will have to wait as I have an exhaust leak at the manifold/head gasket... so I'll just sit on it for now until the exhaust gets worse and either fix it and call it a day or spend 1500+ and re-do the whole exhaust with some stainless long tubes.
so aside from that I was able to finally get around to mounting this 4KW inverter. The idea will be to run posts to the front of the inverter and will tap into the 2nd battery with some long heavy gauge wiring.

also sneak shot of the handy fire extinguisher mount setup I run on pretty much everything, its a simple pin to remove then part of the mount that attaches to the fire extinguisher slides out and you are ready to rock!

this also leaves me just enough room to find a way to fit a small toolbox which is next on the short list of vehicle prep. It turns out when you drive a project car, things tend to happen... who would have guessed?!
so aside from that I was able to finally get around to mounting this 4KW inverter. The idea will be to run posts to the front of the inverter and will tap into the 2nd battery with some long heavy gauge wiring.
also sneak shot of the handy fire extinguisher mount setup I run on pretty much everything, its a simple pin to remove then part of the mount that attaches to the fire extinguisher slides out and you are ready to rock!
this also leaves me just enough room to find a way to fit a small toolbox which is next on the short list of vehicle prep. It turns out when you drive a project car, things tend to happen... who would have guessed?!
fidelity101
1/2 ton status
I had a better idea and quicker access to the fire extinguisher by relocating it to the floor. This allowed me room for a decent sized toolbox so I could some roadside repair if need be. I also had to add a divider to keep the toolbox from hitting the inverter... but had just enough space for the cable.

Now that the bed side is done, need to find a spot for 2 firewall bulkhead connectors and run the 12v leads from the 2nd battery to this device.

yes... I need to vacuum...")
Now that the bed side is done, need to find a spot for 2 firewall bulkhead connectors and run the 12v leads from the 2nd battery to this device.
yes... I need to vacuum...
Drtrider82
Registered Member
This has to be the coolest build I've seen in a while. I seriously found this forum researching doing similar. Please dont run me out for being new. Ive picked up a 2013 2500 Suburban. I also have picked up an 8.0L (not 8.1) that came out of a freightliner lp powered truck. Its basically a gen 6 big block with 4.270 bore and 4.25 stroke, forged crank. It uses 8.1 pistons .020 over and already had 4x cam and 58 crank sensor. I will update further! You all are inspirational ..lol! Not so much to my wallet. Current hangup is finding individual part numbers for trans adapter plate kit?
fidelity101
1/2 ton status
I do not have the separate part number, I had seen online somewhere (at one point) a BOM breakdown where you could input the GM assembly number and it spits out the sub components and associated GM part numbers.
Speaking of which, I just ordered up their new style front cover which was made from a brand new tool so it hopefully wont leak with this latest re-design. I plan on replacing my oil pan and harmonic balancer as well so I can avoid having the exxon valdez size leak from the truck.
Speaking of which, I just ordered up their new style front cover which was made from a brand new tool so it hopefully wont leak with this latest re-design. I plan on replacing my oil pan and harmonic balancer as well so I can avoid having the exxon valdez size leak from the truck.
Drtrider82
Registered Member
I do not have the separate part number, I had seen online somewhere (at one point) a BOM breakdown where you could input the GM assembly number and it spits out the sub components and associated GM part numbers.
Speaking of which, I just ordered up their new style front cover which was made from a brand new tool so it hopefully wont leak with this latest re-design. I plan on replacing my oil pan and harmonic balancer as well so I can avoid having the exxon valdez size leak from the truck.
Great thanks, I'll dig around. The part number on this cover is 19256789 off of 2016 model year engine but traditional big block (gen 6) casting. Crank nd cam pulleys are all the same as you had listed. Would you say you took off the correct amount from your balancer? I only ask because I am figuring Ill have to do the same so it all lines up. I had to order an 8.1 balancer/crank pulley as the one I have is for an industrial application and had like a 7 rib belt and just was going to be all wrong for running normal accessories. I ordered 8.1 accessory brackets so should be close. Where is yours leaking?
fidelity101
1/2 ton status
The new front timing cover is part number 19370157, this is made with a new manufacturing tool as well. This is specific for the 58x timing kit.
I am doubling checking my balancer measurement as I think 5.5mm was too much 4mm may be okay as I keep tossing the serp belt when I hit a puddle at a decent speed, very annoying offroading around mud pits.
mine is leaking everywhere, the front cover, front main seal, CKP sensor, oil pan, exhaust and hydroboost. (it is time for some 90k mile maintenance, I have a lot of leaks) So I ordered all new parts and will be getting the new balancer machined and install the parts and go from there.
Drtrider82
Registered Member
The new front timing cover is part number 19370157, this is made with a new manufacturing tool as well. This is specific for the 58x timing kit.
I am doubling checking my balancer measurement as I think 5.5mm was too much 4mm may be okay as I keep tossing the serp belt when I hit a puddle at a decent speed, very annoying offroading around mud pits.
mine is leaking everywhere, the front cover, front main seal, CKP sensor, oil pan, exhaust and hydroboost. (it is time for some 90k mile maintenance, I have a lot of leaks) So I ordered all new parts and will be getting the new balancer machined and install the parts and go from there.
Okay great. I'm sure you've probably been through this but I ordered a book from Larry Hofer on 8.1 build stuff and it talks about if you are using that kit with 8.1 that he cut a piece of moon shaped aluminum to fill the groove in the bottom of the cover and JB welded in and them ground it smooth so there was a smooth surface for o- rings style pan gasket to seal against otherwise it would leak. I don't know if that helps you or not.
Drtrider82
Registered Member
The new front timing cover is part number 19370157, this is made with a new manufacturing tool as well. This is specific for the 58x timing kit.
I am doubling checking my balancer measurement as I think 5.5mm was too much 4mm may be okay as I keep tossing the serp belt when I hit a puddle at a decent speed, very annoying offroading around mud pits.
mine is leaking everywhere, the front cover, front main seal, CKP sensor, oil pan, exhaust and hydroboost. (it is time for some 90k mile maintenance, I have a lot of leaks) So I ordered all new parts and will be getting the new balancer machined and install the parts and go from there.
Also I don't know if you already ordered parts but I had a heck of time finding a part number for the chain alone. It is 12568787

