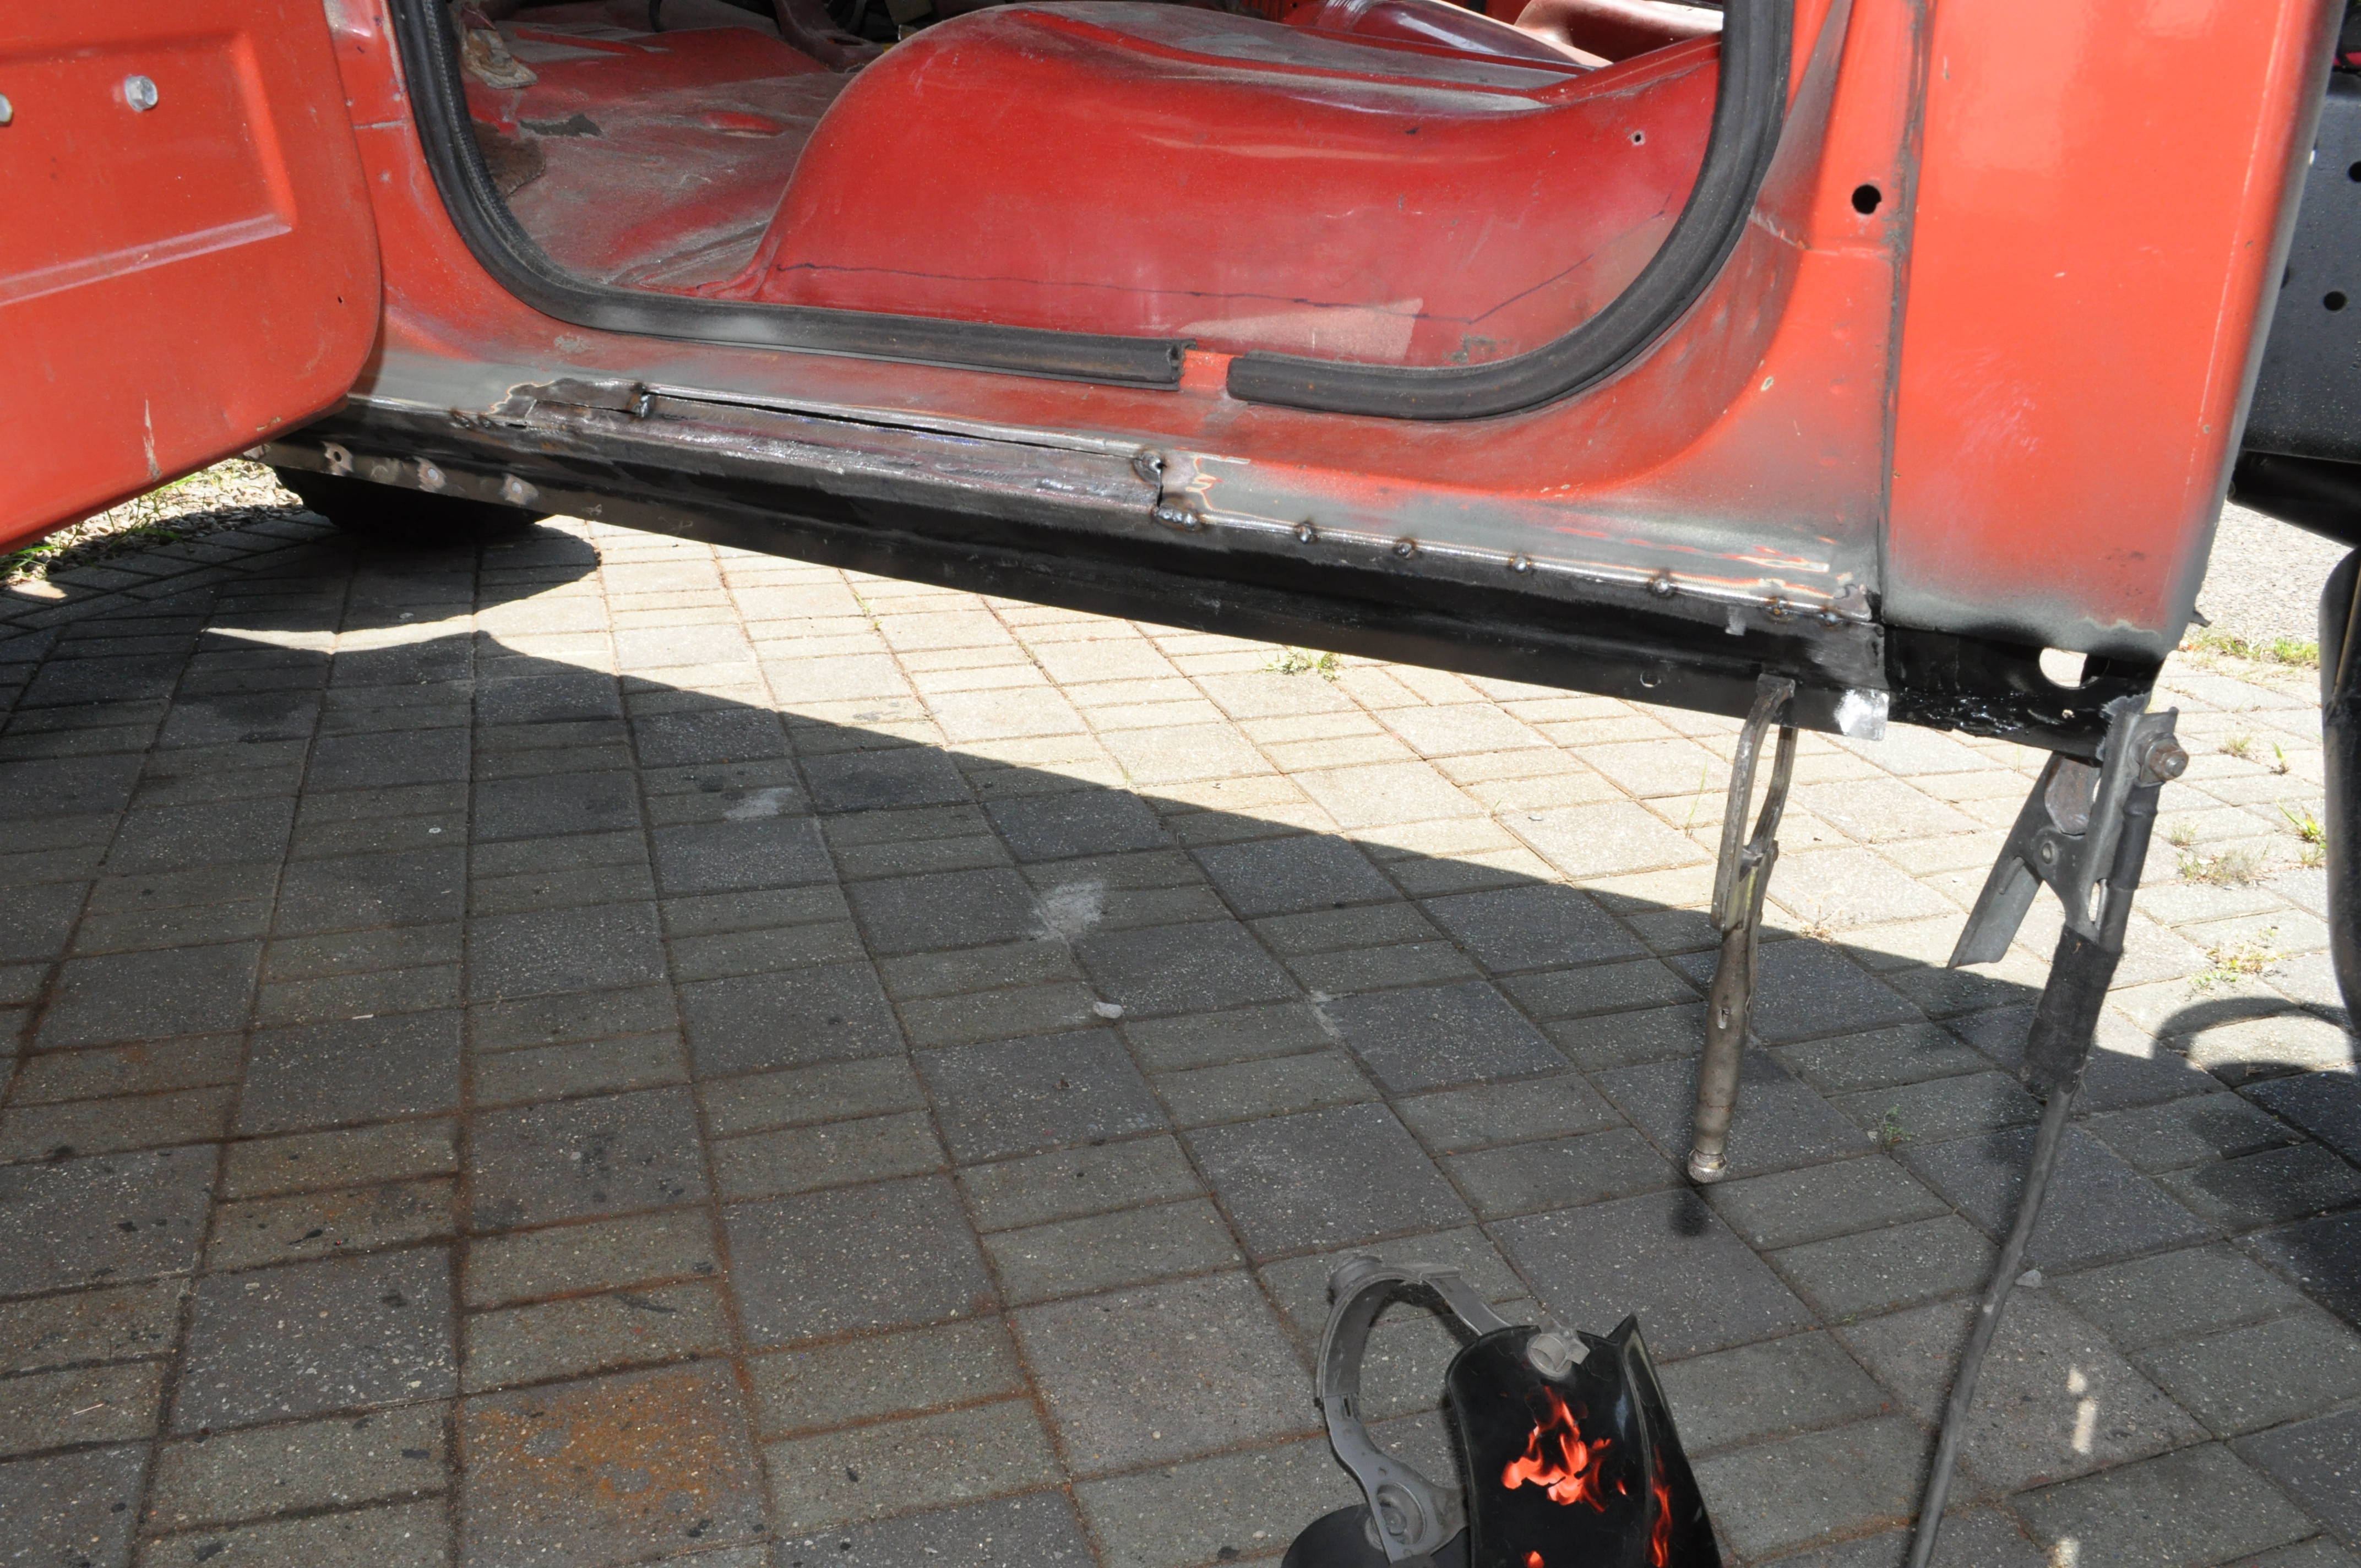
1988 Blazer. First things first, I've never done any rust repair. I am fully confident in my MIG welding abilities. I have floor panels I purchased years ago. They line up like crap but I'm pretty sure that's the standard. After stripping the floor and looking inside the outer rocker with a borescope, the only spot that has any bad rust is the little lip/drip rail where the floor pan goes underneath the rocker. You'll see it in the picture below. Am I on the right track just cutting this small strip out that I marked with a sharpie and then just patching the new piece in? I'm kind of timid at cutting on this Blazer since for the most part it's in really good shape.

CK5

You are using an out of date browser. It may not display this or other websites correctly.
You should upgrade or use an alternative browser.
You should upgrade or use an alternative browser.
Inner rocker for a first timer
- Thread starter jimmyleetn
- Start date
If that part of the floorboard is rusted through you might as well cut that section out like you have it marked. That will let you get a better look at the inner rocker. Mine had a little more rust and is requiring a little more surgery. It's a 73, so a little different


I saw your thread where you were getting into the same thing the other day. Looks like you got a little more to worry about. My driver's side is worse but I figured I'd start with the "easy" passenger's side. I may be asking you some questions along the way. One question I already have is, did your aftermarket floor pans have the the correct width lip where they bend to go under the rocker and then down? I measured 1.5in but the aftermarket sheet metal is only 1in. I think I'm gonna have fab the part. I haven't purchased inner rockers.
If that part of the floorboard is rusted through you might as well cut that section out like you have it marked. That will let you get a better look at the inner rocker. Mine had a little more rust and is requiring a little more surgery. It's a 73, so a little different
Just to be clear, I'm a noob at this and am winging it after doing all the research I could. I bought the lmc front and back and they're not even close to matching up


What I did was flatten out the back and rebend to match. The top of the inner rocker panel I had to remove

1988 Blazer. First things first, I've never done any rust repair. I am fully confident in my MIG welding abilities. I have floor panels I purchased years ago. They line up like crap but I'm pretty sure that's the standard. After stripping the floor and looking inside the outer rocker with a borescope, the only spot that has any bad rust is the little lip/drip rail where the floor pan goes underneath the rocker. You'll see it in the picture below. Am I on the right track just cutting this small strip out that I marked with a sharpie and then just patching the new piece in? I'm kind of timid at cutting on this Blazer since for the most part it's in really good shape.
View attachment 414110
as long as the metal your welding to is solid, it's fine... keeping repairs as small as possible, ESPECIALLY considering the aftermarket tins, is often the norm..
the biggest issue is cleaning remaining stuff as best as possible..
and in a subset to that, enclosed areas (rockers, jambs, etc) and pinch seams...
thus why some will do a "questionable" inner rocker.. just so they can clean/blast inside, prime, paint.. heck, I cavity wax my stuff too.....
proper fitment is everything.. cut/butt is often a good approach.. the welding is easy... a thousand hot tacks, just keep moving around...
")
You're touching on exactly what my plan is... at least for the passenger side. I bought UPOL weld thru primer and Eastwood's cavity coater with the wand. My plan is to coat everything in there so I never have to worry about that part of the truck again. I'm putting a version of rocker boxes that other CK5ers have done in after I get this part done so the floor should be plenty strong.as long as the metal your welding to is solid, it's fine... keeping repairs as small as possible, ESPECIALLY considering the aftermarket tins, is often the norm..
the biggest issue is cleaning remaining stuff as best as possible..
and in a subset to that, enclosed areas (rockers, jambs, etc) and pinch seams...
thus why some will do a "questionable" inner rocker.. just so they can clean/blast inside, prime, paint.. heck, I cavity wax my stuff too.....
proper fitment is everything.. cut/butt is often a good approach.. the welding is easy... a thousand hot tacks, just keep moving around...
Everybody's got to learn at some point, that's the same thing I'm doing. I'm a total noob as well, but this is why I'm letting you go first so if you make a mistake you can tell me what not to do.Just to be clear, I'm a noob at this and am winging it after doing all the research I could. I bought the lmc front and back and they're not even close to matching up
View attachment 414488
View attachment 414489
 I was looking at that gap. Something that might help you with some those gaps unless they're really big would be a nice piece of copper to soak up the heat and allow you to fill the space. I snagged me a little piece at Lowe's when I was in there the other day.
You're touching on exactly what my plan is... at least for the passenger side. I bought UPOL weld thru primer and Eastwood's cavity coater with the wand. My plan is to coat everything in there so I never have to worry about that part of the truck again. I'm putting a version of rocker boxes that other CK5ers have done in after I get this part done so the floor should be plenty strong.
stock,
to crazy...
yup, forget the whole "lay a sweet bead" mentality... just plan on a ton of grinding...
Body work is painstakingly meticulous. Take your time. I prefer the cut and butt approach as its much easier to get your panels fitting properly with minimum gap. When going the cut to butt route cut the seam at a 35° Or so degree angle and your metal will miter themselves into place.
Place your metal with overhang into the good metal and then tack it in place. Then cut your pieces to size through both the new sheet and old floor. This leaves you with the cleanest cut and is much easier to weld cleanly.
Fitzees Fab on YouTube has a great selection of videos and explains the process much better than I can on here. I’m sure he’s got one specifically about floors but this will give you a bunch of tips of how to achieve a super clean butt.
It's funny you listed Fitzee. I watched a very long video of him doing a rocker panel repair on a square body pickup last night. Man is an artist. It's amazing how it makes his own panels like it is no big deal. Only thing that caught me off guard, watch some of his videos and you'll see that he doesn't wear gloves when he welds or a welding helmet. My jaw dropped when I watch him throw a bunch of tacks out without a welding helmet on. Dude is a beast.Body work is painstakingly meticulous. Take your time. I prefer the cut and butt approach as its much easier to get your panels fitting properly with minimum gap. When going the cut to butt route cut the seam at a 35° Or so degree angle and your metal will miter themselves into place.
Place your metal with overhang into the good metal and then tack it in place. Then cut your pieces to size through both the new sheet and old floor. This leaves you with the cleanest cut and is much easier to weld cleanly.
Fitzees Fab on YouTube has a great selection of videos and explains the process much better than I can on here. I’m sure he’s got one specifically about floors but this will give you a bunch of tips of how to achieve a super clean butt.
Yeah when you’re doing sheet metal you don’t need to look at the welds. He closes his eyes before pulling the trigger. I wouldn’t advise it but not going to say I don’t do it either. Hell I don’t wear gloves all the time either. Especially for quick tacks or small beads lolIt's funny you listed Fitzee. I watched a very long video of him doing a rocker panel repair on a square body pickup last night. Man is an artist. It's amazing how it makes his own panels like it is no big deal. Only thing that caught me off guard, watch some of his videos and you'll see that he doesn't wear gloves when he welds or a welding helmet. My jaw dropped when I watch him throw a bunch of tacks out without a welding helmet on. Dude is a beast.
I always have to remind myself when I'm gonna burn bigger stuff in, to put some damn gloves on...
Fitzee gets chit done in his own way... kind of like a Bad Chad, can I pick out some hack approaches, sure... but chits getting built, it's all good...
Fitzee gets chit done in his own way... kind of like a Bad Chad, can I pick out some hack approaches, sure... but chits getting built, it's all good...
He’s that old timer in the shop who does it his way only. Does it take longer? Yes, but will it look good and function properly? Also yes. My old boss was that old timer in the shop. Still laying beads at 70 years old and good luck trying to show him a faster more practical way. There was a handful of times he made me do things the hard way. I just laugh at those moments now. I like how fitzee shows people beautiful formed panels can be made with regular hand tools etc., the way he breaks down the planes of shapes is awesome. Not everyone has a shop full of tools or the budget. And for what he has he makes great use of.I always have to remind myself when I'm gonna burn bigger stuff in, to put some damn gloves on...
Fitzee gets chit done in his own way... kind of like a Bad Chad, can I pick out some hack approaches, sure... but chits getting built, it's all good...
He’s that old timer in the shop who does it his way only. Does it take longer? Yes, but will it look good and function properly? Also yes. My old boss was that old timer in the shop. Still laying beads at 70 years old and good luck trying to show him a faster more practical way. There was a handful of times he made me do things the hard way. I just laugh at those moments now. I like how fitzee shows people beautiful formed panels can be made with regular hand tools etc., the way he breaks down the planes of shapes is awesome. Not everyone has a shop full of tools or the budget. And for what he has he makes great use of.
I've built like him my whole life...
my tube work is a perfect example.. no degree wheel, etc... springback? wtfug is that?
tape measure, angle finder, level, my eye and creativity..Almost all off of my tube bending work was production and had to be exact copies for the parts to be interchangeable and removable.I've built like him my whole life...
my tube work is a perfect example.. no degree wheel, etc... springback? wtfug is that?
But for sure. That’s how I do things at home. I don’t have an English wheel or a shrinksr stretcher etc., I do have a plasma now and man that is nice to have haha
Almost all off of my tube bending work was production and had to be exact copies for the parts to be interchangeable and removable.
But for sure. That’s how I do things at home. I don’t have an English wheel or a shrinksr stretcher etc., I do have a plasma now and man that is nice to have haha
funny you say that... to completely drag us off topic..
I actually broke out the Parker plasma the other day for the first time in quite a few yrs to do a few curves in some 1/8" on my tank project... but yeah, i would break it out for some complex nodes, etc back in the day on the cage work..... it's just so much cleanup/slag work most of the time IMO.. but I don't have a hypertherm either...
I have a super cheap $180 120/220v Amazon plasma and it cuts cleaner than the hypertherm we had at workfunny you say that... to completely drag us off topic..
I actually broke out the Parker plasma the other day for the first time in quite a few yrs to do a few curves in some 1/8" on my tank project... but yeah, i would break it out for some complex nodes, etc back in the day on the cage work..... it's just so much cleanup/slag work most of the time IMO.. but I don't have a hypertherm either...
I thought all plasmas were junk for a long time because that hypertherm we had was terrible and it was the only one I had ever used hahaolder unit? maybe it's more a new tech vs 15, 20 yr old tech.. my Parker was kind of the "hot, cheap, semi-china" stuff coming out in the early 2000's...

