Yes. It has different shoulders on the opposite sides.
CK5

You are using an out of date browser. It may not display this or other websites correctly.
You should upgrade or use an alternative browser.
You should upgrade or use an alternative browser.
What would an "upgrade" be without more problems? (NP241 issue)
- Thread starter dyeager535
- Start date
Yep, that be it. Is that the correct orientation?
I pulled my spare 241 out from underneath the bench, and did a quick teardown and reassembly to see if I could do it right. It's not complex, but I wanted to see how the thing worked internally anyway. I left the snap ring off that retains the front driveshaft sprocket when I tossed it back together, and that allowed enough play to get some intermittent engagement/disengagement on the bench.
I'm hoping it's as simple as the collar being upside down. Whatever it is will be simple, just a matter of figuring out where I went wrong. I'll make sure to assemble it without sealant and test first.
I took pictures as I was taking it apart and this is how it was positioned when I did the rebuild so it is correct. .
Billyworld
I now know that i will never finish this truck.
Thank you for this. Do you know how i could save it bookmark this? I don't see that option anywhere@dyeager535 check out my Misc Stuff pic album, I uploaded all the np241 pages from my GM repair manual.
https://ck5.com/forums/media/albums/misc-stuff.580/
Thank you for this. Do you know how i could save it bookmark this? I don't see that option anywhere
There are several ways you can save the info, at the top right of the thread you see "watch thread" if you click this it saves it to a list called "watched threads" that is yours and only holds threads you want to keep up with (there's also an option to get an email when there's new activity).
The same option is available for both the album and individual pics.
If you want to have the repair manual pics for yourself then post or message me info and I can email or text them to you.
I use Right Stuff on almost everything now. Last time I pulled my 208 I resealed with RS and even with ATF it has held. Been about 4 years now. The only place I don't use it is on stock diff covers. I bent the snot out of one trying to get it off!! Best stuff I've ever used.
Shift collar is/was installed correctly (I did scribe it for proper orientation prior).
Disassembled, reassembled for testing on the bench with no changes to how it was put together, all gears work properly.
But I noticed that the output shaft has about 1/4" (.027" is what I measured) of "endplay".
Without the flange on the rear output shaft, the shaft will move in and out. It sounds/feels like it stops when it hits the output shaft bearing. Installed the flange without the nut tightened, measured the output shaft depth, and came up with 1.17". Tightened the nut and the distance had shrunk to .90".
As near as I can tell the output shaft bottoming out on the bearing in the output shaft housing is what would set endplay (and yes, the bearing is oriented correctly in the output shaft housing, as is the tone ring/snap rings), but obviously that distance is over 1/4". I don't think that is proper, but I can't find a spec. FWIW the spare NP241 (without SYE) I have has no discernible endplay. If this endplay is more than it should be, I can only hope this is the cause of the problem.
FWIW JB got back to me, they suggested I make sure the CV flange has 1.75" of spline length. They say the end play is ok. Kind of question this because end play on the front output (leave the snap ring off and try it) causes issues on the bench. I bought both of the 241's in unknown condition, I may swap the SYE into the other case. I see no issues, but something is wrong. These cases are simple, not sure how this problem continues to happen without an obvious problem.
Here's what an NP241 front flange looks like on the rear, without the nut installed. The front flanges are just over 1.75" spline length:
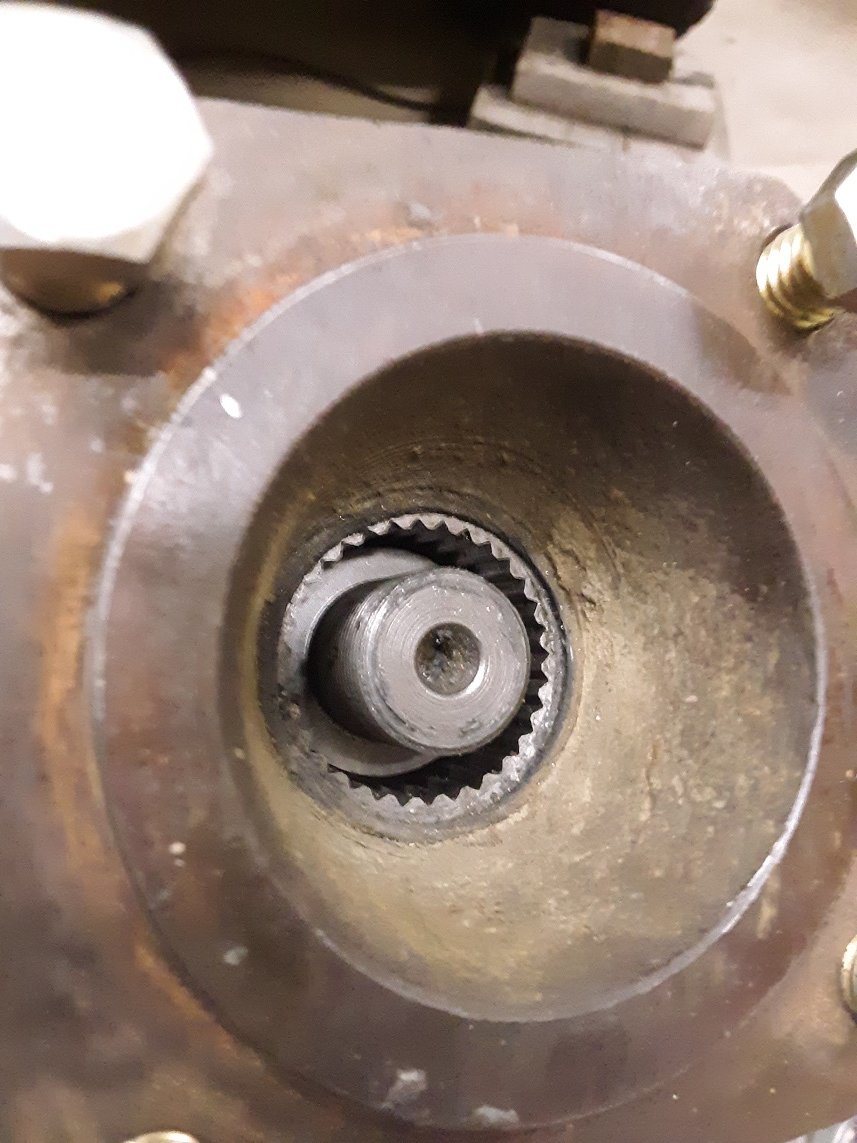
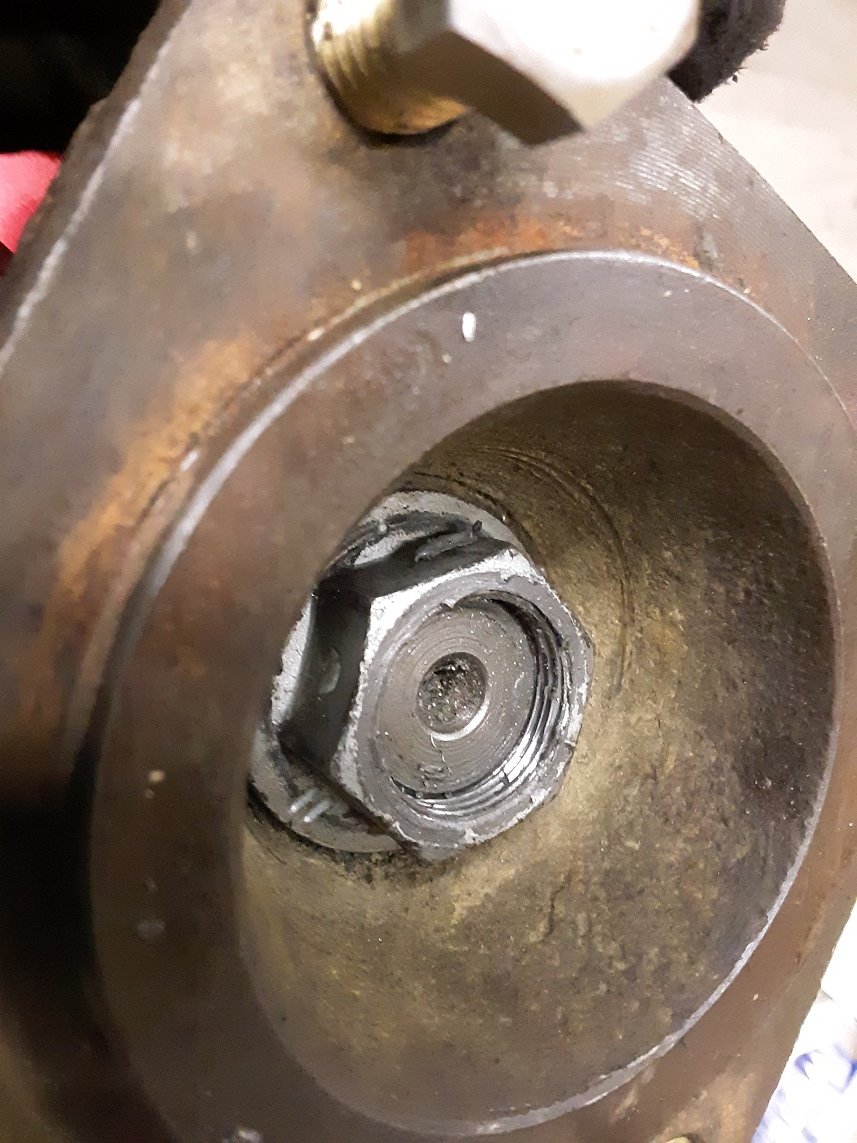
Here it is with the nut lightly torqued, not even a washer under the nut. Shaft is bottomed out on the bearing, all play has been removed from the output shaft:
Disassembled, reassembled for testing on the bench with no changes to how it was put together, all gears work properly.
But I noticed that the output shaft has about 1/4" (.027" is what I measured) of "endplay".
Without the flange on the rear output shaft, the shaft will move in and out. It sounds/feels like it stops when it hits the output shaft bearing. Installed the flange without the nut tightened, measured the output shaft depth, and came up with 1.17". Tightened the nut and the distance had shrunk to .90".
As near as I can tell the output shaft bottoming out on the bearing in the output shaft housing is what would set endplay (and yes, the bearing is oriented correctly in the output shaft housing, as is the tone ring/snap rings), but obviously that distance is over 1/4". I don't think that is proper, but I can't find a spec. FWIW the spare NP241 (without SYE) I have has no discernible endplay. If this endplay is more than it should be, I can only hope this is the cause of the problem.
FWIW JB got back to me, they suggested I make sure the CV flange has 1.75" of spline length. They say the end play is ok. Kind of question this because end play on the front output (leave the snap ring off and try it) causes issues on the bench. I bought both of the 241's in unknown condition, I may swap the SYE into the other case. I see no issues, but something is wrong. These cases are simple, not sure how this problem continues to happen without an obvious problem.
Here's what an NP241 front flange looks like on the rear, without the nut installed. The front flanges are just over 1.75" spline length:
Here it is with the nut lightly torqued, not even a washer under the nut. Shaft is bottomed out on the bearing, all play has been removed from the output shaft:
Last edited:
Not sure this update is even worth it, but a few things.
First, JB was onboard with helping until I sent the above photo showing the nut not fully engaging the threads with the stock flange. I got no response after that.
The problem was an obvious one, except to me. PO. Should always verify. The SYE conversion does not require the input to be removed. Not sure how I missed it throughout three rebuilds and installs, but at some point before I got it, the input shaft snap ring had been removed. On the final assembly, after all sealed up, I noticed the input moving, which then allowed me to replicate the 4 low grinding on the bench. Luckily I had the spare case, and the retainer/snap ring are all accessible without separating the case halves.
"Fixed" the issue with machined yoke, added a washer to the underside of the yoke and that made the thread/nut/yoke interface nearly perfect. Not easy to tell from the pic, but the provided flange nut isn't what seems to be standard in terms of thickness (threaded length of nut equal to diameter of bolt or shaft it's going on), and it's probably not supposed to be re-used, so I'm going to have to see if I can't find a replacement.
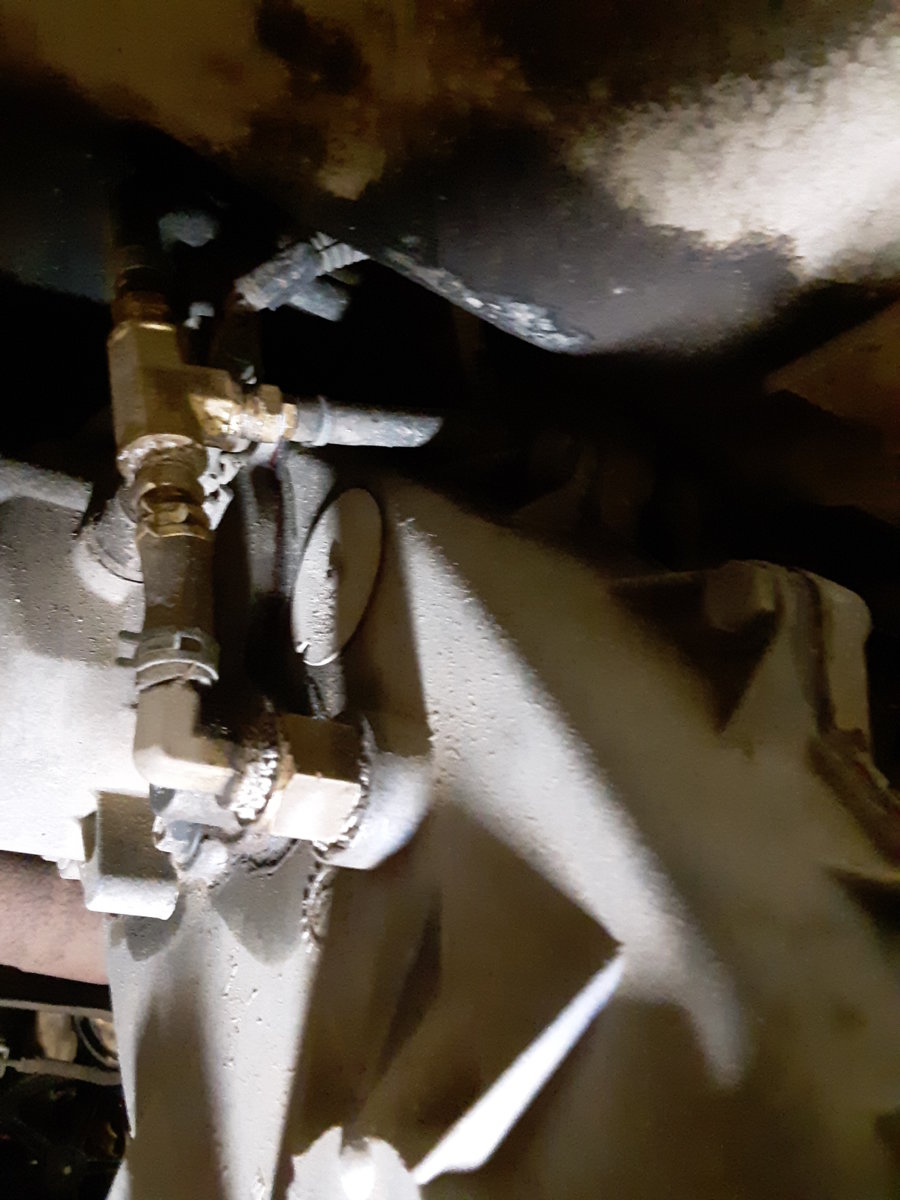
Also seem to have resolved the issue with the NP241 venting fluid when it's at the proper level. This is a known/design issue with the early cases, the vent hole is directly in line with the planetary, under certain conditions (bone stock they don't seem to do it, but different gears, tires, etc seem to put them over the edge) the fluid is apparently forced into that orifice fast enough and in enough volume that it will fill the vent line and puke. Mine did. Later on (I've only seen it on drivers drop/later cases) NP cast a deflector to keep fluid from being able to be driven directly into the hole. I got complex, but I didn't have much choice as I needed it up and running. Used the stock vent line fitting on the case, and ran the rubber hose to a brass tee that is somewhat near the t-case fill plug. The "high" side of the tee was vented up the firewall with smaller diameter (1/8 or 1/4, can't recall) hose, with a sintered bronze breather on the end. The "low" side used the same diameter hose as the case vent, with a 90* barb fitting into this:
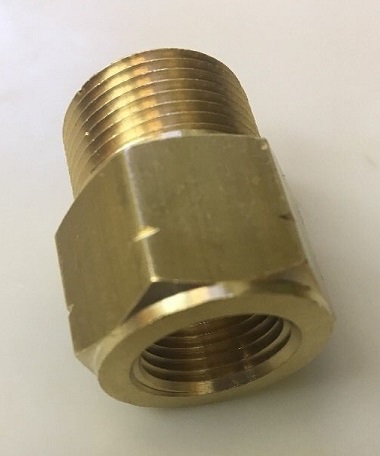
(3/8 Female Pipe Thread x M22 Male 14mm, off ebay, was going to use to see what fluid temps ran, glad my random OCD helped in this case) which replaced the fill plug.
I took pics of the setup but my phone didn't save them. Since people use those push-lock air type fittings for other fluids, that would probably be a lot easier, cheaper, and less bulky than the brass fittings I had available, assuming the temp isn't too much, and the Dexron doesn't affect them.
Took another pic. New phone, still crappy pics. Perhaps not the phone. lol.
I used anaerobic sealer on it this time. I know some folks that used to rebuild various transfer cases for military use (including the HMMWV), they highly recommended it. Somewhat messy, since whatever flows out of the sealing surface doesn't harden. No idea if part of the leaking problem was from the input slop somehow. Seems unlikely, but it leaked through two rebuilds with RTV, this time it didn't. I believe RTV is spec'd for the t-case, and others have no issues using RTV, I did. While expensive, I wanted to do everything I could not to have to pull the case again. I *despise* leaks.
https://www.permatex.com/products/g...e-sealants/permatex-anaerobic-flange-sealant/
https://www.permatex.com/products/t...rmatex-surface-prep-activator-for-anaerobics/
Oh. And because I like to experiment, I used ebay to get my hands on some copper seal or sealing washers that are " M22*28*1.5 " They work to seal the fill/drain plugs, GM appears to have used some fiber design, and mine leaked.
First, JB was onboard with helping until I sent the above photo showing the nut not fully engaging the threads with the stock flange. I got no response after that.
The problem was an obvious one, except to me. PO. Should always verify. The SYE conversion does not require the input to be removed. Not sure how I missed it throughout three rebuilds and installs, but at some point before I got it, the input shaft snap ring had been removed. On the final assembly, after all sealed up, I noticed the input moving, which then allowed me to replicate the 4 low grinding on the bench. Luckily I had the spare case, and the retainer/snap ring are all accessible without separating the case halves.
"Fixed" the issue with machined yoke, added a washer to the underside of the yoke and that made the thread/nut/yoke interface nearly perfect. Not easy to tell from the pic, but the provided flange nut isn't what seems to be standard in terms of thickness (threaded length of nut equal to diameter of bolt or shaft it's going on), and it's probably not supposed to be re-used, so I'm going to have to see if I can't find a replacement.
Also seem to have resolved the issue with the NP241 venting fluid when it's at the proper level. This is a known/design issue with the early cases, the vent hole is directly in line with the planetary, under certain conditions (bone stock they don't seem to do it, but different gears, tires, etc seem to put them over the edge) the fluid is apparently forced into that orifice fast enough and in enough volume that it will fill the vent line and puke. Mine did. Later on (I've only seen it on drivers drop/later cases) NP cast a deflector to keep fluid from being able to be driven directly into the hole. I got complex, but I didn't have much choice as I needed it up and running. Used the stock vent line fitting on the case, and ran the rubber hose to a brass tee that is somewhat near the t-case fill plug. The "high" side of the tee was vented up the firewall with smaller diameter (1/8 or 1/4, can't recall) hose, with a sintered bronze breather on the end. The "low" side used the same diameter hose as the case vent, with a 90* barb fitting into this:
(3/8 Female Pipe Thread x M22 Male 14mm, off ebay, was going to use to see what fluid temps ran, glad my random OCD helped in this case) which replaced the fill plug.
I took pics of the setup but my phone didn't save them. Since people use those push-lock air type fittings for other fluids, that would probably be a lot easier, cheaper, and less bulky than the brass fittings I had available, assuming the temp isn't too much, and the Dexron doesn't affect them.
Took another pic. New phone, still crappy pics. Perhaps not the phone. lol.
I used anaerobic sealer on it this time. I know some folks that used to rebuild various transfer cases for military use (including the HMMWV), they highly recommended it. Somewhat messy, since whatever flows out of the sealing surface doesn't harden. No idea if part of the leaking problem was from the input slop somehow. Seems unlikely, but it leaked through two rebuilds with RTV, this time it didn't. I believe RTV is spec'd for the t-case, and others have no issues using RTV, I did. While expensive, I wanted to do everything I could not to have to pull the case again. I *despise* leaks.
https://www.permatex.com/products/g...e-sealants/permatex-anaerobic-flange-sealant/
https://www.permatex.com/products/t...rmatex-surface-prep-activator-for-anaerobics/
Oh. And because I like to experiment, I used ebay to get my hands on some copper seal or sealing washers that are " M22*28*1.5 " They work to seal the fill/drain plugs, GM appears to have used some fiber design, and mine leaked.
Last edited:
just a note / opinion from me :
nice fu*kin job jb on the slip yoke eliminator kit help . . . way to hold up on customer service .
to the o.p. glad you got it figured out and with out there help .
nice fu*kin job jb on the slip yoke eliminator kit help . . . way to hold up on customer service .
to the o.p. glad you got it figured out and with out there help .
just a note / opinion from me :
nice fu*kin job jb on the slip yoke eliminator kit help . . . way to hold up on customer service .
to the o.p. glad you got it figured out and with out there help .
Eh, while I know what I experienced and saw, I find it hard to believe that the kit is designed for 2" of spline length, and that all the kits turned out were made wrong, I think we'd hear more about it. I'm thinking something else is going on, and they didn't feel like dealing with a one-off. I'm not super upset about it, I was just happy to get some sort of fix in so I could run the truck. Which I did for a full week, probably put 500+ miles on/off road, 2 and 4WD, with and without a ~2000lb trailer.
thats why i document my builds so in depth here on ck5 . if somthing ever happened to me or i had to get rid of a truck i can say here ya go this is how every part was built / installed / setup for this truck . any questions just look here .
when i buy stuff i like to ask lots of questions unless i already know about it .
when i buy stuff i like to ask lots of questions unless i already know about it .
urbex
1/2 ton status
How is that stuff to get off? I'm not looking forward to removing the RTV that I used this time, the thin amount I used the first time was a pain to remove, I have four times as much to remove this time.
I know this sounds nuts, but I've found a normal carbon steel wire brush in a Dremel does an excellent job of RTV removal on aluminum parts. The wires are small and flexible enough that you have to work at damaging the aluminum with one. I've even used them to clean up surfaces that are meant to seal with a flange sealant, and aluminum blocks/heads at the head gasket side, with no adverse effects.
I know this sounds nuts, but I've found a normal carbon steel wire brush in a Dremel does an excellent job of RTV removal on aluminum parts. The wires are small and flexible enough that you have to work at damaging the aluminum with one. I've even used them to clean up surfaces that are meant to seal with a flange sealant, and aluminum blocks/heads at the head gasket side, with no adverse effects.
I did use the Roloc-type pads (from Harbor Freight) and they worked good. Wore down kind of fast, and makes a mess as it breaks up, but it worked everywhere except where it wouldn't fit.
I suspect with steel if you get soft wire, and were careful, you'd be ok. However I hit up the cast iron adapter gasket surfaces with a wire brush, and it took a substantial (visible to the naked eye) amount of cast iron off.
I noticed with the Roloc, (which also needs to be the right type, not abrasive) that as hard as I pushed, or as long as I held it in one place, I could still see the machining marks on the surface. I felt that proves they are a good choice. I only had a couple of the right pads, I think it would have been faster had I more and changed them out as they clogged.
urbex
1/2 ton status
That's why I specifically said "in a Dremel". The Dremel wire wheels are soft. The typical hand held wire brush is not. It works so well that I virtually never use the nylon or brass Dremel wire brushes.
That's why I specifically said "in a Dremel". The Dremel wire wheels are soft. The typical hand held wire brush is not. It works so well that I virtually never use the nylon or brass Dremel wire brushes.
Sorry, missed the dremel bit.
") You can also get brass ones as well. My dremel died, that kinda put me off on them, although they are pretty much the go-to for certain projects.
You can also get brass ones as well. My dremel died, that kinda put me off on them, although they are pretty much the go-to for certain projects.urbex
1/2 ton status
Alot of it also depends on what you're using the Dremels on, and HOW you're using it. Light duty work, and even the cheap ones will last for years (had a Black and Decker version for almost a decade that I used for the dirtier work, cost about $20 originally). Porting cylinder heads? Don't even bother. Dad and I burned through a few legit Dremels doing aluminum heads, and finally went with a Fordom 1/4" flex shaft tool. MUCH nicer, though not really portable. I also have one of the now discontinued Dremel Stylus, which is roughly equivalent to the current 7.2 volt cordless model in a pistol grip package which is often my go-to for quick gasket cleanups. Been using it for almost a decade to do bike carb cleanups, and the batteries are just now starting to wear out.
The big part that a lot of people miss on them is to let the speed of the tool do the work. Start pressing down on it at all, and you'll wear out bearings and/or burn the motor out in a jiffy.
The big part that a lot of people miss on them is to let the speed of the tool do the work. Start pressing down on it at all, and you'll wear out bearings and/or burn the motor out in a jiffy.

