CK5
Register an account today to become a member! Once signed in, you'll be able to participate on this site by adding your own topics and posts, as well as connect with other members.

1986 K30 6.2 Diesel Truggy Build - "The Mule"

Been a while. Not much progress to report other than my new ORD front bumper came in. The old school winch bumper and winch I sold locally to a fellow CK5 member.


Looks naked without a bumper.


Old winch and bumper was not light I used the lift to pull it. On to the new bumper pics.


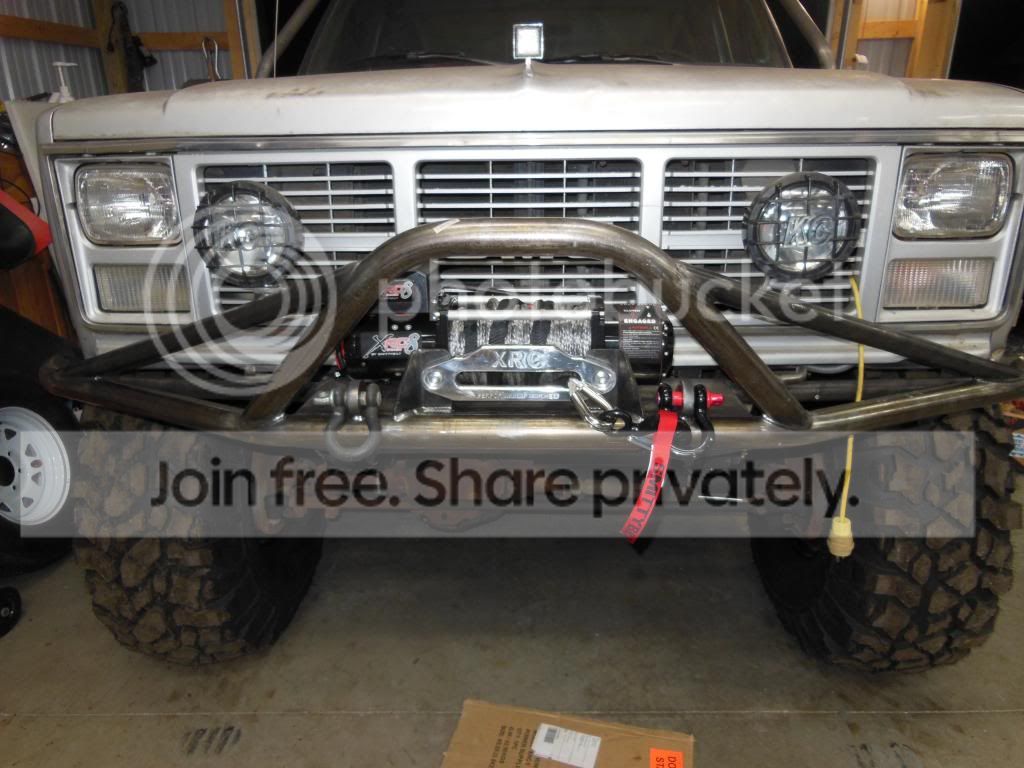
Fit of the bumper is great and all the bolt holes lined up easily. The welds are beautiful. Mine had a bit of a shipping mishap and got skinned up a bit but I am sure it will get messed up once I wheel it. I will say this ORD's bumper is expensive but it is worth the cost.

That is not the winch that will be residing there permanently that is the suck down winch. The 10k I will be mounting there is still in a multi-mount cradle and the suck down winch was sitting on my bench. The KC lights came off my truck I had in high school and have been in my basement in storage for 10 years. I also de-fanged the front but more trimming is in order on the front and back of the wheel well.

I am debating about completing the exo and tying in the new bumper. Something very similar to bboy's exo on his blazer below.


I would run the upper tube a little higher on the fender but I like how the lower tube follows the body line. Maybe use 1.75" for the main exo to match everything else and run 1.5" for the body line tube. I would use disconnects so I could get the bumper back off if I wanted to. Only concern I have is bracing the fender exo so it does not just push in when you lean into a tree. I was thinking maybe one bar across right at the top of the grille or somehow tying into the core support? Hole saw through the fender and make a bracket to tie to core support? Maybe I could tie to the stinger?

Thoughts?? I may hold off on adding the extra tube for now just kicking around ideas.
 
Shhhh be very quiet!!! It is not very often you see this beast out of it's natural garage habitat.


Truck saw some sunshine today because we were having a party. Now if I could just find some time to work on it.
 
Little bit of progress. I picked up the steel needed for my trans cross member, fuel cell mounting and some more 12 gauge plate for more panels on the bed.​

My neighbor called me last weekend (he is a mechanic that works out of his home shop) looking for 14 bolts parts. He had a rollback in his shop that the guy managed to blow up his G80 and then had some other guy try to weld it with no luck. So he needed a carrier for a 4.56+ 14 bolt. It just so happens that my 14 bolt came with the G80. But I had a used Detroit locker and a new open carrier waiting to be installed. So I gave him my G80 carrier in exchange for his labor installing the open carrier and Detroit. I did not get any pics but the wear pattern was great and the gears were stamped 03/1986 and were indeed 4.56s. Detroit works great and help me use the 42s to dig holes in my gravel driveway at idle in low low.​

My dad also gave me this nice piece:​


It was built to be a pump pit cover. My Dad sells underground utilities and this was ordered and was made wrong and had to be built again. It had been sitting behind their warehouse for a while and they wanted it gone. It is all aluminum and is 80" by 42"​


It was traffic rated so the diamond plate is 1/4" and has stiffeners welded to the back. I plan to use one of the doors for my flat belly skid and will still have plenty left over.​
 
Last edited:
Nice score man! Your rig is looking so good, that bumper is perfect for it.
 
Thanks Guys!! Made some a little progress today. I modified the old fuel cell mount and added a cross member underneath to support he 1/4" plate. And then welded the new fuel cell mount bases in.


I even got some Ryoken Green primer on there since it was all nice clean steel. I primed the upper mounts too and got the fuel cell bolted down.


I also welded some tabs to mount the toolbox and made some cross members out of 1"x2"x1/8" C channel. These cross members have to be removable so the toolbox can be removed. The toolbox has to be turned on it's end to be removed from the truck. The cross members will keep the plastic tool box from sagging over time.


Next up I plan to finish up the deck plates and work on some more filler plates in the bed.
 
Some progress. Top deck plates are pretty much finished and all the tabs welded in. I hope to get the deck plates prepped and in primer shortly.

Last week I spend some time flexing the truck out to measure for the sway bar. It flexes well and the rear steer is very minimal much better than before.


As you can see I still need that sway bar to transfer some of the flex to the leaf springs. Especially when the front end is raised the cab leans over like crazy because the rear does all the flexing.


And as you can see the rear flexes extremely well. Looks like easily 18-20 inches of rear wheel travel. I needed to flex the rear out to determine how long the sway bar could be. I have been working with Kickass Offroad to design a sway bar to distribute the flex to the front. After some discussion and measuring I ended up ordering a 36" long bar (40" end to end) with 20" arms. The bar is made out of 1.5" chromo and will be turned down to 1.125 in the middle. We went with a stiffer bar to start because it can always be turned down.

With the sway bar about 2-3 weeks out I knew the front fenders needed to be trimmed more to clear the 42s. I quickly de-fanged the front just enough to clear the 42s earlier. Yesterday I recruited the help of expert fender trimmer Nick (newoldscottsdale77) thanks again Nick! I knew the front of the front fender needed the most attention. Nick had a great idea to use a laser level to project a line that would contour to the fender. It worked great.


We then traced the line with a marker. The front was cut even with the bottom of the valance and about 2" below the marker light. We then used a bucket to create a radius starting at the middle of the marker light going up the fender. I was lucky enough to have some pics of how jt512 cut his fenders and he is running the same tires with about the same amount of lift. I used an air saw with a 24 TPI blade that made the cuts really easy.


The inner needs to be trimmed up some more and the core support will need to be trimmed some as well to clear the 42s when turning. We trimmed the back side some too but I am waiting to set where the sliders need to be cut and cut the fender to match.


One side down one to go!


Very happy how it turned out. I know more needs to be trimmed but this should be a good start. Stay tuned in the next 2 weeks truck is going to get some more tubing!!
 
The pile of fender trimmings isn't nearly large enough....keep cutting :popcorn:

Cant wait to see this thing at RC :waytogo:
 
The pile of fender trimmings isn't nearly large enough....keep cutting :popcorn:

Cant wait to see this thing at RC :waytogo:

Dan had previously cut the fangs back so thats why there wasn't alot of sheet metal removed, this allowed access to clearence the bottom rear of the core support. We got the idea from a really trick truggy from this site:whistle:
 
Great to see it getting a turbo! Keeping the 6.2 or just dropping the 6.5 in it?
 
Just a quick update. I was too pissed off last night to post. The 6.5 motor that I bought which supposedly only had a slight knock and a freshly rebuilt turbo and injection pump is trash.

The turbo is trash. I can wobble the compressor shaft up and down over 1/4"!! the compresor wheel edges are actually worn off from rubbing the housing. I should have checked that before I bought but the intake hose and box were still hooked up and he showed me the paperwork where a new GM rebuilt turbo was installed 2 months ago.

I was not not worried about the bottom end knock because my plan was to swap the 6.5 turbo stuff to my 6.2. Then to top it all off I wanted to use the serpentine setup on my 6.2 but this motor has the dual thermostats where the housing and throttle cable bracket have to be modified to work with a mechanical injection pump on my 6.2.

End rant. Looks like no turbo for now.
 
I'd definitely be raising hell with the guy that sold it, why can't people just be honest anymore. Sucks to hear man good luck to you!
 
How does the oil look in the 6.5?

Could of had head gasket problems that took out the turbo.

Here is the history on this motor and he showed me the documents to prove it so I guess it is not really his fault. It was a fleet vehicle so they had records on it. 159,xxx miles a Jasper motor was installed about two years ago because of head gasket issues. 20K miles later not running very well they take it to shop A. Shop A says it is the injection pump and they replace. Few hundred to 1K miles later truck not running well again. They take truck to Shop B. Shop B says you are not going to believe this but the injection pump Shop A put in is bad and has been leaking diesel into the crankcase and it burned your turbo up. They replace turbo with a rebuild and replace injection pump again with a GM pump and change the oil. I have receipt for this for almost $3K from 3 months ago. Truck runs fine they put like 150 miles on it and it develops a bottom end knock and they park it and part it out.

Oil has no coolant in it. Upon initial inspection I did not see any metal in the oil but when wiped on paper towel you can see metal. Turbo looks newish because it has "fresh" rust on it like a new unpainted turbo would. So either the bearing went out on the motor and metal took the turbo out or the new turbo went bad and took the motor bearings out. Either way I have no turbo :frown1:

Looks like I can use the serp setup with some modifications and hopefully sell the "new" injection pump along with other stuff like the starter, clutch and flywheel (for NV4500 that he left on the motor), and then keep the turbo manifolds and intake in case I have the urge to turbo this later.
 
Last edited:

Latest Posts

Top Bottom