I made a lot of my parts for my blazer on a Atlas bench top lathe. South bend is probably another good choice for older stuff.
CK5

You are using an out of date browser. It may not display this or other websites correctly.
You should upgrade or use an alternative browser.
You should upgrade or use an alternative browser.
'72 K5 - Greg's @MightAsWellK5 Build
- Thread starter Greg72
- Start date
This is the build description. I will improve this later. (GB)
A mill can be used in place of a drill press.Yeah, this is a tough one. I really don't want to keep giving up floor space so I'd really like to find the most useful machine possible for the space I'm willing to allocate. If the machine can do drillpress-type work, I could possibly just swap out my current drillpress for a slightly larger machine and use the same spot in the garage. That would be ideal.. just don't know enough about it all yet.
-G
That Smithy combo one looks pretty sweet. I don't think anything other than used stuff will be reasonably priced. Room is definitely a problem. I want all the cool fab and machining stuff but my 1250 SQ ft garage rapidly got filled up. My boss has a 60'x80' shop that's full so he's adding on. He's setting up a full machine shop though at home. I guess I just need to be his buddy always so I can get stuff made.
Greg, sounds like a 4 car garage is in order. MAW
Greg, sounds like a 4 car garage is in order. MAW
I'll have to buy the neighbors house and then dig an underground tunnel to connect the garages together!!!

-G
beags86
Eastbound and Down
Greg, I've been in the same boat for years. I need a small bench top lathe to knock out little parts here and there. Not needing it for rebuilding an engine or a Swiss watch kinda thing.
It's very easy to get wrapped up in things and think you need a fancy one. I have a family member that has a JET bench top model and does all kinds of car/truck/tractor projects on it and it works ok.
I offend thought I would just get something like that. And if I used it enough I could upgrade later on. Get a better built one and sell off the old one. Even the china made ones hold a decent value on the used market.
https://www.northerntool.com/shop/t...hes + Lathe Accessories&utm_source=Google_PLA
Also Eastwood, grizzly, Baileigh tools all have small bench top models that are probably similar.
I have some grizzly stuff and so far it seems to be a good return on investment.
That Smithy combo one looks pretty sweet. I don't think anything other than used stuff will be reasonably priced. Room is definitely a problem. I want all the cool fab and machining stuff but my 1250 SQ ft garage rapidly got filled up. My boss has a 60'x80' shop that's full so he's adding on. He's setting up a full machine shop though at home. I guess I just need to be his buddy always so I can get stuff made.
My shop is about 1/2 that size (672 sq ft)... and you're right, I really have to justify EVERY piece of equipment that uses up floor space.
Fortunately, I was able to hoist my hydro bender up into the loft area for long-term storage. It's a little inconvenient to move it up and down now, but getting back 12sq ft of floor space was worth it.
-G
https://www.grizzly.com/products/Shop-Fox-Small-Combo-Lathe-Mill/M1018
Any opinions / experience with Shop Fox?
This looks popular, and could even order and pick up locally through Home Depot?
-G
Any opinions / experience with Shop Fox?
This looks popular, and could even order and pick up locally through Home Depot?
-G
beags86
Eastbound and Down
Buy it and let us know!https://www.grizzly.com/products/Shop-Fox-Small-Combo-Lathe-Mill/M1018
Any opinions / experience with Shop Fox?
This looks popular, and could even order and pick up locally through Home Depot?
-G
bp71k5
3/4 ton status
Is making friends with someone that has a lathe not a viable option? I wonder if a driveline shop or other similar outfit would be willing to handle a few projects, unless your planning on consistent usage.
other option is harbor freight and fix what breaks. I’d think you need to figure out what chuck size you need and make sure the machine can handle that.
other option is harbor freight and fix what breaks. I’d think you need to figure out what chuck size you need and make sure the machine can handle that.
Is making friends with someone that has a lathe not a viable option? I wonder if a driveline shop or other similar outfit would be willing to handle a few projects, unless your planning on consistent usage.
other option is harbor freight and fix what breaks. I’d think you need to figure out what chuck size you need and make sure the machine can handle that.
That's the exact dilemma.... if a "good" machine ends up being too expensive then I have no choice. I'll just have to farm out small projects and pay for those. It will be cheaper in the long run, but inconvenient with my current work schedule to ever get things done. If I can find a machine at a decent price point, then it might be worth the extra money for the convenience of doing things on my own schedule.... and learning new skills in the process.
-G
Eastwood has come out with a benchtop mill and lathe. Here's the former:
https://www.eastwood.com/eastwood-mini-mill.html
Eastwood seems like they're hitting a good value mark on this one. I'd pocket an aluminum rocker suspension on this in a heartbeat.
David
https://www.eastwood.com/eastwood-mini-mill.html
Eastwood seems like they're hitting a good value mark on this one. I'd pocket an aluminum rocker suspension on this in a heartbeat.
David
I live 45 minutes from THE Grizzly store. Want me to go look at it? We could video conference and look at it “together”...https://www.grizzly.com/products/Shop-Fox-Small-Combo-Lathe-Mill/M1018
Any opinions / experience with Shop Fox?
This looks popular, and could even order and pick up locally through Home Depot?
-G
I live 45 minutes from THE Grizzly store. Want me to go look at it? We could video conference and look at it “together”...
I have a sinking feeling that it's discontinued. Can't seem to find any online stores that have it anymore.
Maybe it was replaced with a newer model? Seems like the Smithy site spends a lot of effort criticizing it, so maybe there is some kind of legal battle going on between those two companies? Dunno.

-G
Interesting...I have a sinking feeling that it's discontinued. Can't seem to find any online stores that have it anymore.
Maybe it was replaced with a newer model? Seems like the Smithy site spends a lot of effort criticizing it, so maybe there is some kind of legal battle going on between those two companies? Dunno.
-G
Eastwood has come out with a benchtop mill and lathe. Here's the former:
https://www.eastwood.com/eastwood-mini-mill.html
Eastwood seems like they're hitting a good value mark on this one. I'd pocket an aluminum rocker suspension on this in a heartbeat.
David
How about this instead? It's in your area... no shipping or tax.
https://dallas.craigslist.org/ftw/tls/d/fort-worth-lathe-mill/7136026526.html
(maybe I can finally cost YOU some money with my posts)
-G
2020.07.08 - UPDATE!! - HUGE PHOTO BACKLOG...
It's been a while since new photos were posted. There has been good incremental progress over the past few weeks, so let's take a look at what's been going on .
Now that the exhaust is finished completely, it was time to work on placement of the final large pieces of the puzzle underneath (air tanks, compressors, batteries) and formalizing the cagework and tying it to the frame / outrigger assemblies to lock everything together and insure that there were no dimensional problems later on. One item that was identified before the NH -> TX move was that the cab had a slight offset (twist) relative to the frame below. There wasn't time to address this properly at that time, so as is often the case... a piece of green tape was used to make annotations as a reminder for later on.
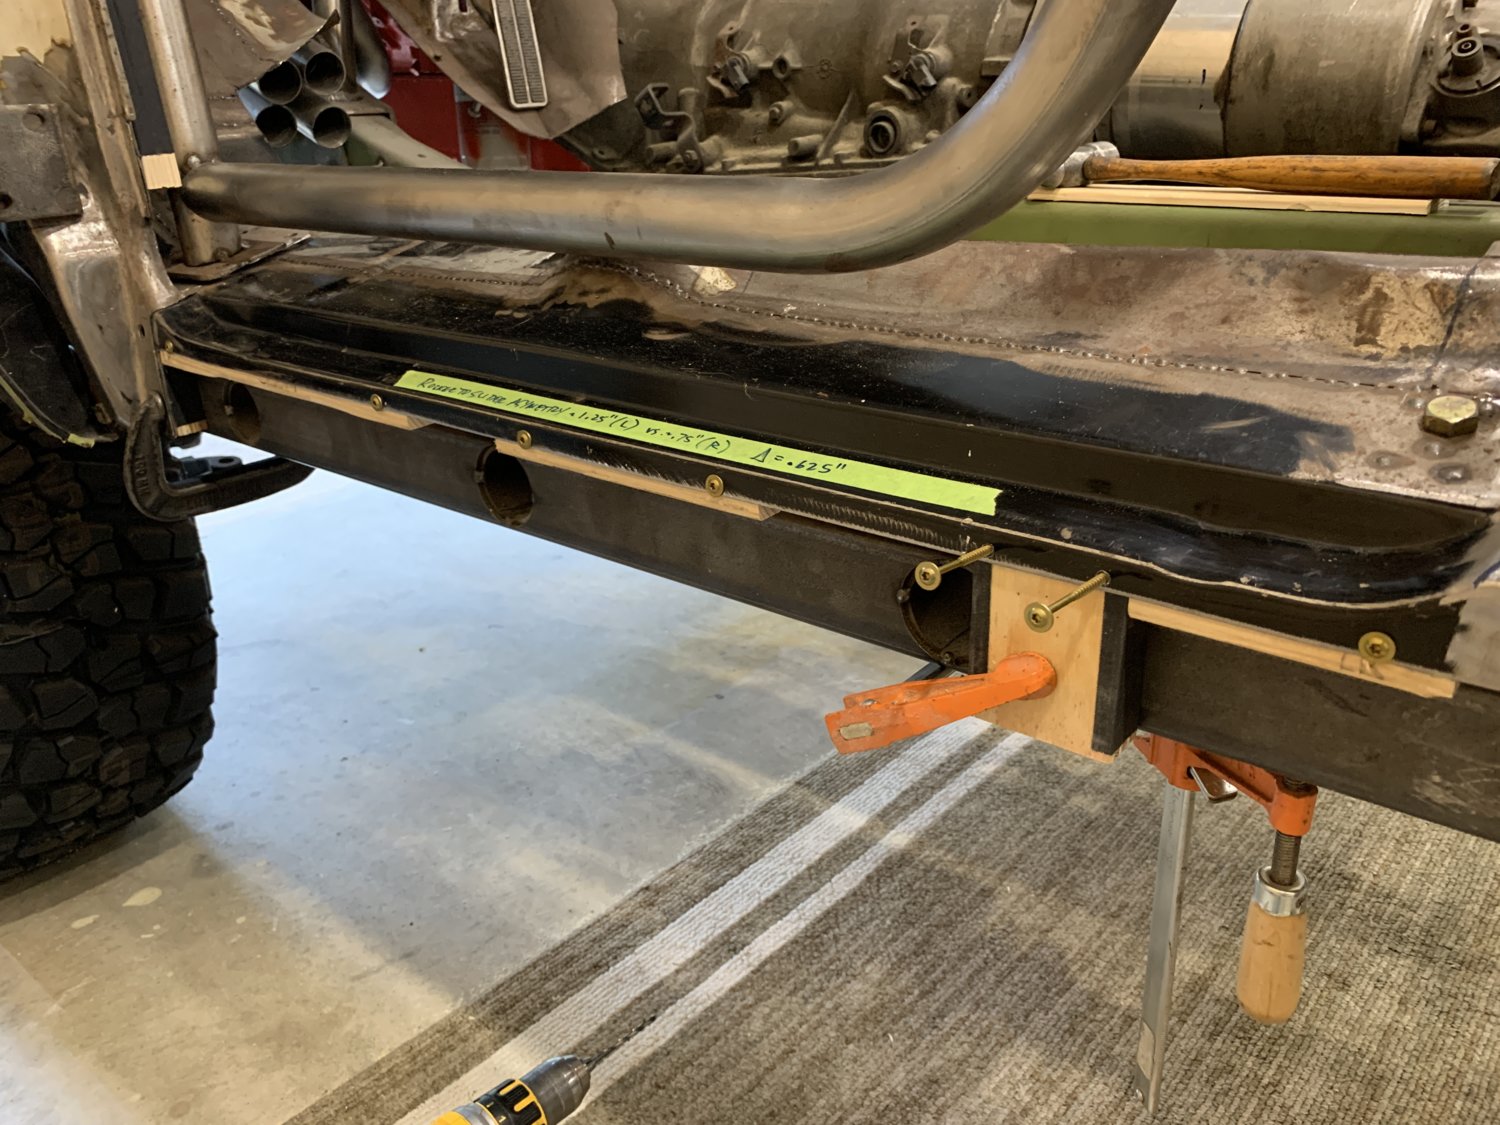
The fix wasn't really all that hard. A 5/8" error is only a change of 5/16" to split the difference between both sides, so some small blocking and cabinet screws were used to hold the proper position of the outer rockers in place and insure that they were perfectly aligned with the square-tube rockslider outriggers below them. Once the position was perfect, small support stubs were created for the door bar, and the subsequent through-holes in the sheetmetal would permanently index all of these dimensions and lock them down prior to building and installing the new floors.
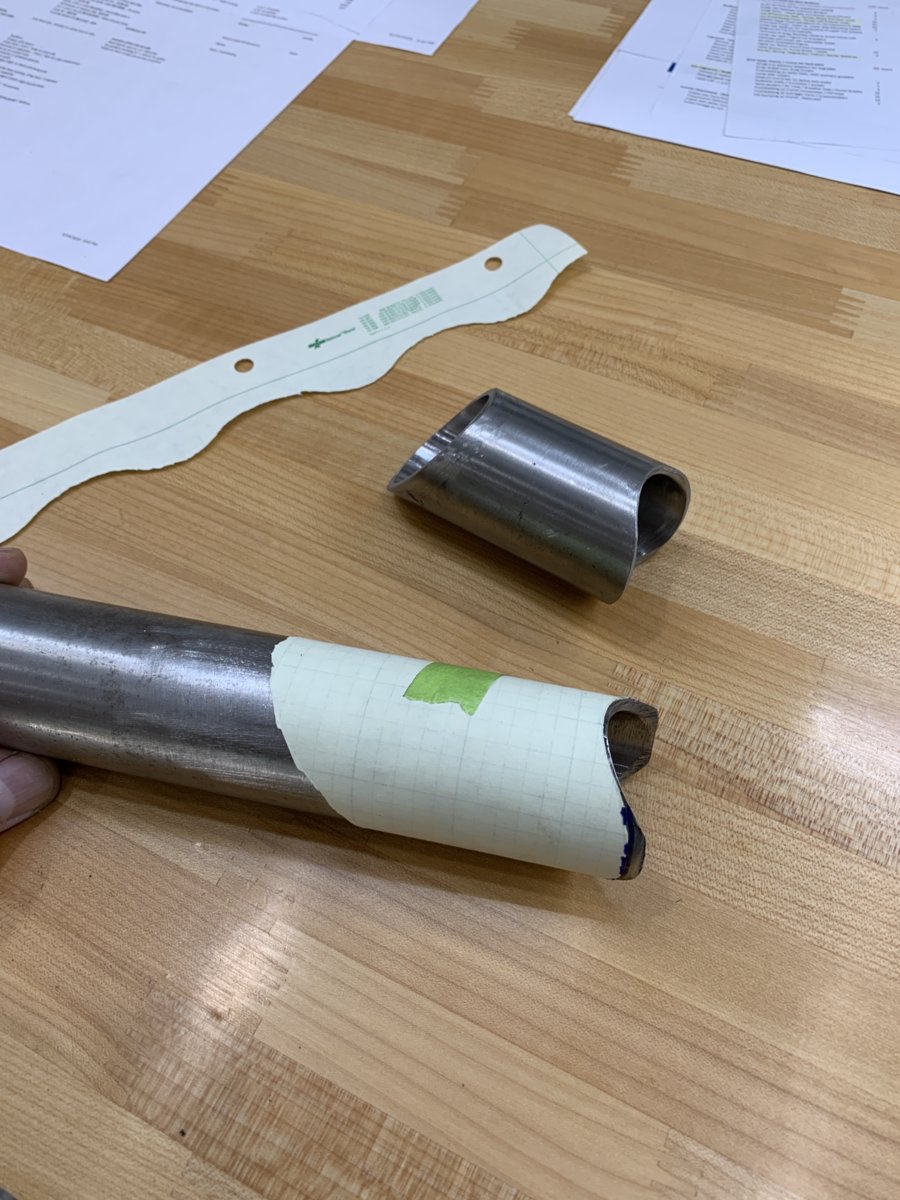
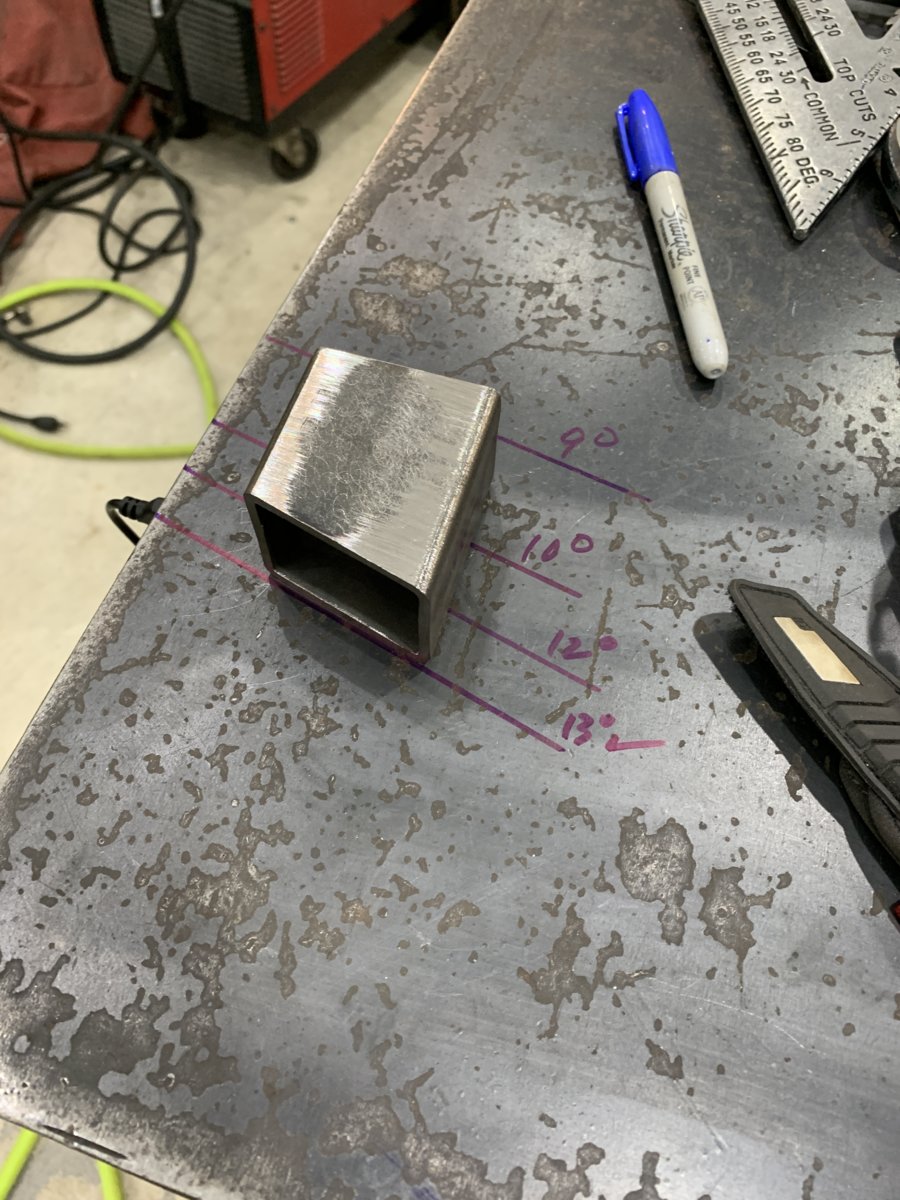
As always... the first part is the hardest. There are actually two angles involved since the floor slopes toward the door sill so it took a bit of trial-and-error to finally get a nice fitment. But once that was established, a paper template made it easy to transfer to the opposite side as a mirror-image part.
The span across the sill was still about 28" long, so an intermediate tie-in was added for extra support for the seat mounts. They will ultimately be part of the rollcage and not the floor sheetmetal so it's never a bad idea to give them lots of good anchor points.
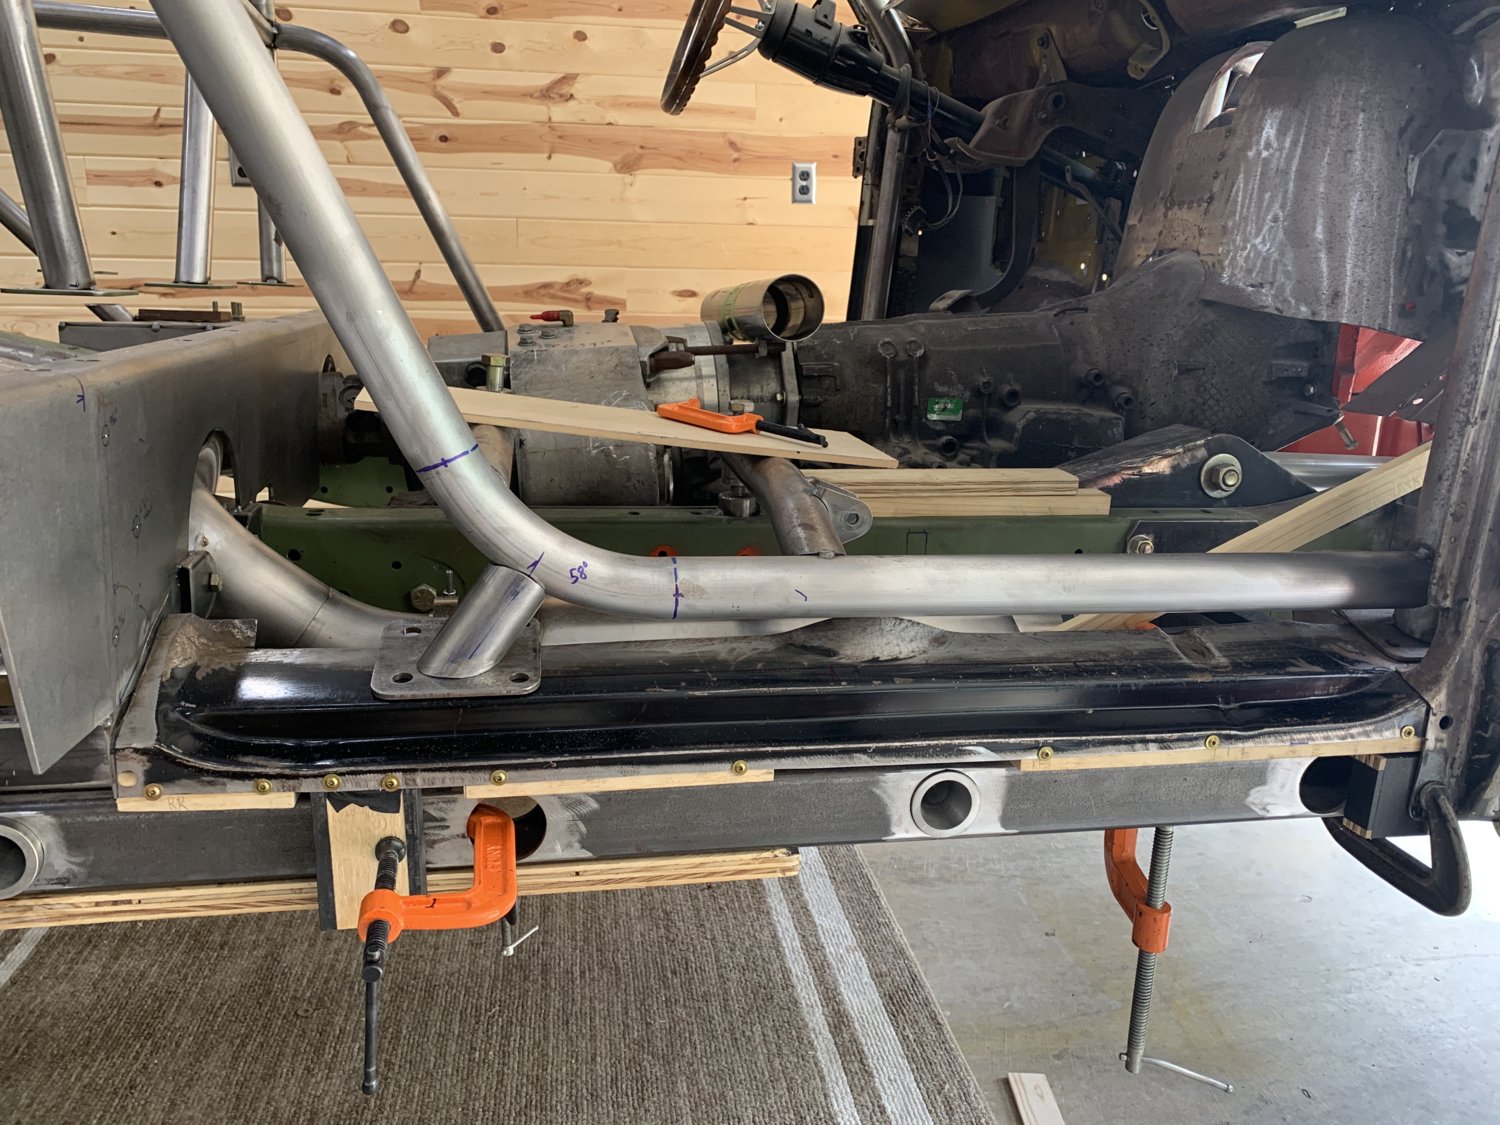
With the top side complete, it was still necessary to get those new tie-ins down to the outriggers below the floor. This small angled square stock worked great... and 13* ended up being the perfect angle to match up to the floor taper.
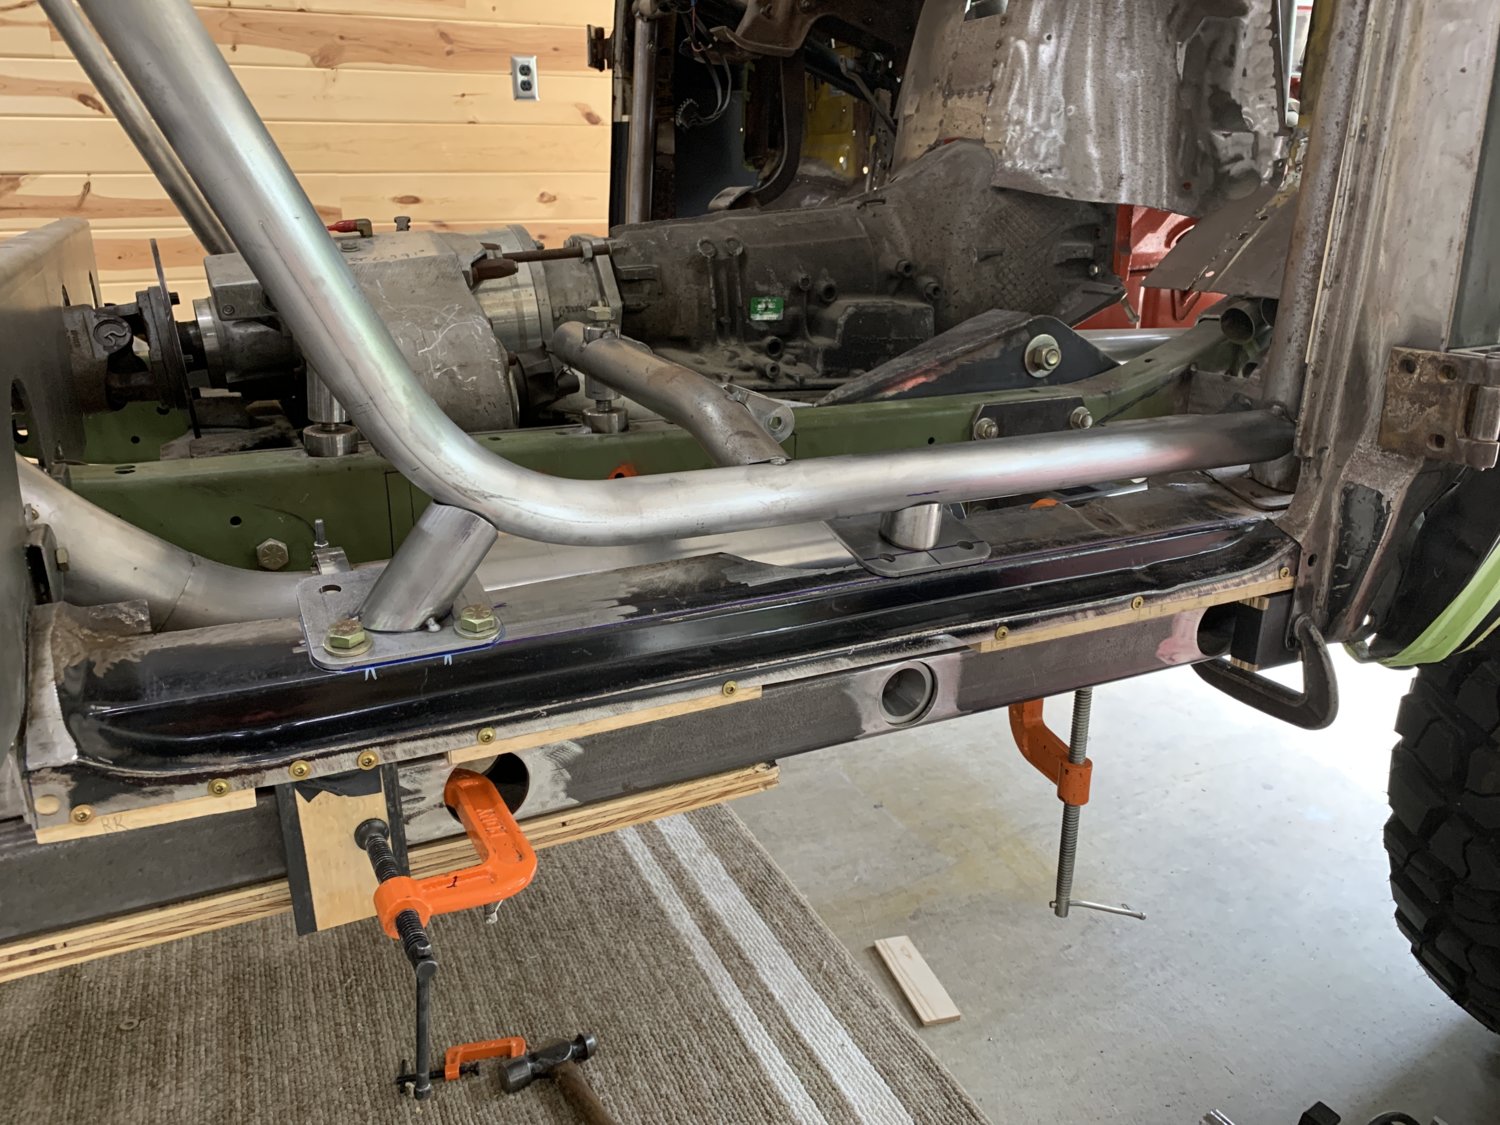
From the driver's side looking to the passenger side it's easy to see the way this all works. Nice and strong, and as soon as the parts are tacked together there is an INSTANT stiffening of the entire structure. Very satisfying.
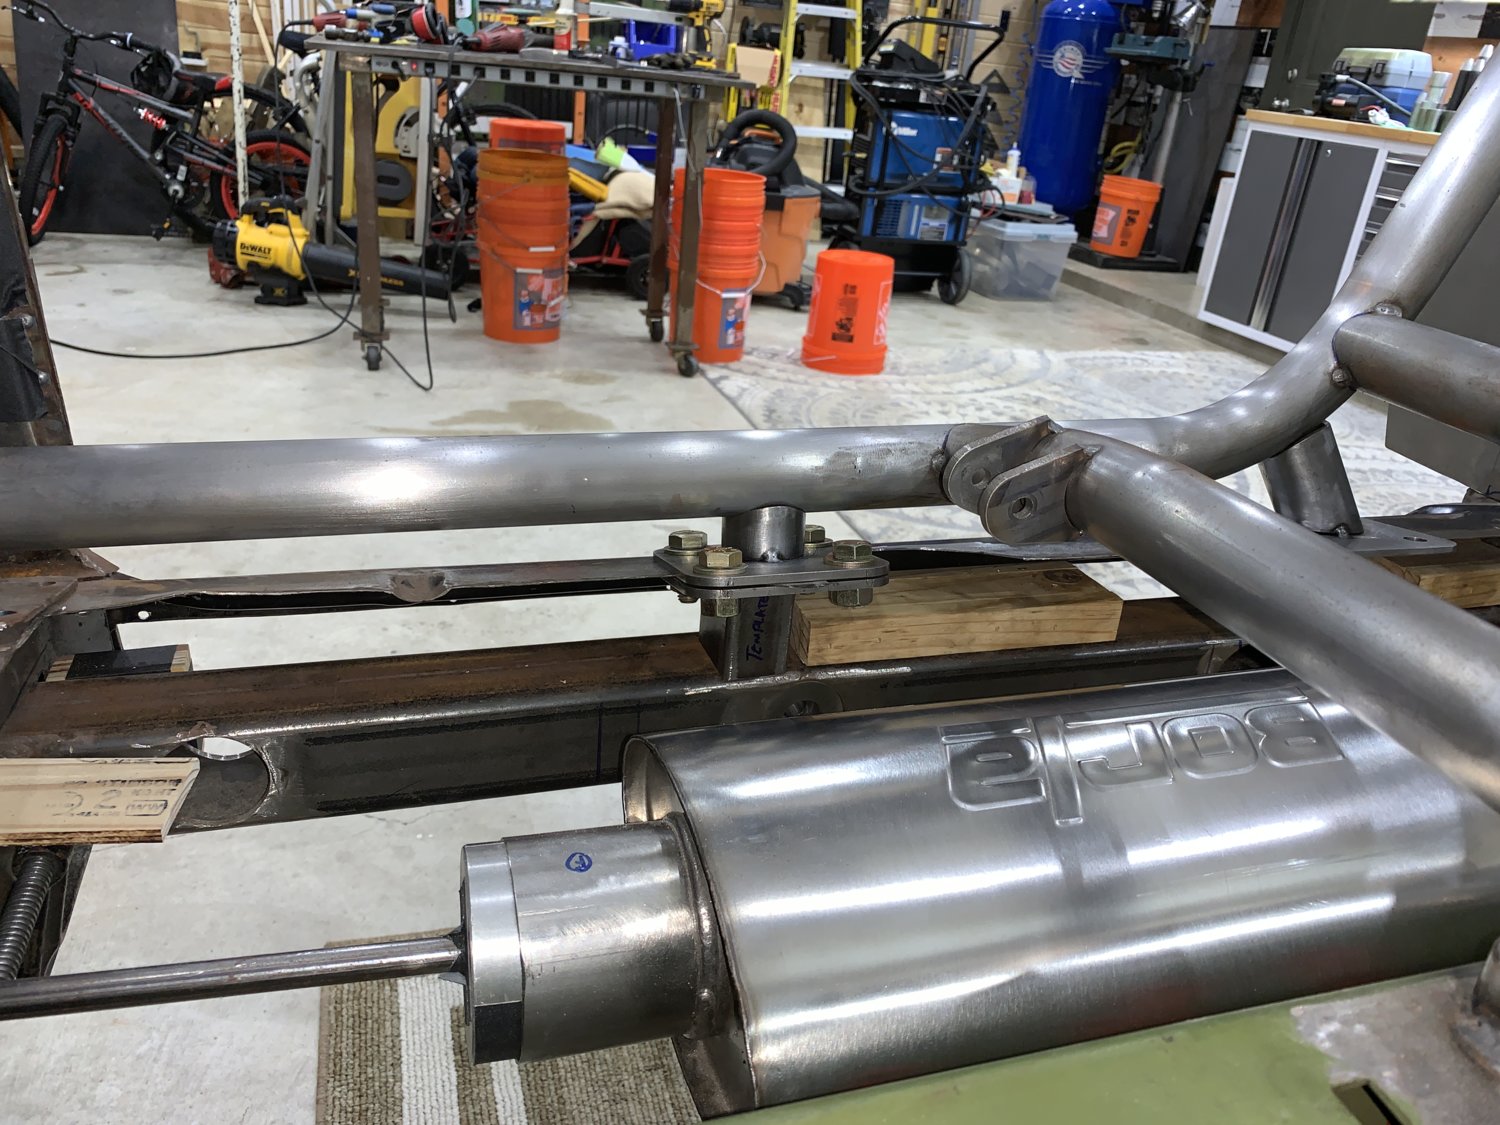
Shot of the passenger side, with a few bolts installed and tack welds in place.
This was all going along beautifully until it was time to deal with the A-pillar cage plate in the front footwell. In the earliest part of this MAW build the original cab supports were lovingly removed and replaced, but over time they became and impediment to the routing of the exhaust system and were chopped and hacked to make room. This was an "IOU" that was written long ago that finally needed to be addressed properly. The old cab support HAD to come out and a new style of mount needed to go in to replace it. As you can imagine, access was a substantial problem.... so the entire cage was hoisted out of the way to make things easier.
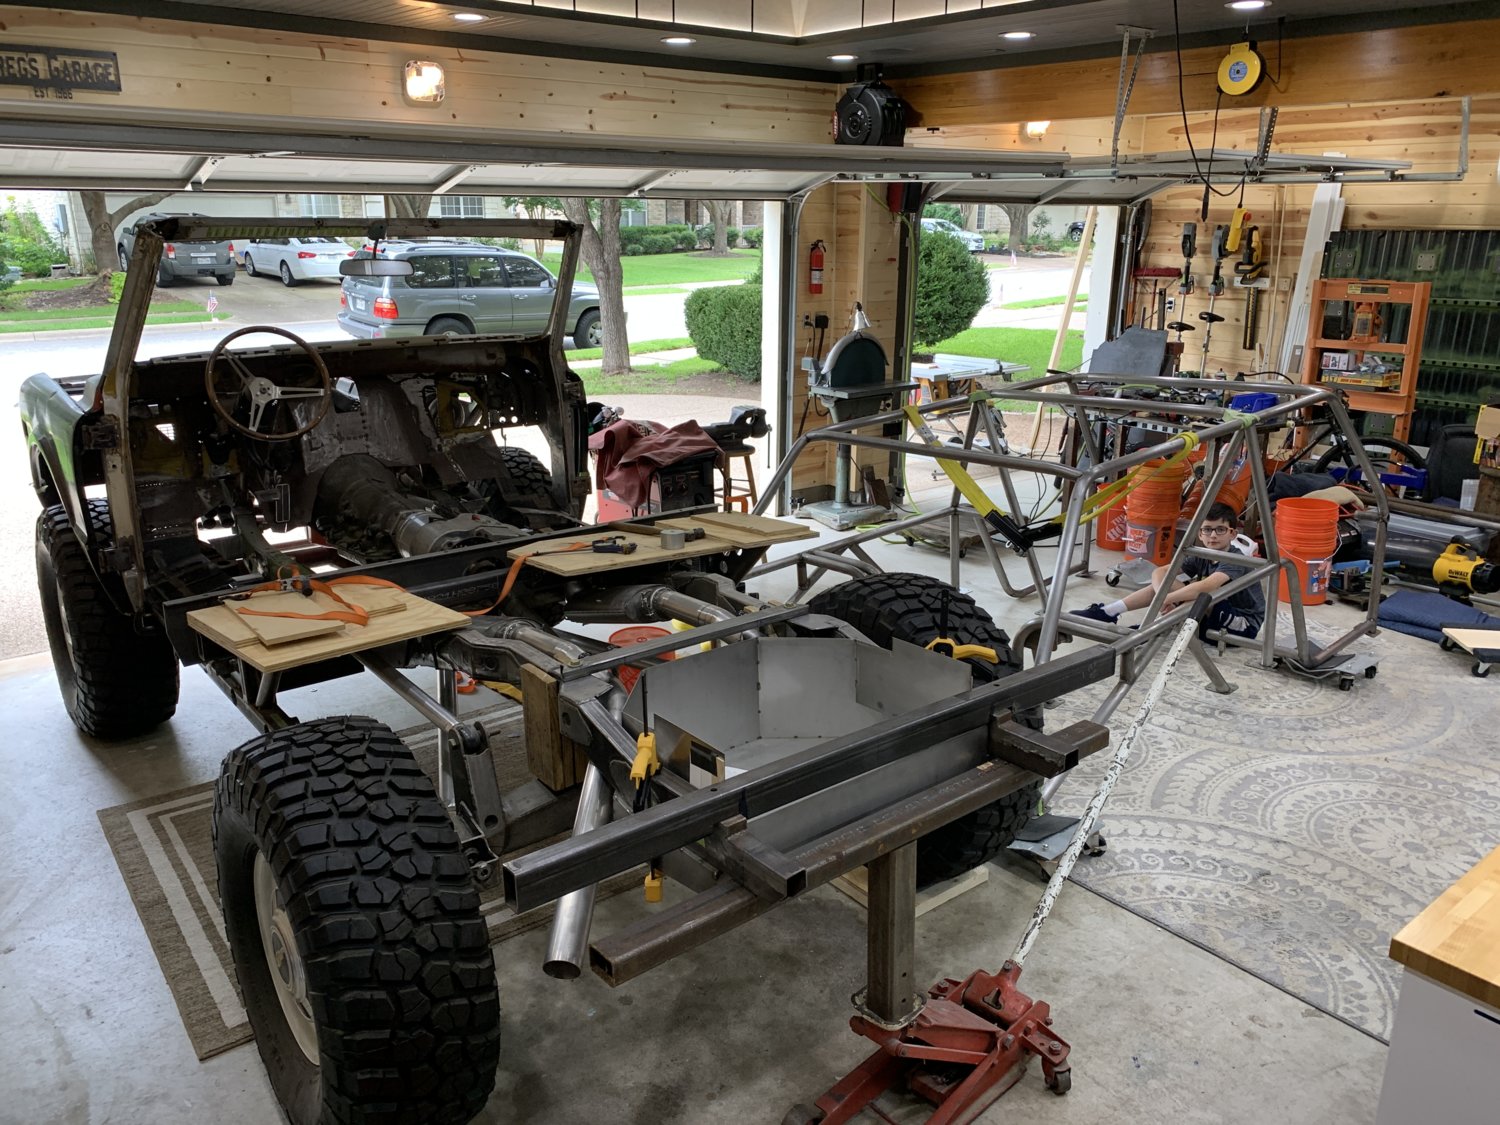
Couldn't resist the chance to take a couple of driveway photos of the cage which it was pushed out of the way. It's pretty cool to see it separated from the truck like this and really shows all the places where it will tie-in to the frame more clearly than ususal.
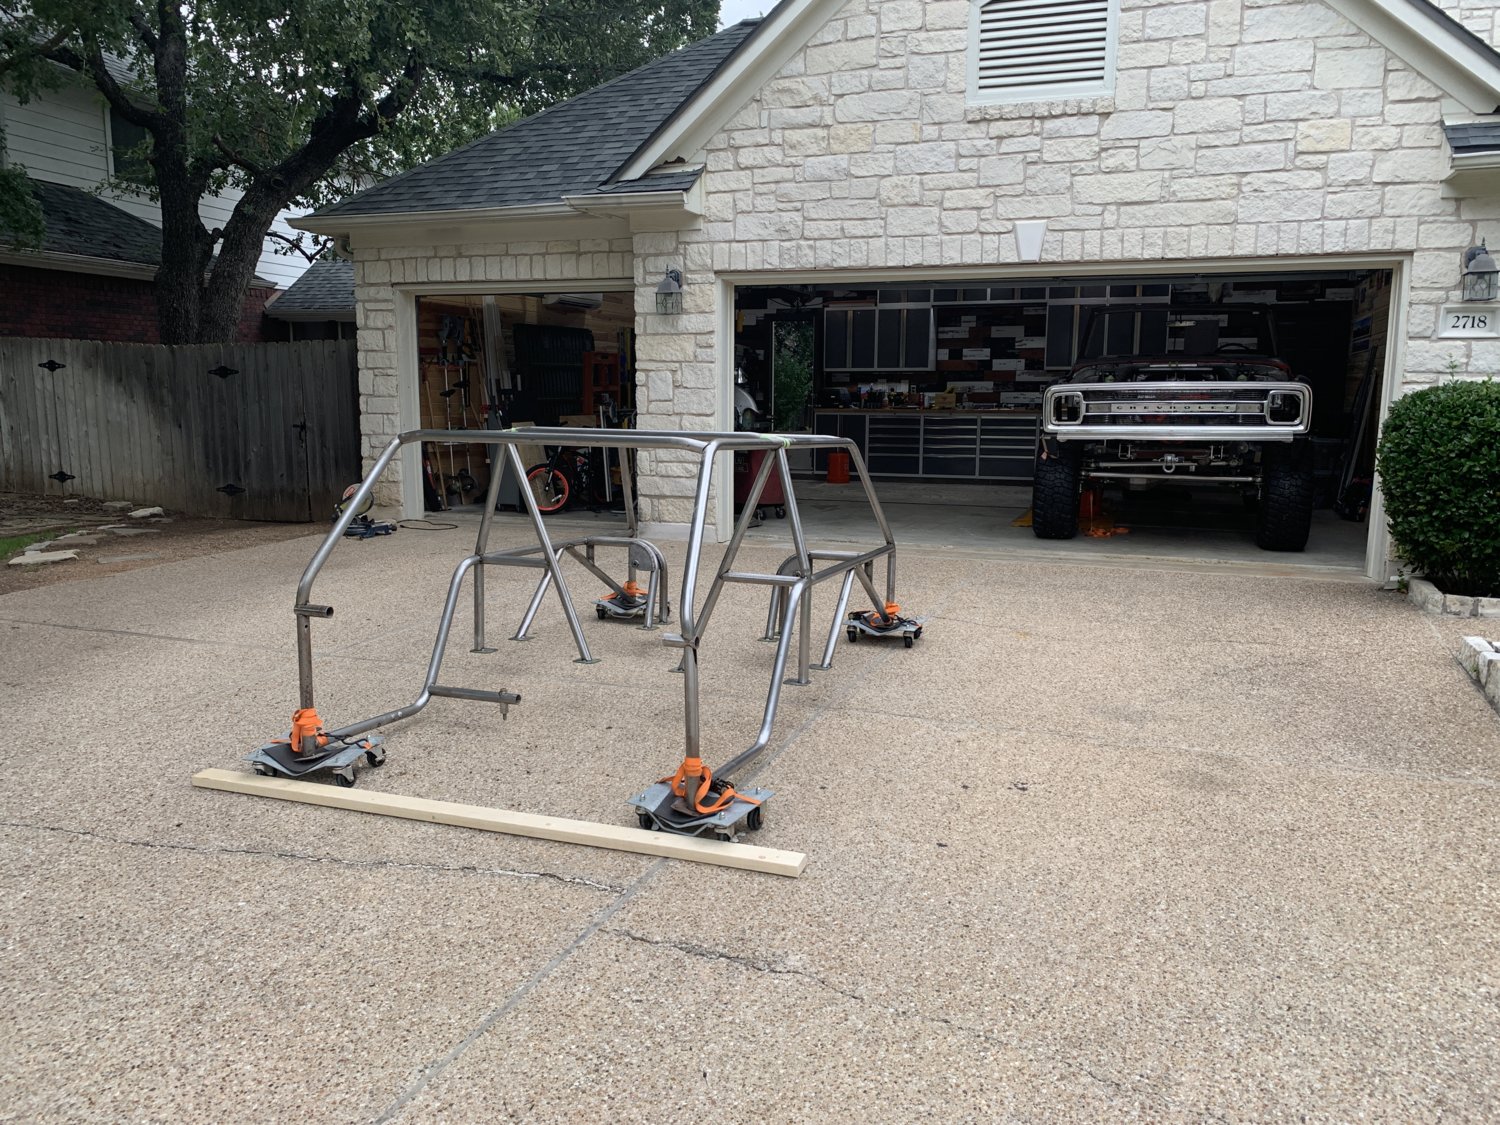
Another shot from a different angle.
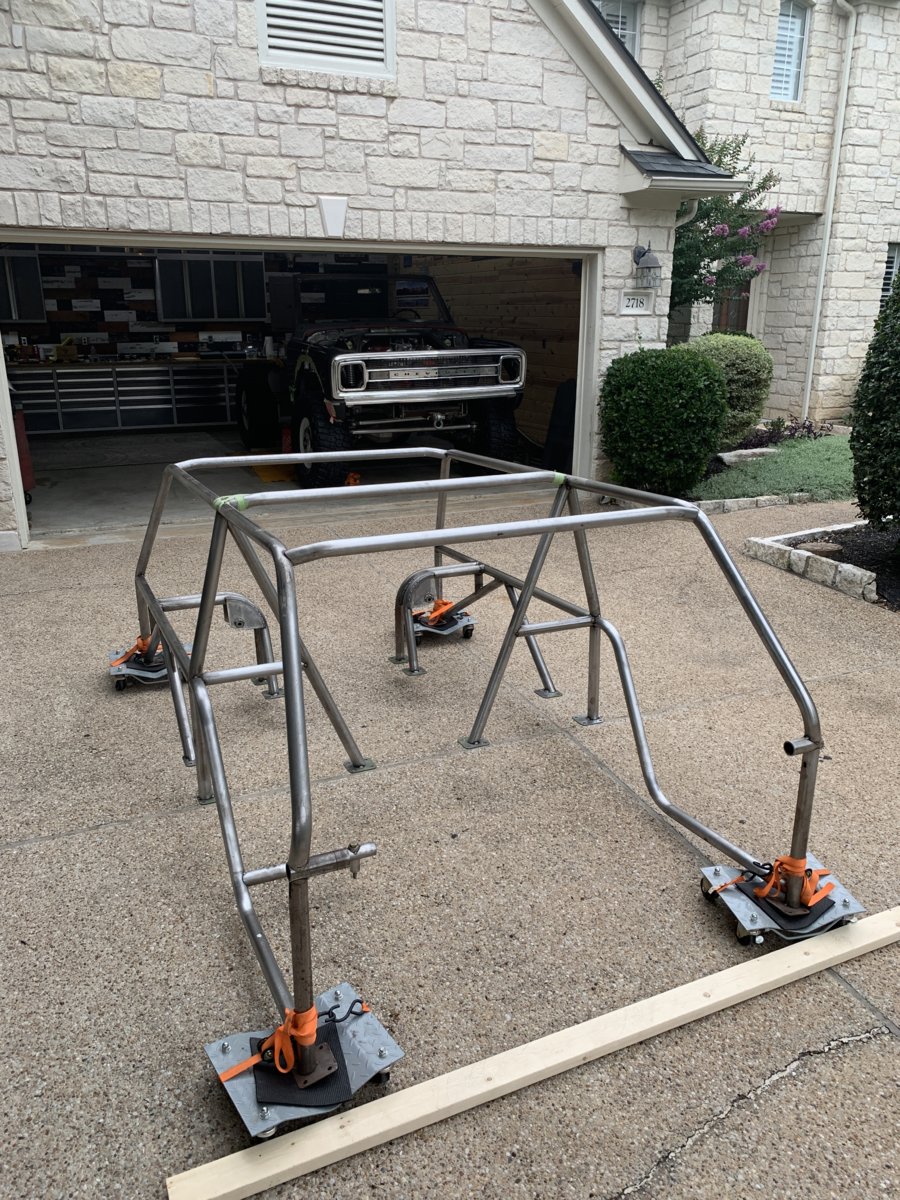
Charlie came out for an hour and helped get the cage onto rolling dollies and also with marking the door sills with Dykem for a new "clean-up cut" to prepare them for a fresh sheetmetal grafting in the future.
The front wheel also came off to make room for A-pillar cab support extraction...
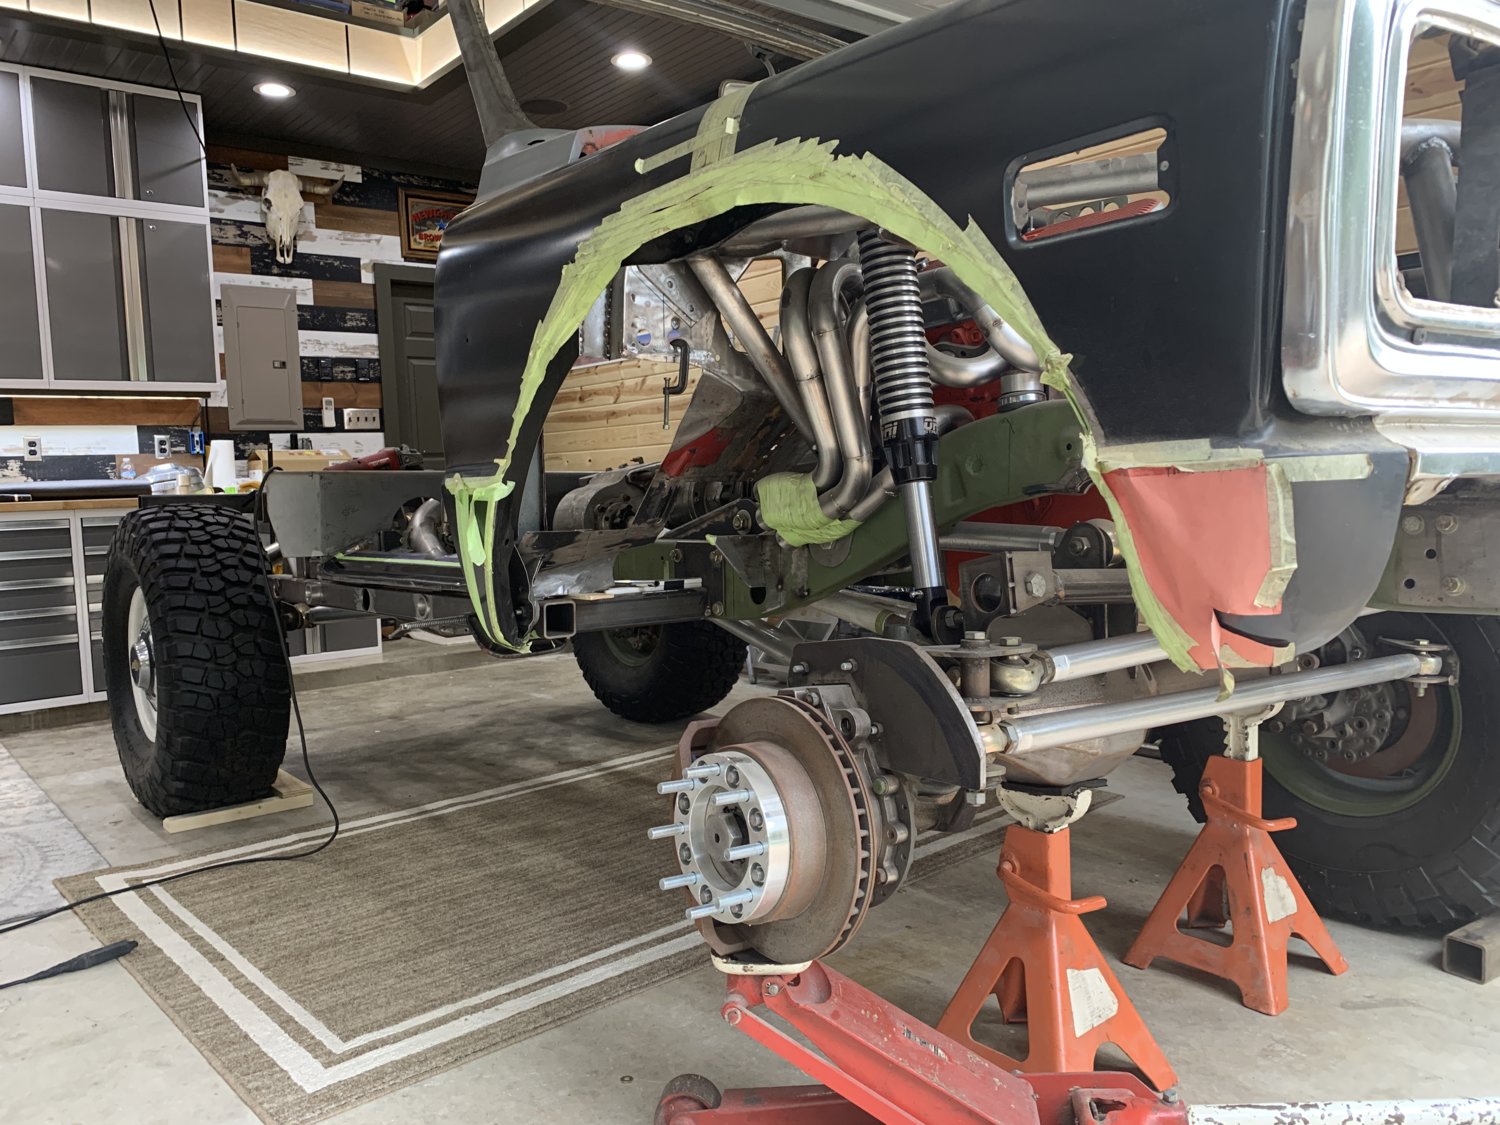
It wasn't easy, but eventually there was new "tuition pile" material sitting on the garage floor!!
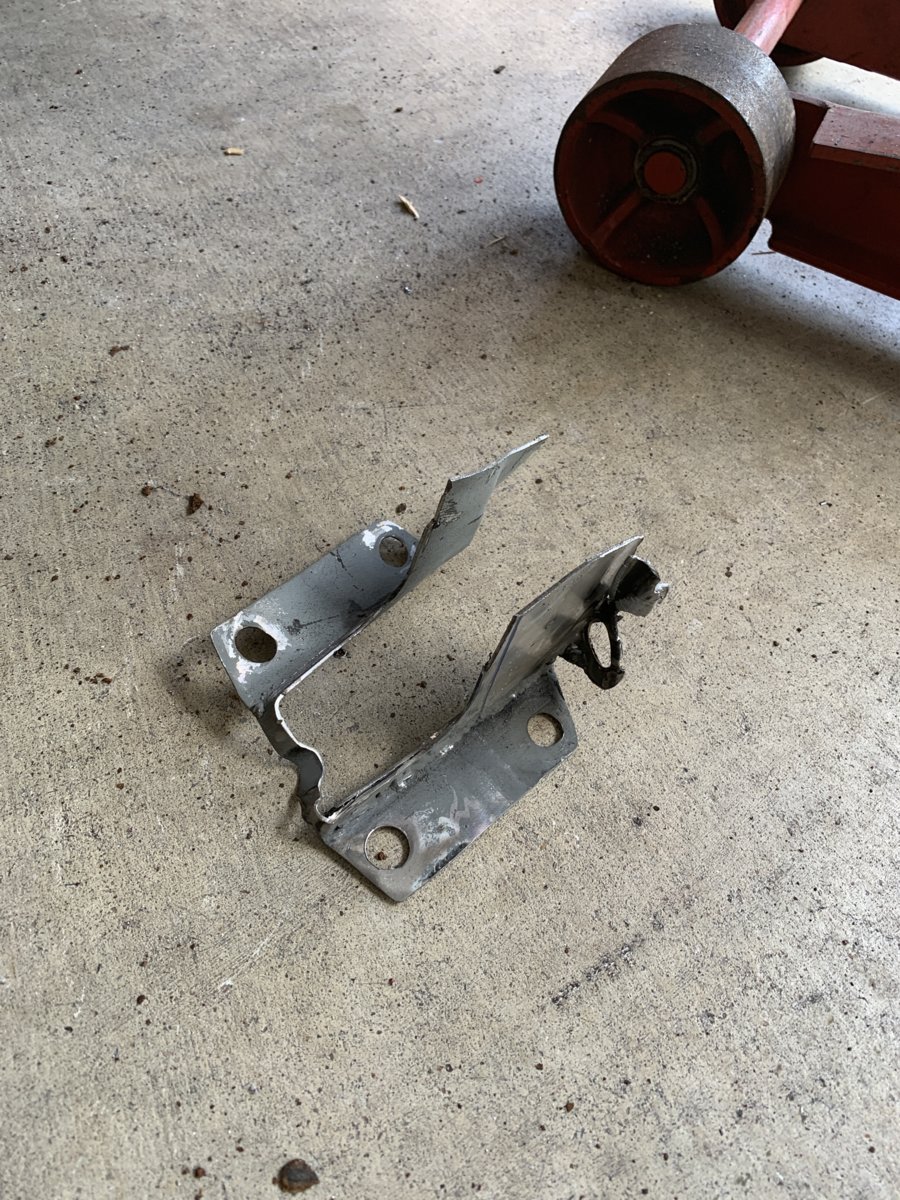
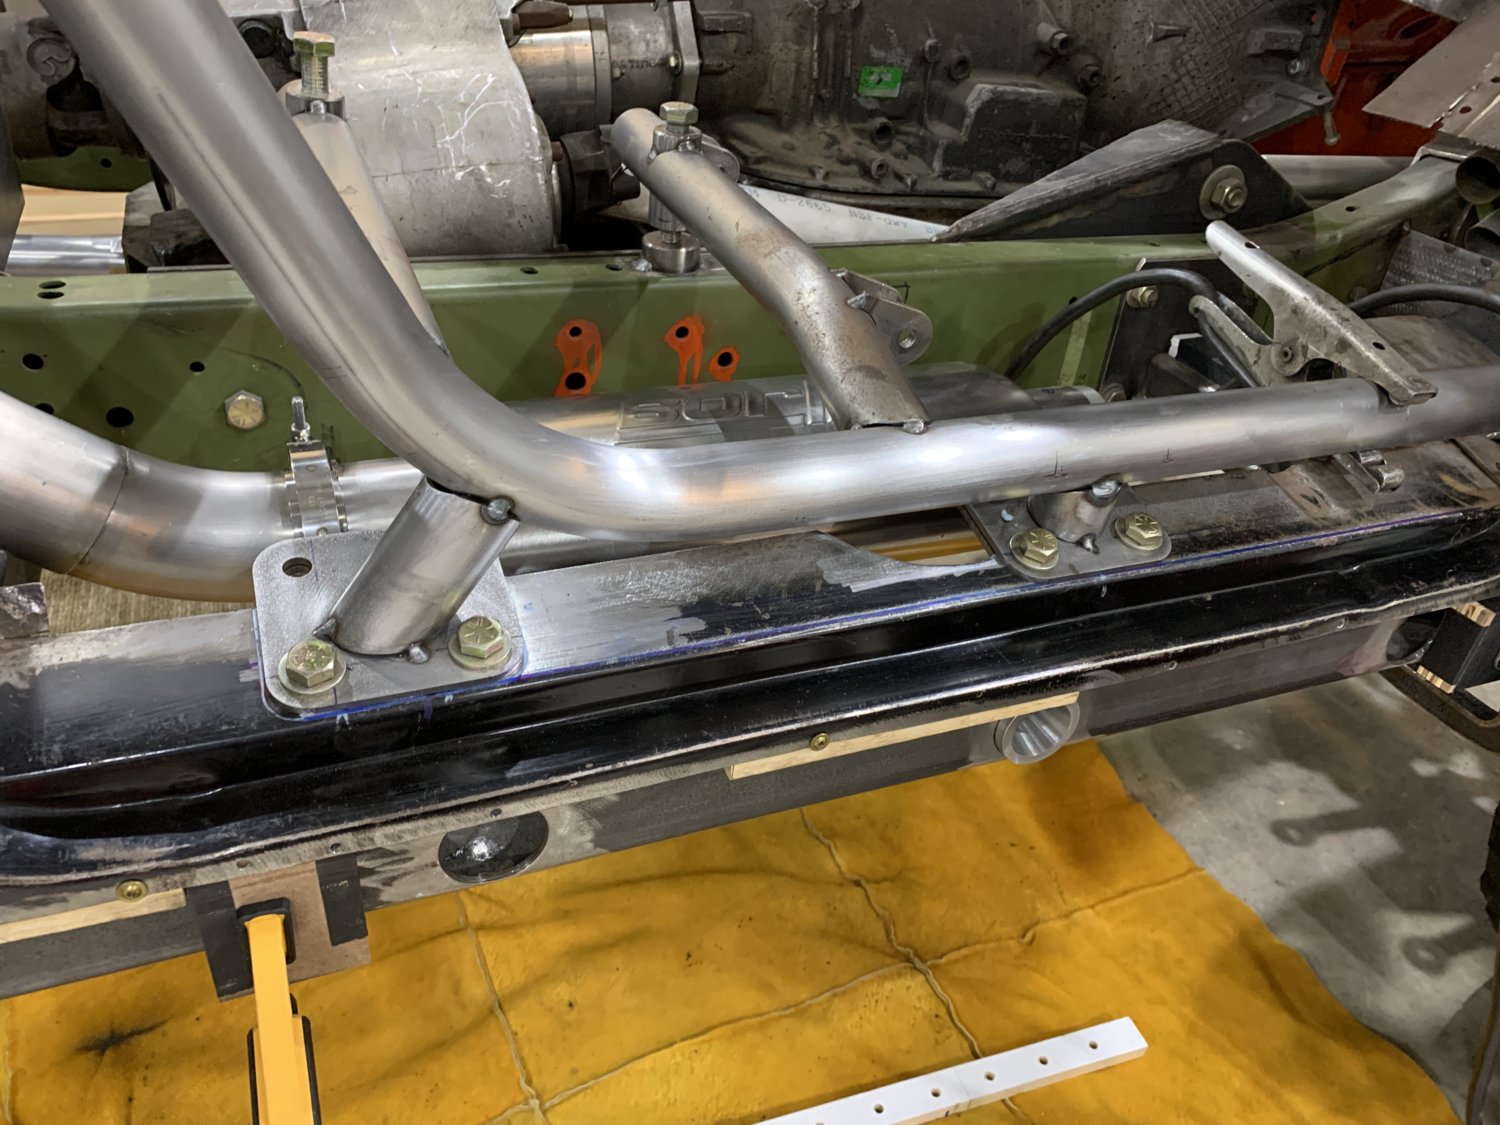
The end-result: The "four bolts area" that all 1st Gen guys know all too well... cleaned up from the inside / underside and ready for a more appropriate support piece.
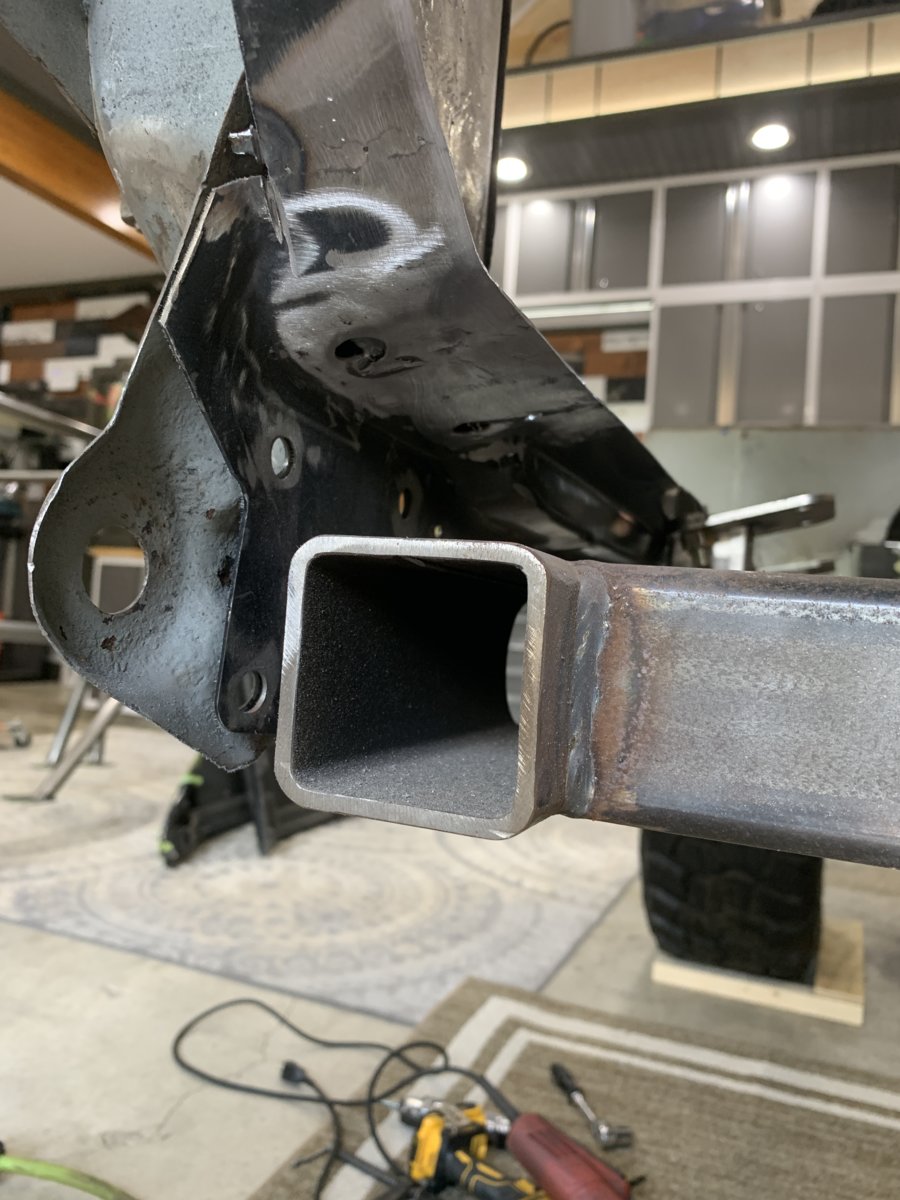
A slightly different angle showing the cleanup cut along that door sill and the rockslider mount that will be used for all of the rollcage tie-in points.
The payoff: It was a lot of effort to get to this simple photo, but this is where the angled support will go. Obviously it needs a cage plate as well, and the upper rollcage plate will probably need to be moved slightly to insure that all the bolt holes line up perfectly....
So that's it.... 16 new photos to keep everyone occupied for now. Looking forward to getting this step completed on both sides of the cab so that the rollcage can be lifted back into place... it's getting a bit crowded in the workshop in the evenings !
-G
It's been a while since new photos were posted. There has been good incremental progress over the past few weeks, so let's take a look at what's been going on .
Now that the exhaust is finished completely, it was time to work on placement of the final large pieces of the puzzle underneath (air tanks, compressors, batteries) and formalizing the cagework and tying it to the frame / outrigger assemblies to lock everything together and insure that there were no dimensional problems later on. One item that was identified before the NH -> TX move was that the cab had a slight offset (twist) relative to the frame below. There wasn't time to address this properly at that time, so as is often the case... a piece of green tape was used to make annotations as a reminder for later on.
The fix wasn't really all that hard. A 5/8" error is only a change of 5/16" to split the difference between both sides, so some small blocking and cabinet screws were used to hold the proper position of the outer rockers in place and insure that they were perfectly aligned with the square-tube rockslider outriggers below them. Once the position was perfect, small support stubs were created for the door bar, and the subsequent through-holes in the sheetmetal would permanently index all of these dimensions and lock them down prior to building and installing the new floors.
As always... the first part is the hardest. There are actually two angles involved since the floor slopes toward the door sill so it took a bit of trial-and-error to finally get a nice fitment. But once that was established, a paper template made it easy to transfer to the opposite side as a mirror-image part.
The span across the sill was still about 28" long, so an intermediate tie-in was added for extra support for the seat mounts. They will ultimately be part of the rollcage and not the floor sheetmetal so it's never a bad idea to give them lots of good anchor points.
With the top side complete, it was still necessary to get those new tie-ins down to the outriggers below the floor. This small angled square stock worked great... and 13* ended up being the perfect angle to match up to the floor taper.
From the driver's side looking to the passenger side it's easy to see the way this all works. Nice and strong, and as soon as the parts are tacked together there is an INSTANT stiffening of the entire structure. Very satisfying.
Shot of the passenger side, with a few bolts installed and tack welds in place.
This was all going along beautifully until it was time to deal with the A-pillar cage plate in the front footwell. In the earliest part of this MAW build the original cab supports were lovingly removed and replaced, but over time they became and impediment to the routing of the exhaust system and were chopped and hacked to make room. This was an "IOU" that was written long ago that finally needed to be addressed properly. The old cab support HAD to come out and a new style of mount needed to go in to replace it. As you can imagine, access was a substantial problem.... so the entire cage was hoisted out of the way to make things easier.
Couldn't resist the chance to take a couple of driveway photos of the cage which it was pushed out of the way. It's pretty cool to see it separated from the truck like this and really shows all the places where it will tie-in to the frame more clearly than ususal.
Another shot from a different angle.
Charlie came out for an hour and helped get the cage onto rolling dollies and also with marking the door sills with Dykem for a new "clean-up cut" to prepare them for a fresh sheetmetal grafting in the future.
The front wheel also came off to make room for A-pillar cab support extraction...
It wasn't easy, but eventually there was new "tuition pile" material sitting on the garage floor!!
The end-result: The "four bolts area" that all 1st Gen guys know all too well... cleaned up from the inside / underside and ready for a more appropriate support piece.
A slightly different angle showing the cleanup cut along that door sill and the rockslider mount that will be used for all of the rollcage tie-in points.
The payoff: It was a lot of effort to get to this simple photo, but this is where the angled support will go. Obviously it needs a cage plate as well, and the upper rollcage plate will probably need to be moved slightly to insure that all the bolt holes line up perfectly....
So that's it.... 16 new photos to keep everyone occupied for now. Looking forward to getting this step completed on both sides of the cab so that the rollcage can be lifted back into place... it's getting a bit crowded in the workshop in the evenings !
-G
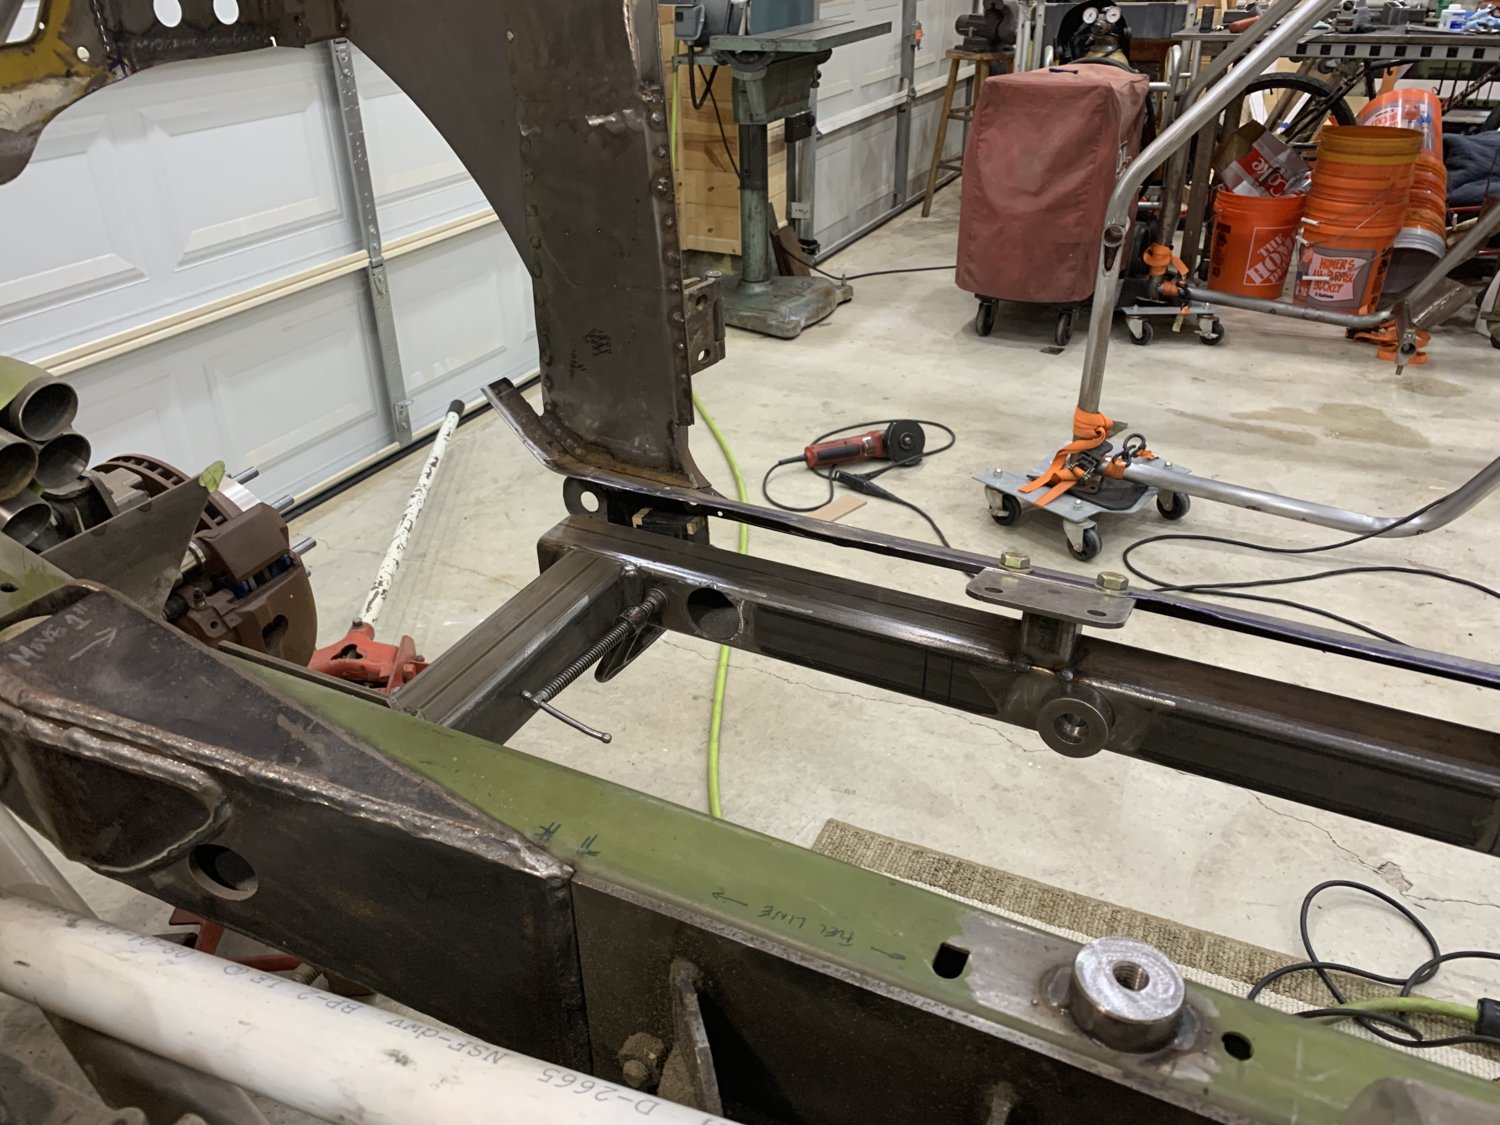
2020.08.30 - UPDATE! - REMOVABLE ROCKSLIDERS RESTARTED
Slow progress lately but time is still being invested in the shop when possible.
All of the intermediate risers that were needed to connect the frame to the cage plates up top were finally cut / fit and welded in place (16 locations so far)... it was tedious work, but a big relief now that it's over.
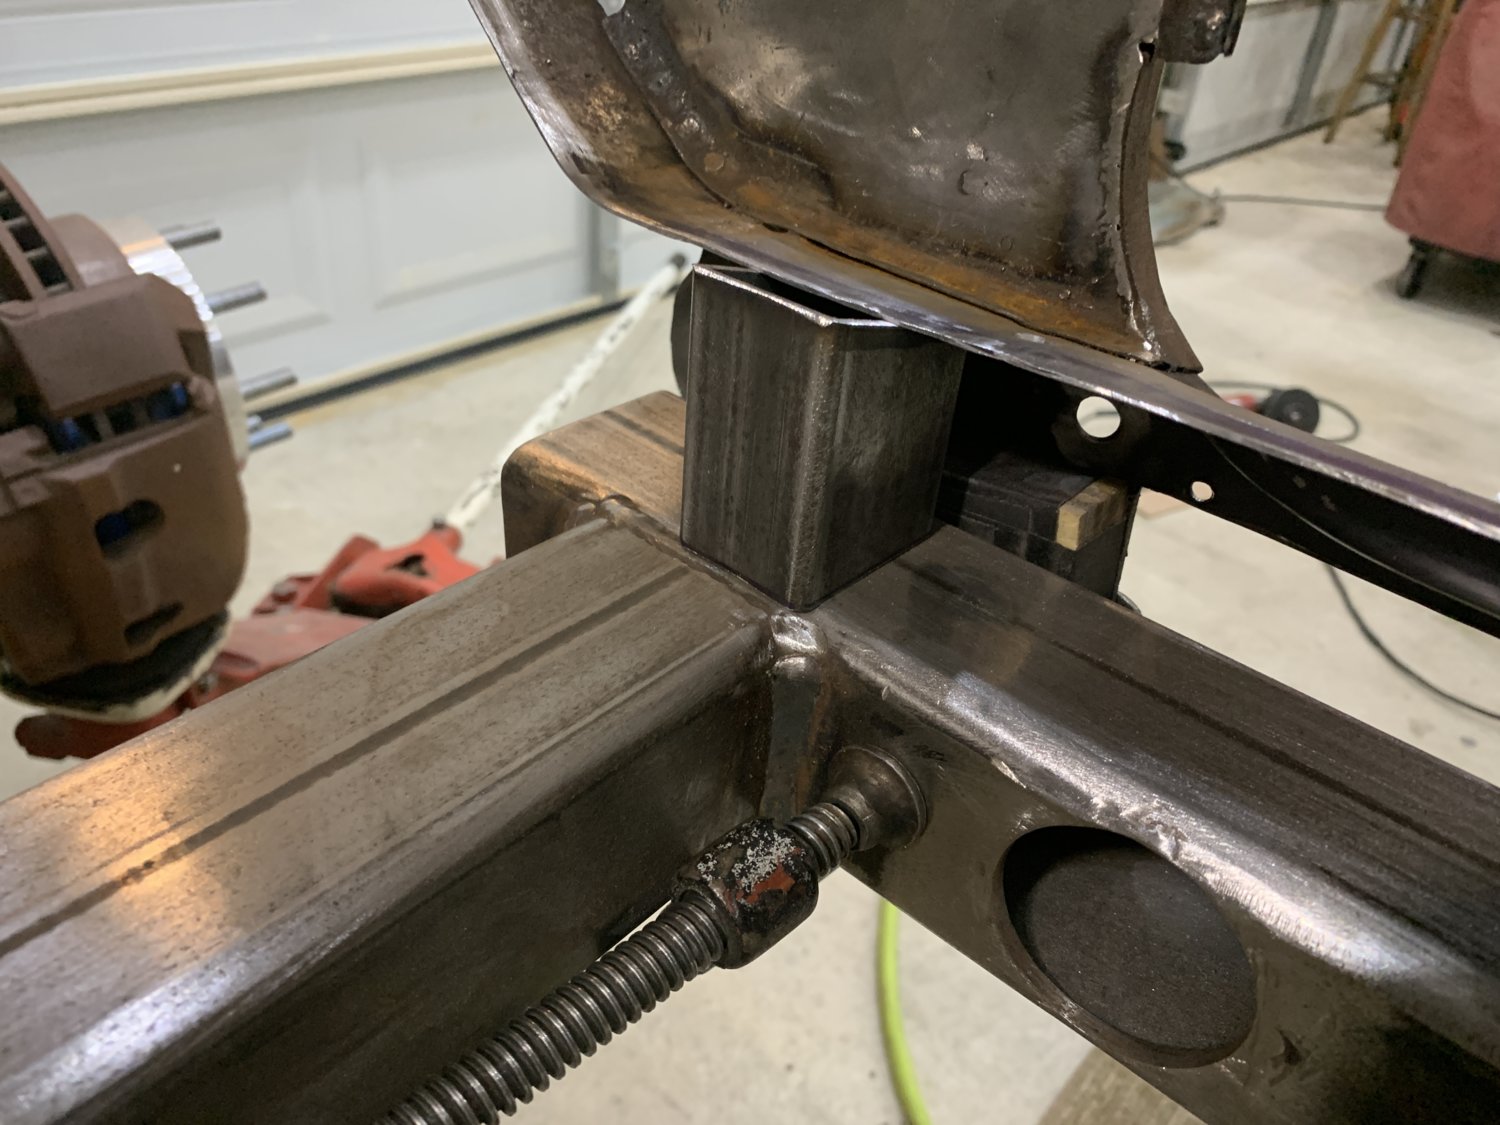
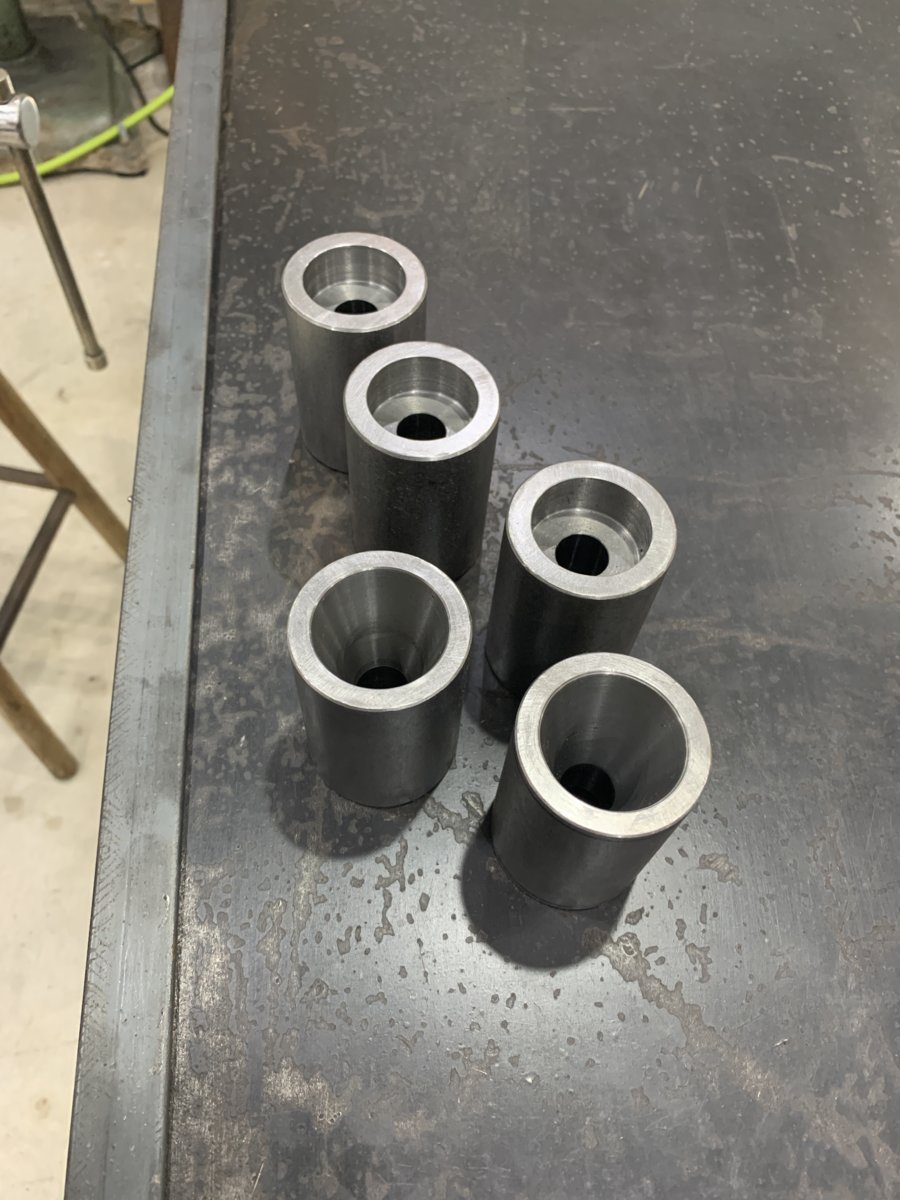
Some of the removable rockslider mount parts were sent out to be remachined for a deeper bolt pocket that would allow the bolt head to sit flush with enough clearance for a washer and impact socket to fit.
Now that they are back in the shop, it seemed like a good time to clean up the square tubing and get the new parts mocked into place.
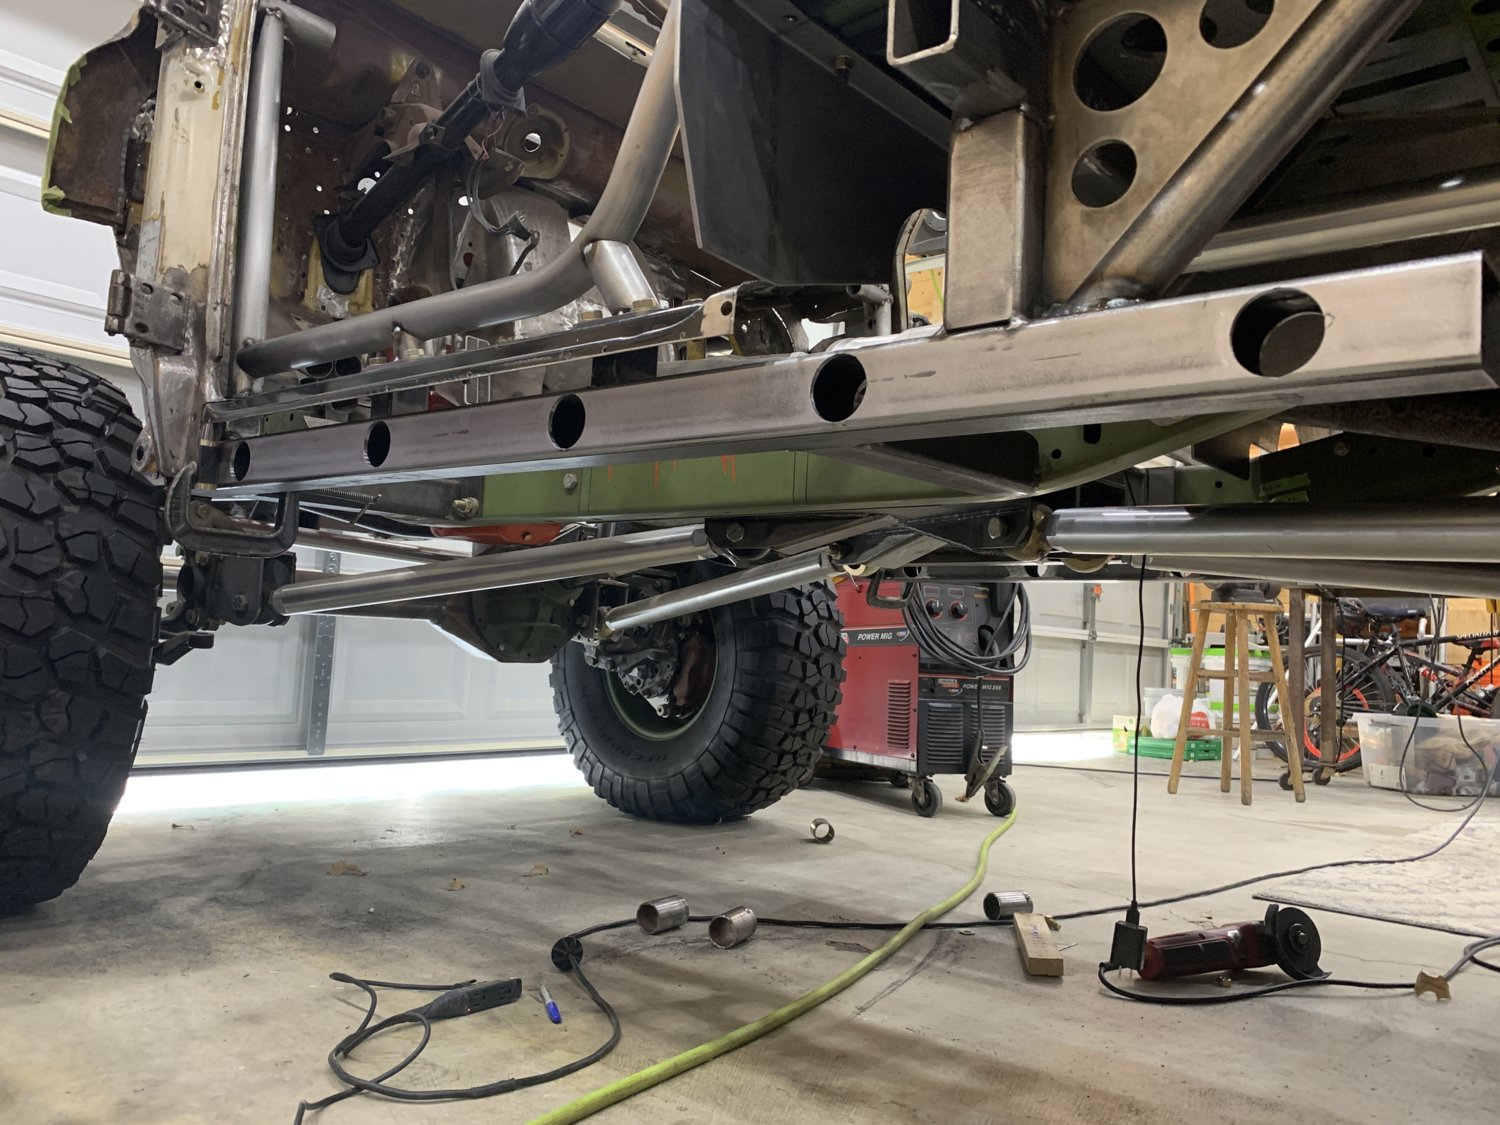
Here's the outrigger part that has been under the truck for several years, but cleaned up in preparation for welding of new parts.
Here are the inserts. Now they have a new deep bolt pocket, and you can see the front side is a nice tapered profile to allow the rockslider braces to "Self Align" as the bolts are torqued down at each of the 5 positions.
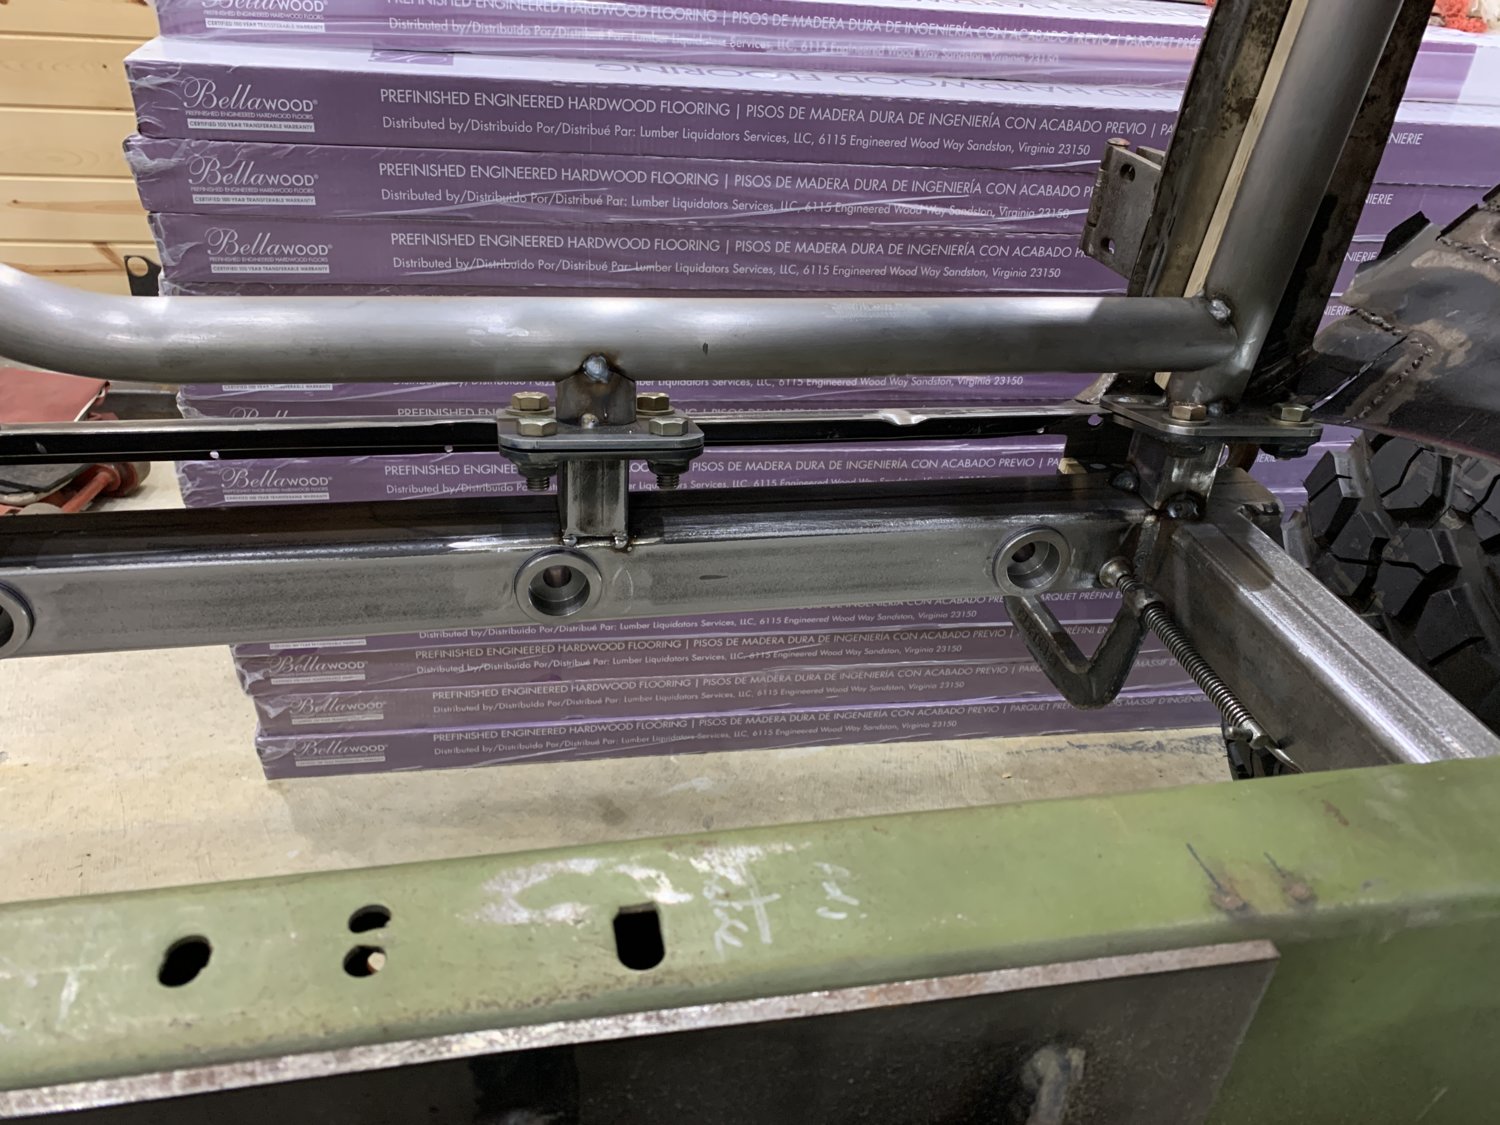
Once the parts were mocked into place, this is the view from the inside. You can see how the bolts will run through the holes and allow for the rocksliders to be bolted onto the truck.
This is a view across the transmission area over to the driver's side of the truck. Sorry about the busy background... that's another 41 boxes of hardwood flooring that was just delivered to be installed in my #TURNKEY house.
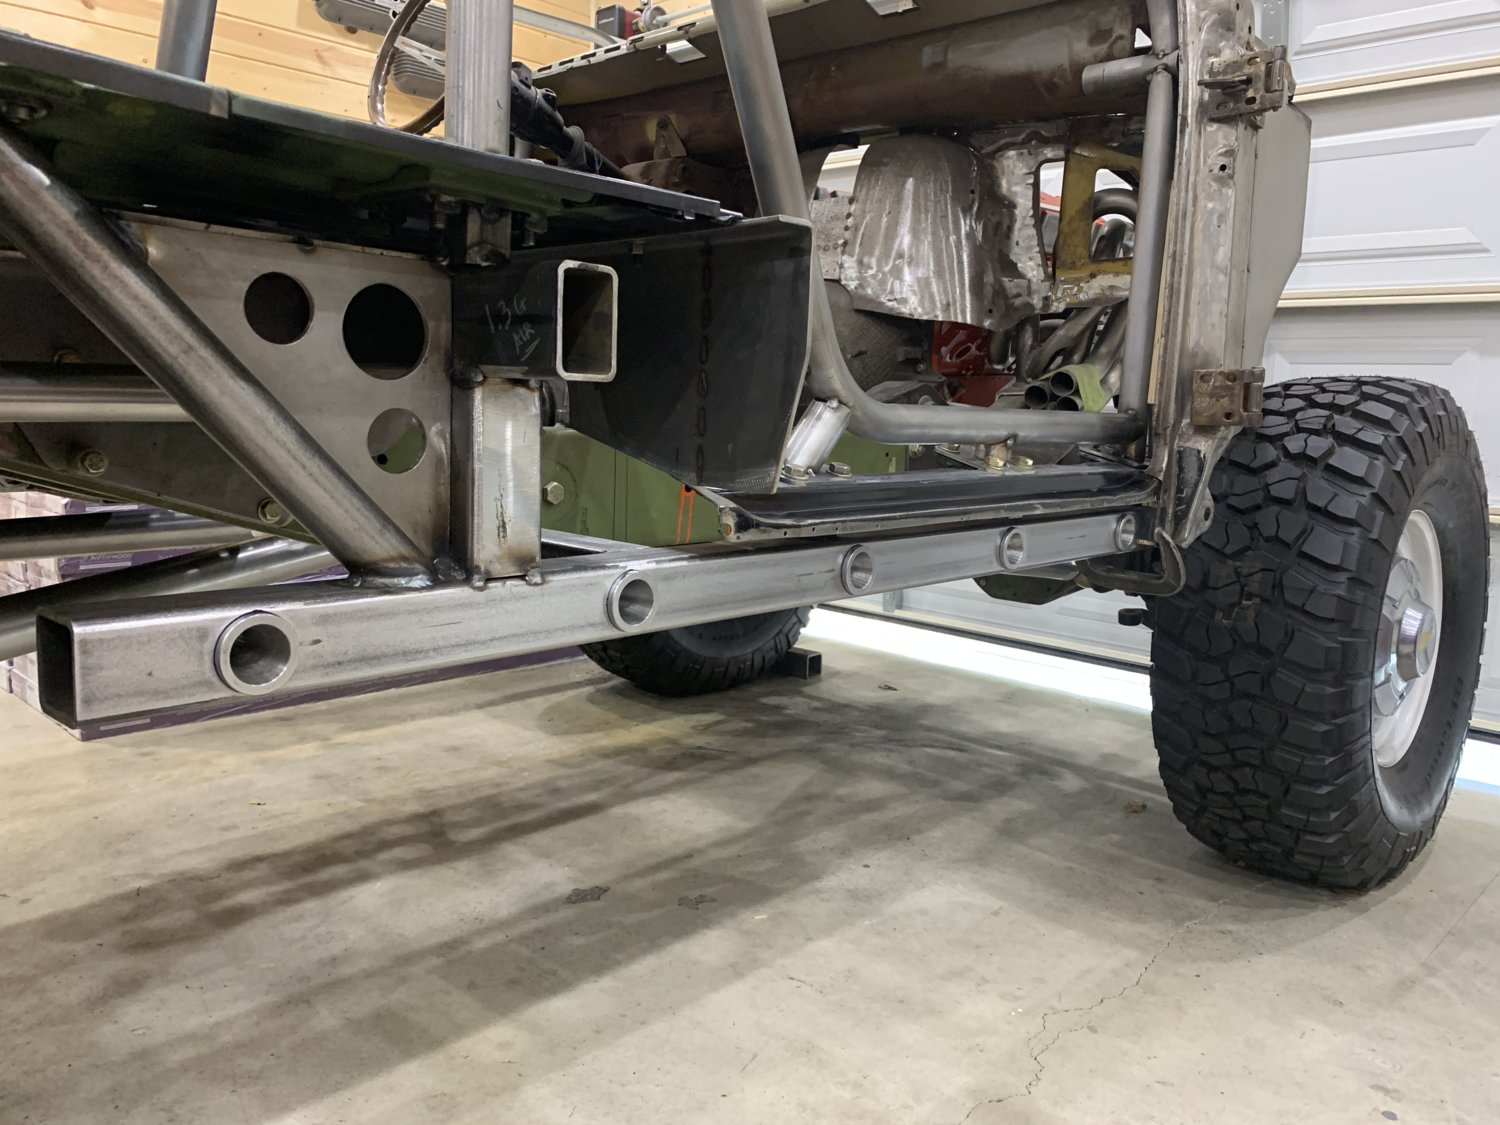
The view of the passenger side is a bit easier to decipher, and you can see the tapered inserts from this angle.
(You can also see some of the rollcage tie-in stubs from this angle as well)
My day job has been really hectic for the last few months, so it's almost impossible to sneak out into the garage on weekday evenings so I appreciate everyone being patient with these infrequent updates and photos.
-G
Slow progress lately but time is still being invested in the shop when possible.
All of the intermediate risers that were needed to connect the frame to the cage plates up top were finally cut / fit and welded in place (16 locations so far)... it was tedious work, but a big relief now that it's over.
Some of the removable rockslider mount parts were sent out to be remachined for a deeper bolt pocket that would allow the bolt head to sit flush with enough clearance for a washer and impact socket to fit.
Now that they are back in the shop, it seemed like a good time to clean up the square tubing and get the new parts mocked into place.
Here's the outrigger part that has been under the truck for several years, but cleaned up in preparation for welding of new parts.
Here are the inserts. Now they have a new deep bolt pocket, and you can see the front side is a nice tapered profile to allow the rockslider braces to "Self Align" as the bolts are torqued down at each of the 5 positions.
Once the parts were mocked into place, this is the view from the inside. You can see how the bolts will run through the holes and allow for the rocksliders to be bolted onto the truck.
This is a view across the transmission area over to the driver's side of the truck. Sorry about the busy background... that's another 41 boxes of hardwood flooring that was just delivered to be installed in my #TURNKEY house.
The view of the passenger side is a bit easier to decipher, and you can see the tapered inserts from this angle.
(You can also see some of the rollcage tie-in stubs from this angle as well)
My day job has been really hectic for the last few months, so it's almost impossible to sneak out into the garage on weekday evenings so I appreciate everyone being patient with these infrequent updates and photos.
-G
chulisohombre
1/2 ton status
Good progress. Any is good.
Cool idea!

