Is that some kind of projector headlight you're running on it now?
CK5

You are using an out of date browser. It may not display this or other websites correctly.
You should upgrade or use an alternative browser.
You should upgrade or use an alternative browser.
'89 K5 The Bulldozer
- Thread starter Tnsejed
- Start date
1989 K5, linked, caged, backhalfed, LS3, Hero case, on 42's
Is that some kind of projector headlight you're running on it now?
Yes it is. Once I get to the modern build pictures I'll show how I did it. They are Hella modules. Generally the projector module is not watertight as its inside the entire housing, but these ones are complete sealed units. I then machined some mounts for them.
I had wanted a light with a good cutoff that I could aim correctly, or even lower than what would be correct, so as to not blind people. Seems that's a big trend nowadays and It pisses me off. The downside to the ones I'm currently running is they are a euro cutoff, absolutely no spill above the line. That gets a little rough as some spill is a good thing so I use my BD pods if I need to see up as long as there is no traffic (I.E. signs, or farther away than cutoff etc.).
For my axle buildout the internals have only slightly changed.
-The '04 14 bolt runs stock axle shafts and is stock inside except for the ARB and the 5.13 Yukon gears. I did however change out the wheel studs to match the front 60 SAE studs. A little time on the lathe and they fit.
-The Front D60 is not stock. I run an ARB with Superior Gear 5.13. Yukon 4340 axle shafts and 35 spline stub shafts. I run CTM joints, which with religious greasing have been on the truck since day 1. I started with stock knuckles and ended up moving to the Reid racing knuckles later on, while plating my inner C's. I also started with standard kingpin bushings and springs. Then junked those and moved to reid racing bronze bushings. Then ditched the springs and used Crane's spring eliminator which combined with the bronze bushings required me to machine my own steer arm caps. I'll show that in the build. These two parts are not meant to be used together for good reason unless you can make you're own arms to match the kingpins with good precision. Couple thou off and you're boned, and the stack height of both together is above a standard steer arm.
Edited to add. My lockouts are Yukon Hardcore hubs and I have CTM drive slugs as my backup.
Last edited:
Time for the front 4 link.
I started this with the goal of the truck to be at 4" lift. I got a little less off the 64's (based on measurements of the original truck). I also wanted 6.5" minimum uptravel and the wheelbase at 112" If I remember my original goal.
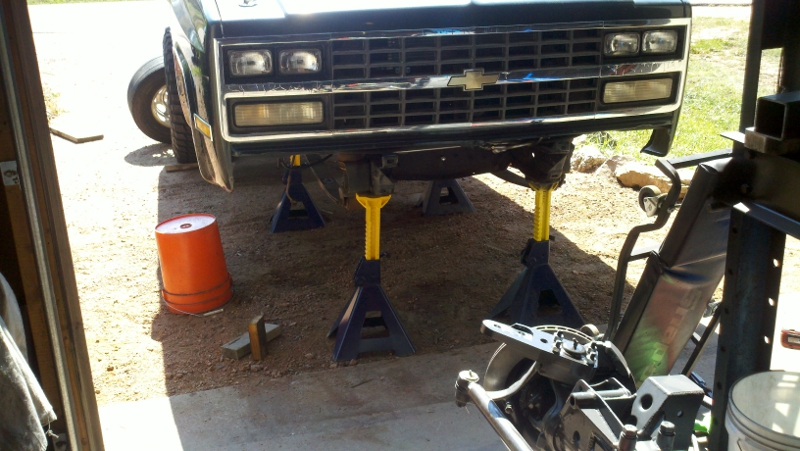
First thing was getting the wheels and tires in so I could move the axle around and check fitment. 40" Radial treps that at street pressure measured just slightly over 40" if I remember correctly. Either way they were definitely true to size. I use balancing beads in the tires and that works very well. In fact the new bias treps have been 96mph and run smooth with the beads

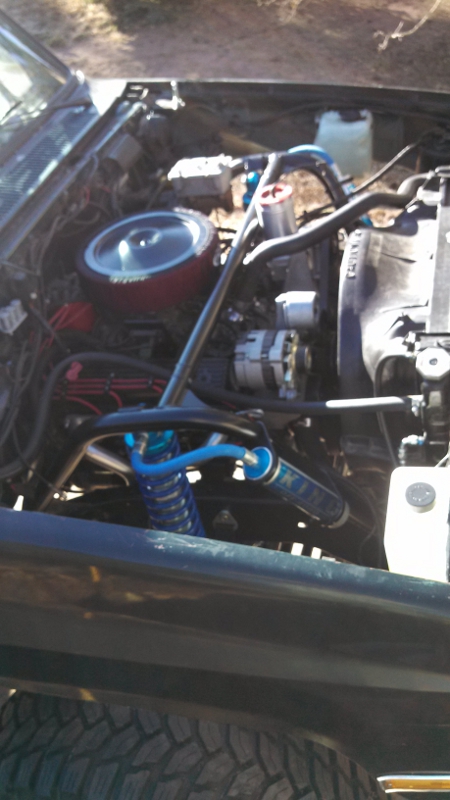
Then I gutted the hood and got the truck prepped to start building.
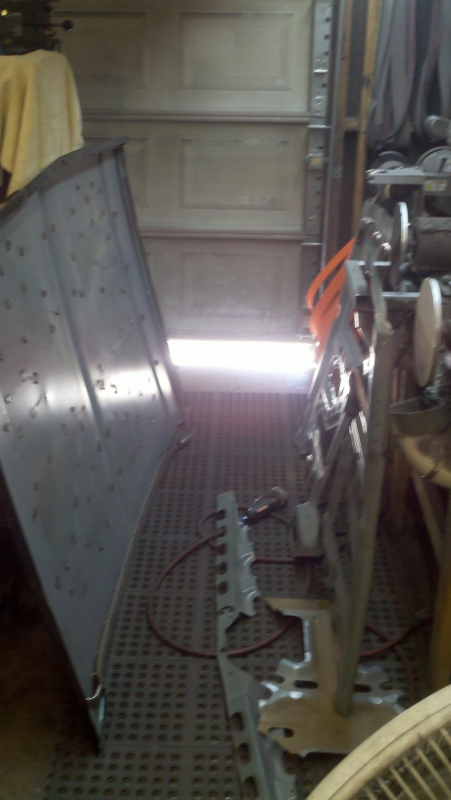
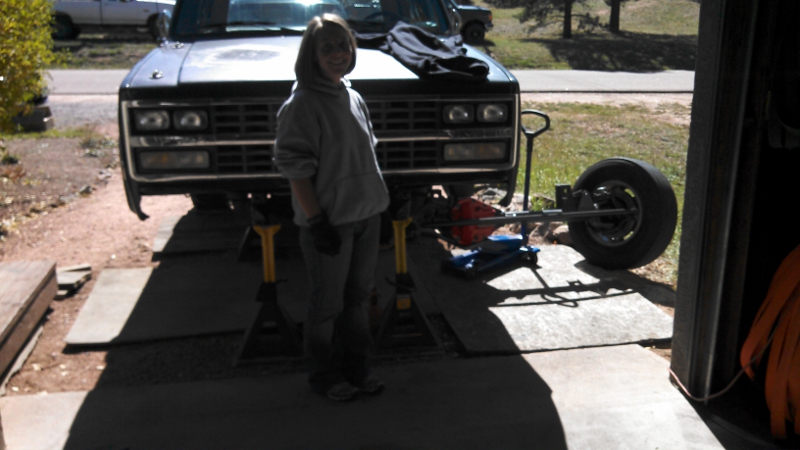
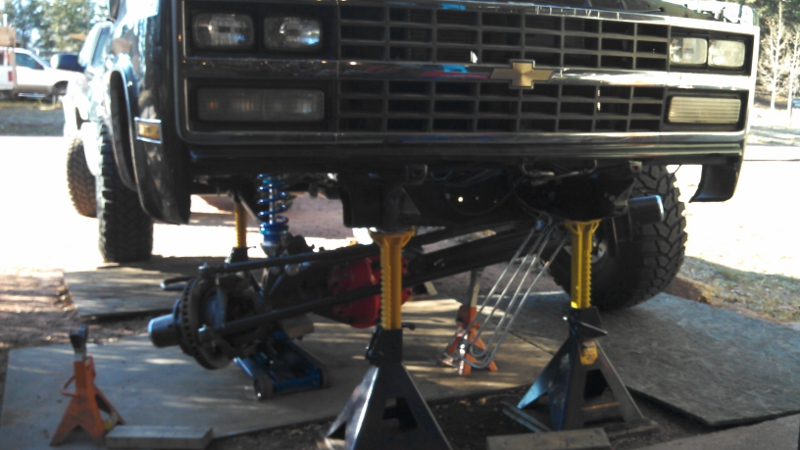
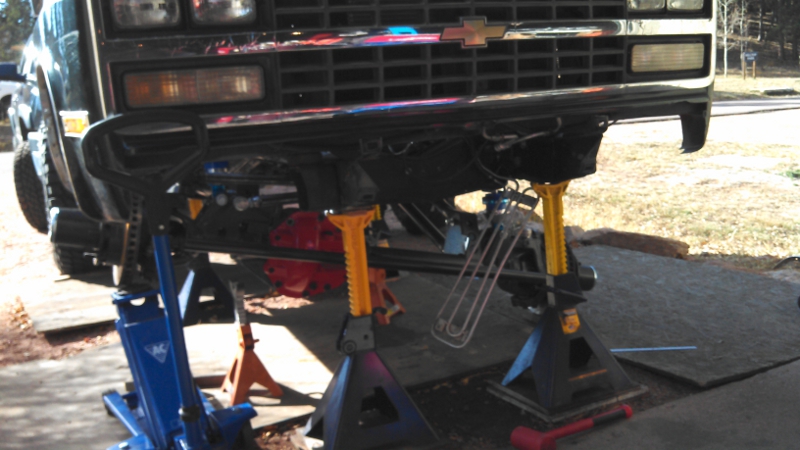
This sucked, as I couldn't play Jenga this time with the jacks as the truck was too front heavy. So I had to get the axle up that hill and over those rocks under the truck.
Good thing I married a good woman.
I started this with the goal of the truck to be at 4" lift. I got a little less off the 64's (based on measurements of the original truck). I also wanted 6.5" minimum uptravel and the wheelbase at 112" If I remember my original goal.
First thing was getting the wheels and tires in so I could move the axle around and check fitment. 40" Radial treps that at street pressure measured just slightly over 40" if I remember correctly. Either way they were definitely true to size. I use balancing beads in the tires and that works very well. In fact the new bias treps have been 96mph and run smooth with the beads
Then I gutted the hood and got the truck prepped to start building.
This sucked, as I couldn't play Jenga this time with the jacks as the truck was too front heavy. So I had to get the axle up that hill and over those rocks under the truck.
Good thing I married a good woman.
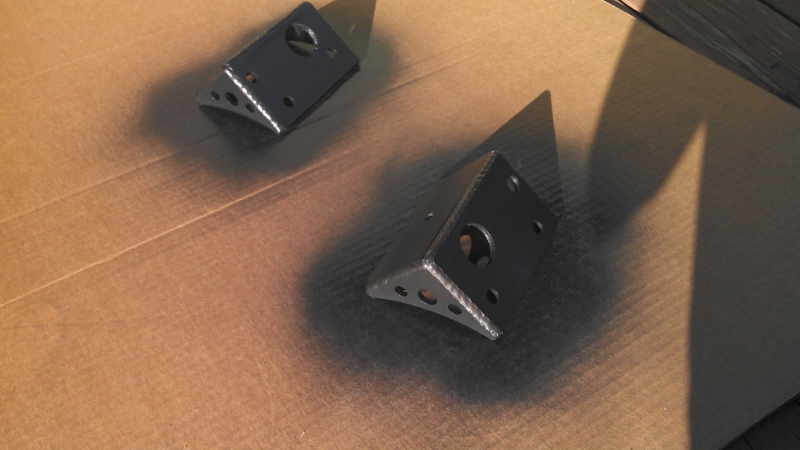
Then started working on the link brackets, the frame stuff, links, etc until I ran into a problem that kept me from going where I wanted to.
I frenched the body mount and link brackets together. This is showing me what I'll need for clearance
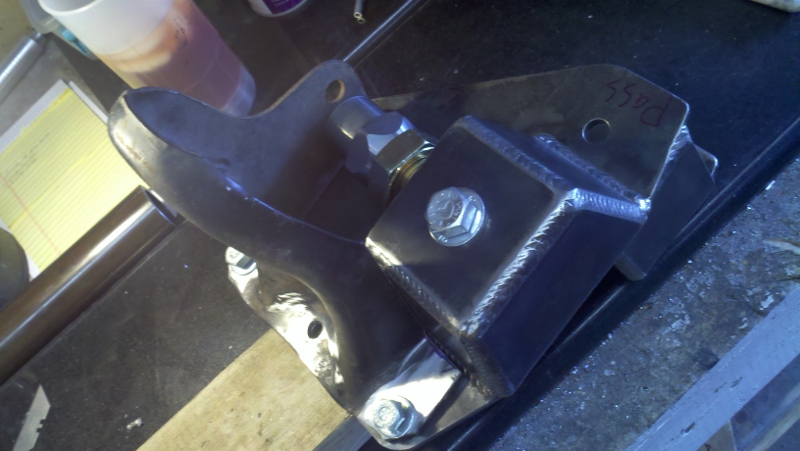
Modifying the backets for the lower height.
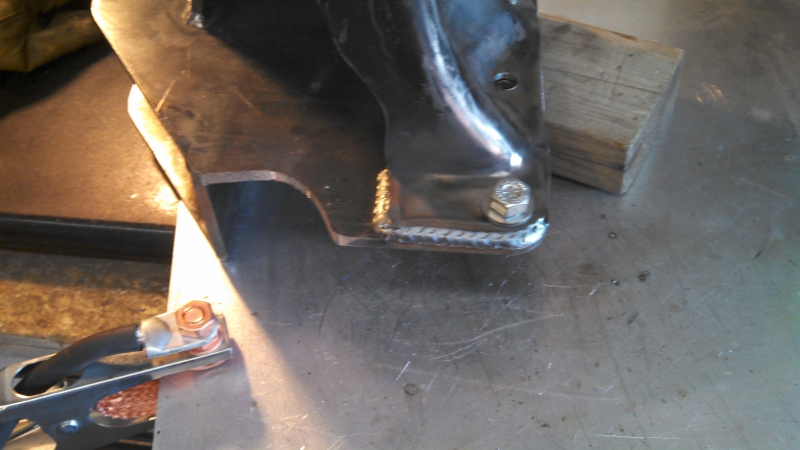
Good to go
Links going together for mockup.
I frenched the body mount and link brackets together. This is showing me what I'll need for clearance
Modifying the backets for the lower height.
Good to go
Links going together for mockup.
Now I don't have any picks of the initial mockup. for the link and axle placement. I'm a huge proponent of fabbed chassis datums and then cross measuring for axle locations as getting things square is hugely important. So I neglected some pics here.
When I did the rear axle I took multiple measurements of the frame and the body and gave myself a certain window I wanted the rear axle to be. My truck is about 1.00" 'wonky' I guess you'd say. Depending on frame curvature and body location etc things float quite a bit on my truck. So I came up with sort of a squareness window that put the body and frame and drivetrain in their best respective positions. I would then weld datum points (little sharpened bolts) on the truck that I could measure off of as it was just me and I had noone to hold the other end of the tape measure. For the rear I had the hangars done off those datums and they landed on the frame where the measurement was correct, and not just offset from previous mount holes.
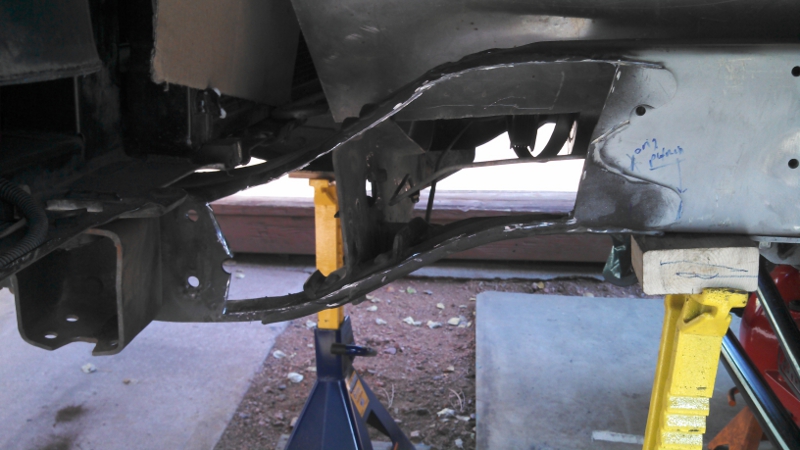
So now that the front was going in I would do the same with the front but also measure off the rear axle to double check it all.
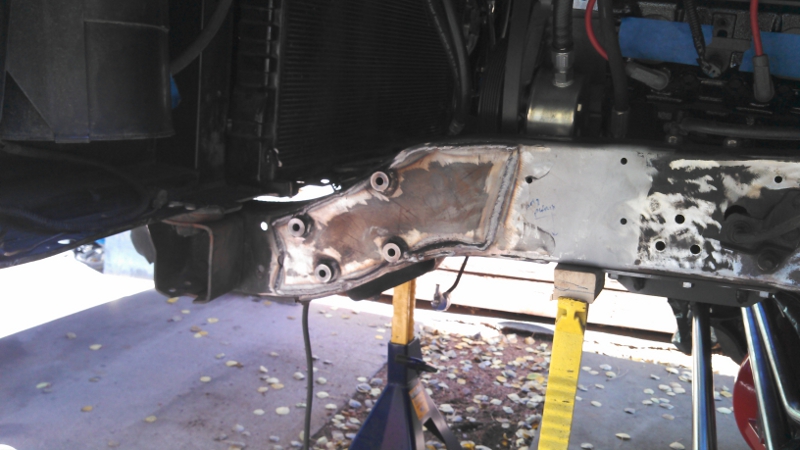
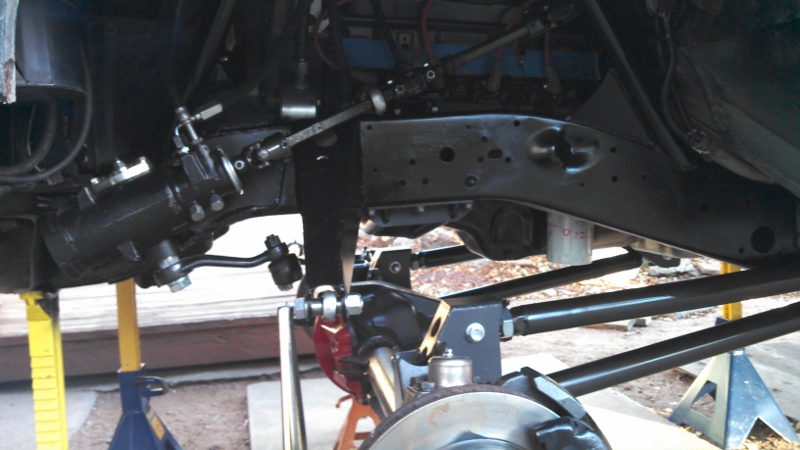
But I could not get the front axle as far forward as I wanted with the steering box in the factory location. So that son of a bitch had to go. I wanted as far forward as I could get to 112". So I pushed it all the way into the core support mount.
When I did the rear axle I took multiple measurements of the frame and the body and gave myself a certain window I wanted the rear axle to be. My truck is about 1.00" 'wonky' I guess you'd say. Depending on frame curvature and body location etc things float quite a bit on my truck. So I came up with sort of a squareness window that put the body and frame and drivetrain in their best respective positions. I would then weld datum points (little sharpened bolts) on the truck that I could measure off of as it was just me and I had noone to hold the other end of the tape measure. For the rear I had the hangars done off those datums and they landed on the frame where the measurement was correct, and not just offset from previous mount holes.
So now that the front was going in I would do the same with the front but also measure off the rear axle to double check it all.
But I could not get the front axle as far forward as I wanted with the steering box in the factory location. So that son of a bitch had to go. I wanted as far forward as I could get to 112". So I pushed it all the way into the core support mount.
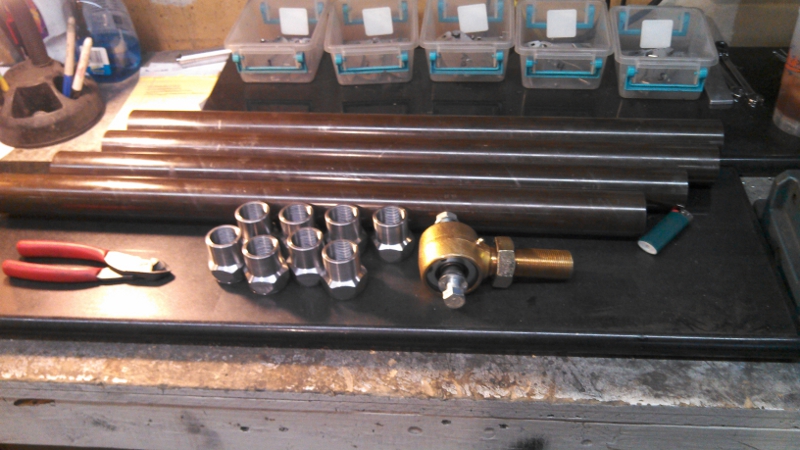
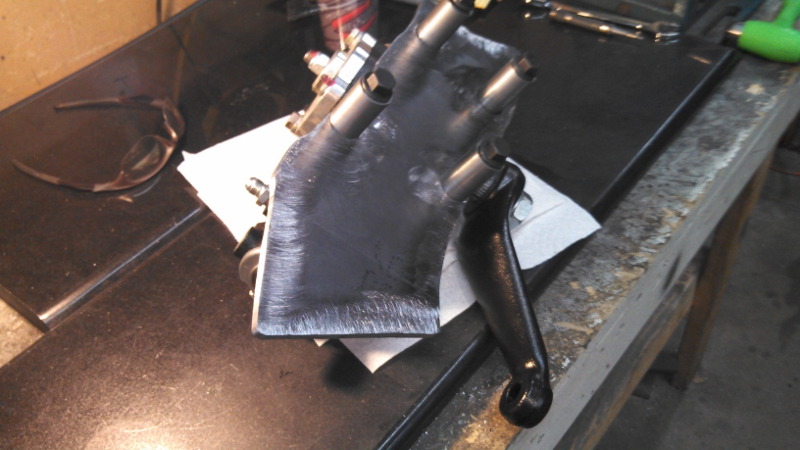
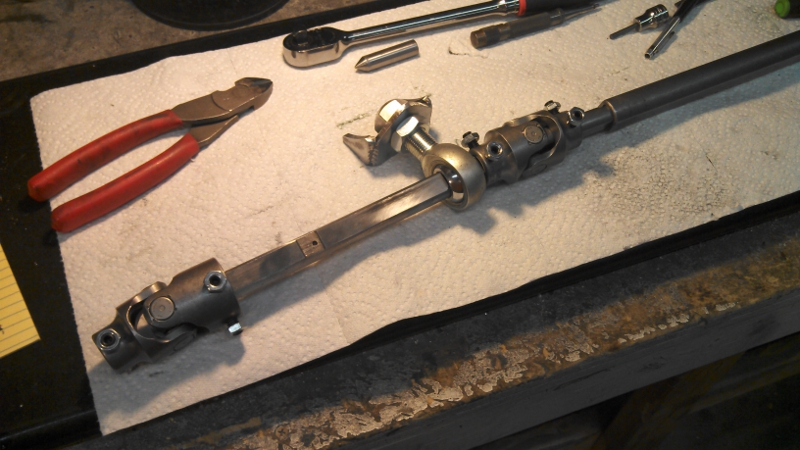
Then I believe I worked on the steering shaft as I'd need that before shock stuff. So I built my shaft with the new box location.
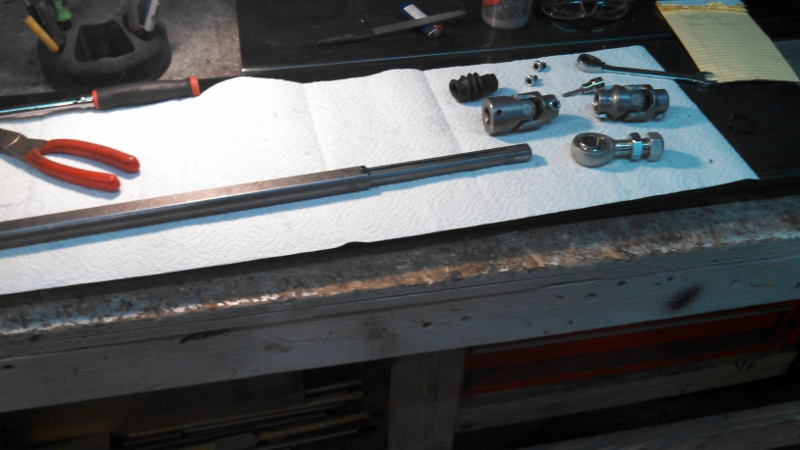
Making little crap like this stuff always eats up so much time:
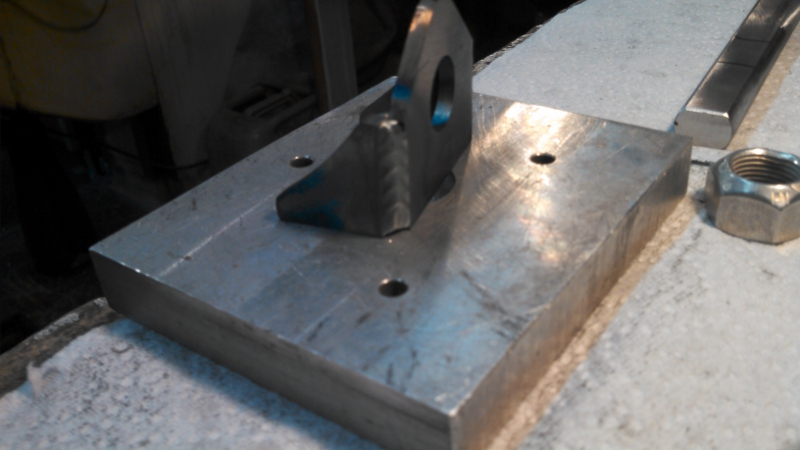
Making little crap like this stuff always eats up so much time:
Wow, for some reason I had a feeling this rig had an incredible amount of work into it when I nominated you for GMOTM. But from what I have seen so far, incredible was an understatement.
What welder do you use?
What welder do you use?
Wow, for some reason I had a feeling this rig had an incredible amount of work into it when I nominated you for GMOTM. But from what I have seen so far, incredible was an understatement.
What welder do you use?
Dude, I saw you liking stuff as I was posting, I was about to ask if you were having a drink like I was while I'm doing this. I've got some single barrel knob creek right now. Stuff is great.
Anyways... I currently have a Lincoln Powermig 256 and a Miller Dynasty 210 (but I'm not great at Tig and it is only used for emergency repairs on titanium parts). I love my lincoln 256. I did not have that machine though during the time period of these pictures, I had an older Lincoln 255 which was good but gave up the ghost to the point I got fed up with it and went with a brand new 256. The 256 is epic. I run 3 different guns, and primarily only use 2 for my normal stuff. The big gun the machine came with has only been used once. The 95% of the time gun I run is a 100L liner with a USAweld Flex Neck gun in the 100L size. I primarily weld with .030 er70s6 for almost all of my stuff. My other gun is my old 100L with a squished gas nozzle and a bent neck specifically bent to get in weird places. My shit is always out of position as I have no lift or anything. Fancy beads are easy on the bench. I've made welds on this truck that definitely weren't the prettiest but I was welding with a mirror upside down using a a piece of cardboard as shielding because the helmet wouldn't fit. I call this Zimbabwe style. And realistically, if its strong that's the only damn thing that matters.
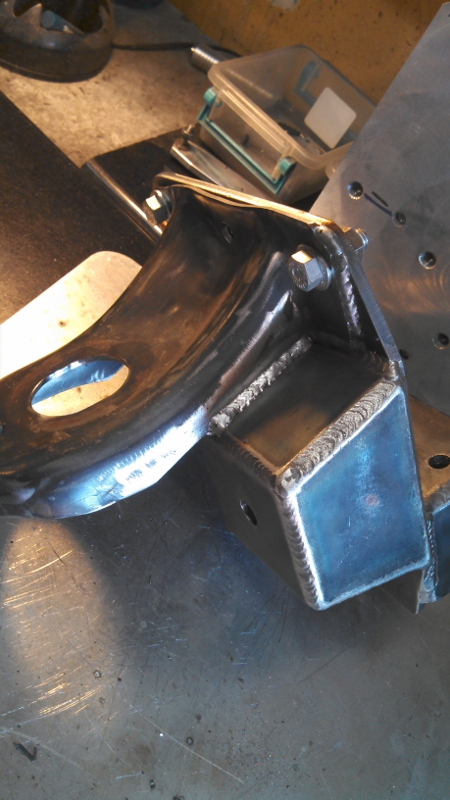
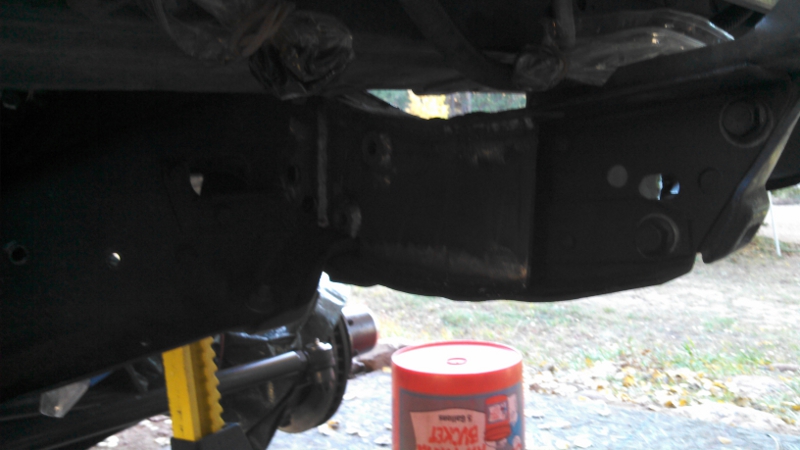
Ok so the new box position looked good. Got the panhard bracket in and got the link mounts in.
I do remember modifying the first panhard bracket for the lift height, but not nearly like I modified again when the front suspension got all redone the second time (about 2 years ago and pics will be coming with the real cool stuff).
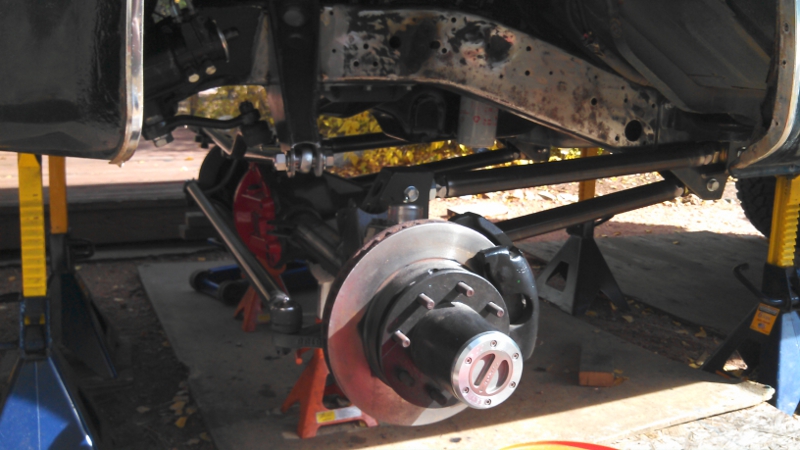
I do remember modifying the first panhard bracket for the lift height, but not nearly like I modified again when the front suspension got all redone the second time (about 2 years ago and pics will be coming with the real cool stuff).
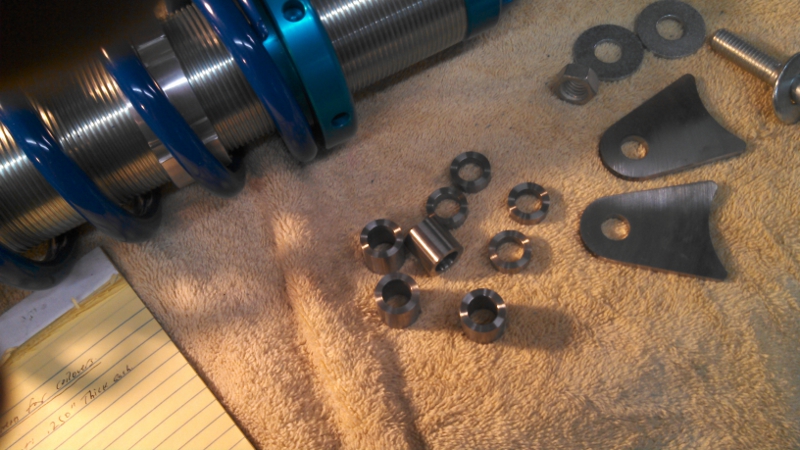
First I had to make all my misalignment spacers before starting on the shocks:

So now it was time to get the shocks mounted. Lots of theories on this and I have settled on the one I like later on in my experiments. I can say this, the front is a bitch but I got pretty close here. Its easy though to nail almost 90 at full bump to the operating link, and that is important. The 90 to articulation is very hard to hit on the front of our trucks and I personally think that is a too much angle anyways. But I didn't go for that here anyways. Personally I'd like a bit more angle than what you see here and I wish I would have modified the axle brackets to outboard more. Hardest thing is turning and tire clearance at stuff. Its all a compromise and realistically it worked damn well. I was happy. But in a few years thing would change...
After all that paragraph I've only got 3 pictures before it was time to finish weld.
Last edited:
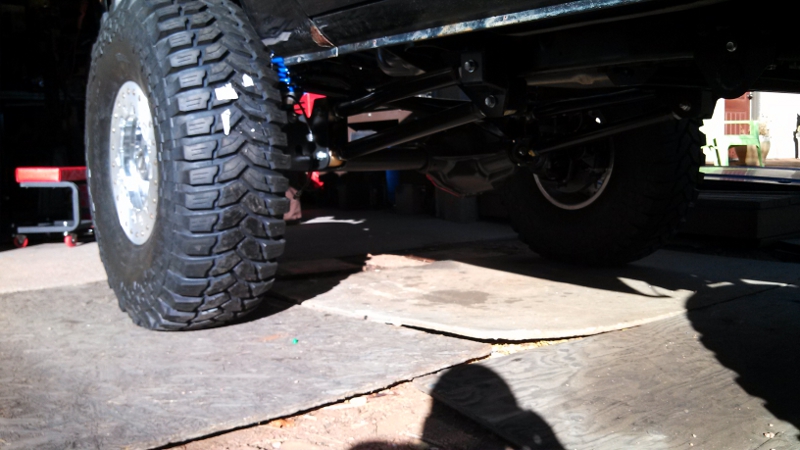
So after things were checked for clearance, good conditions found for ability to clearance the body with the rubber, good driveshaft angles throughout travel, good shock angles, and clearance enough for multiple caster angles, I was ready to final weld and paint the raw steel.
It looked mean stuffed with the full body. I always like that look so I'll start this post with it.
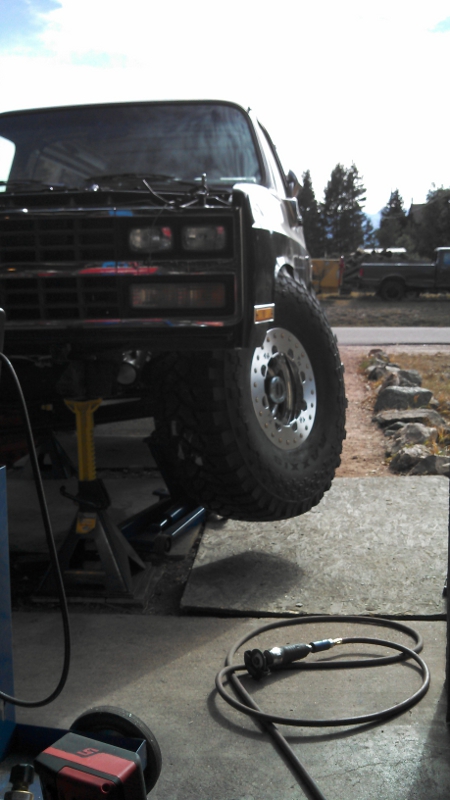
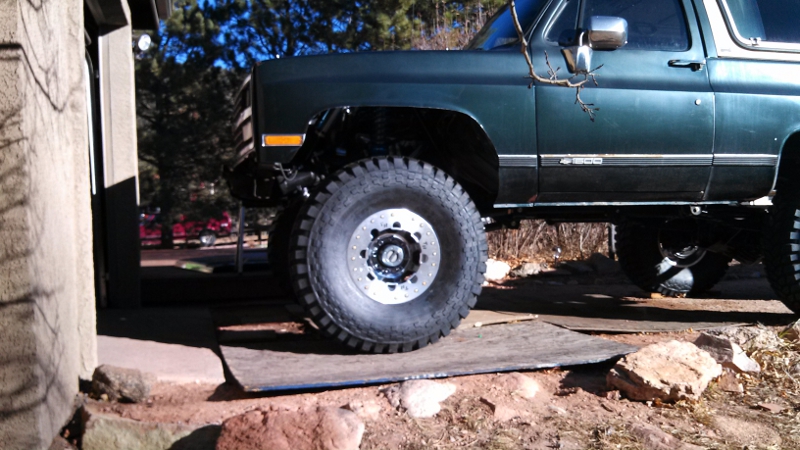
This is the 'Houston we have a problem' picture. Sitting way too high. Now there is no winch and some things that would add weight, but not enough to drop it to where I built ride height. I way overshot the spring weight. But thats pretty normal, you never really get it on the first go unless you have scales (Which I do now.. lol).
It looked mean stuffed with the full body. I always like that look so I'll start this post with it.
This is the 'Houston we have a problem' picture. Sitting way too high. Now there is no winch and some things that would add weight, but not enough to drop it to where I built ride height. I way overshot the spring weight. But thats pretty normal, you never really get it on the first go unless you have scales (Which I do now.. lol).
Bumpstop brackets I whipped up for the poly bumps I built the truck with originally:
Now I had the truck on its own weight I could start working on the cage and interior. The whole truck was built with the idea that the cage is a structural cage and would tie-in at suspension components, and be welded directly to the body as well as the frame and all my tube crossmembers. The cage would come through the dash and tie into the engine cage. I also wanted fullsize spare inside the truck.
With this I left clearance for the rear tires until the cage time as I knew I would have to tub the truck, I just didn't know how much.
Note that all of this tube work was done in BendTech Pro and I Solid modeled some of the interior tub to help with the translation from existing truck to bendtech.
I'll start working on these pictures tomorrow evening.
So after things were checked for clearance, good conditions found for ability to clearance the body with the rubber, good driveshaft angles throughout travel, good shock angles, and clearance enough for multiple caster angles, I was ready to final weld and paint the raw steel.
It looked mean stuffed with the full body. I always like that look so I'll start this post with it.
This is the 'Houston we have a problem' picture. Sitting way too high. Now there is no winch and some things that would add weight, but not enough to drop it to where I built ride height. I way overshot the spring weight. But thats pretty normal, you never really get it on the first go unless you have scales (Which I do now.. lol).
Out of curiosity, what were were those first spring rates? What about currently?
RoccoK5
1/2 ton status
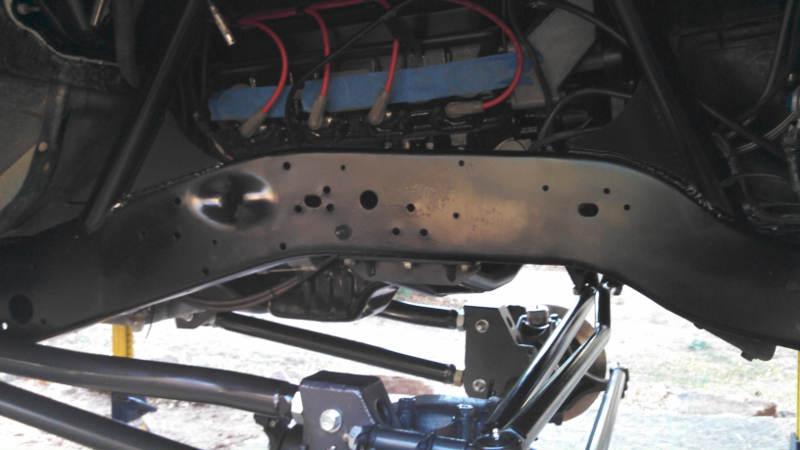
Oh yeah, I also cleaned the whole underside, by hand. Holy hell.
Awesome build! I'm about to clean the underside of mine (build thread incoming!) and am dreading it. What did you do to remove the undercoating and grime? Any tips?
")

Out of curiosity, what were were those first spring rates? What about currently?
I don't remember. They would have probably been about right if I had a bumper and all the sheetmetal, and if the axle was not pushed as far forward. Also I have no batteries in the front, no AC etc...
The other thing that happens when you build a half-link half-leaf truck is that you may find spring rates you have to use that are not the ideal preload and sag due to trying to get it all balanced.
Currently I'm on 200/250 in the front but with minimal front end left, all aluminum motor with aluminum accessory drive, aluminum radiators, and the front pushed even more.
I can say this, I used those springs to get the truck rolling and work out some of the details after the build. If you get caught up in not getting it moving and hyper focused on one detail it'll kill you. At this point I wanted it to move and be driveable really bad but I still had a ton of work to do.
I came back to edit, don't forget the truck in that picture has no cage, sliders, interior winch, fuel cell, seats, etc... So it will definitively be coming down more but I had the metal work all modeled and new the total weight, so its only based off calculations I could tell it wouldn't get me where I wanted. I wouldn't take the pic for any sort of reference on another truck.
Last edited:
Awesome build! I'm about to clean the underside of mine (build thread incoming!) and am dreading it. What did you do to remove the undercoating and grime? Any tips?
It sucks, really bad. Do it on a hot day but you have to wear more clothes than I did. I used a hose and purple cleaner, which will numb your hands and skin after awhile. Spray it down and let it soak for a day or two before you do it. Lots of brushes. And rubber gloves and lots of clothes. I didn't do that and came out stained for awhile.
Man, this is really getting good!
@Tnsejed were you the one that had the rocker skids that covered the underside almost like the early rocker boxes?
I have the rockers cut out and square tube in their place. I've got good pictures of that. I know I sent some pictures of it to some people on the forum that asked. They're an integral part of my cage and frame tie in.

