peppermint oil/extract works well too. Just a couple drops here and there, they don't like the smell. It's only a few bucks at the store and will last you a long time.
CK5

You are using an out of date browser. It may not display this or other websites correctly.
You should upgrade or use an alternative browser.
You should upgrade or use an alternative browser.
'89 R3500 Crew Cab 2wd to 4wd conversion & beyond
- Thread starter mrk5
- Start date
Started out with 2wd TBI350 with SM465 to current 4wd with 454, 700r4, NP241
Mmmm, I like peppermint too. Now it's a toss up between all the options; cedar scented mothballs, dryer sheets, or peppermint.
juanblzer
1/2 ton status
very cool build!
I'm looking at doing a cable shifter for my 241 also. Do you have a list of parts you used?
I'm looking at doing a cable shifter for my 241 also. Do you have a list of parts you used?
The shifter, cable, and cable connectors all came from JB Custom Fab. http://jb-custom-fabrication.myshopify.com
They also included a new lever that bolts to the tcase for the new cable ends replacing the factory arm.
They also included a new lever that bolts to the tcase for the new cable ends replacing the factory arm.
And I made my own bracket to hold the cable at the tcase. However JB Custom Fab has a bracket for that now too. They just sent me one to try out but I haven't installed it yet.
juanblzer
1/2 ton status
Cool! I sent them an email. Any idea how much it will cost for all the stuff? I can see all the prices for the parts but none for a "single" shifter
I don't remember but I should have a copy of the invoice in my collection of build receipts.
Looks like around $200. That was a year ago, don't know if pricing has changed. You might also check what they have for sale in their ebay store.
Been working on getting the DIY4x dash from K5 modified for the crew cab. You will notice some random odd holes because of it being used differently in the K5.


Been working on getting the DIY4x dash from K5 modified for the crew cab. You will notice some random odd holes because of it being used differently in the K5.
I like that!

Thanks!
Fixed the wiring. I cheated and just pulled a new wire to replace the melted wire. I had never removed a headlight switch before so I had to look that up. Pull the knob out, push in the metal button indicated below, and then pull the knob and it comes out with the shaft.
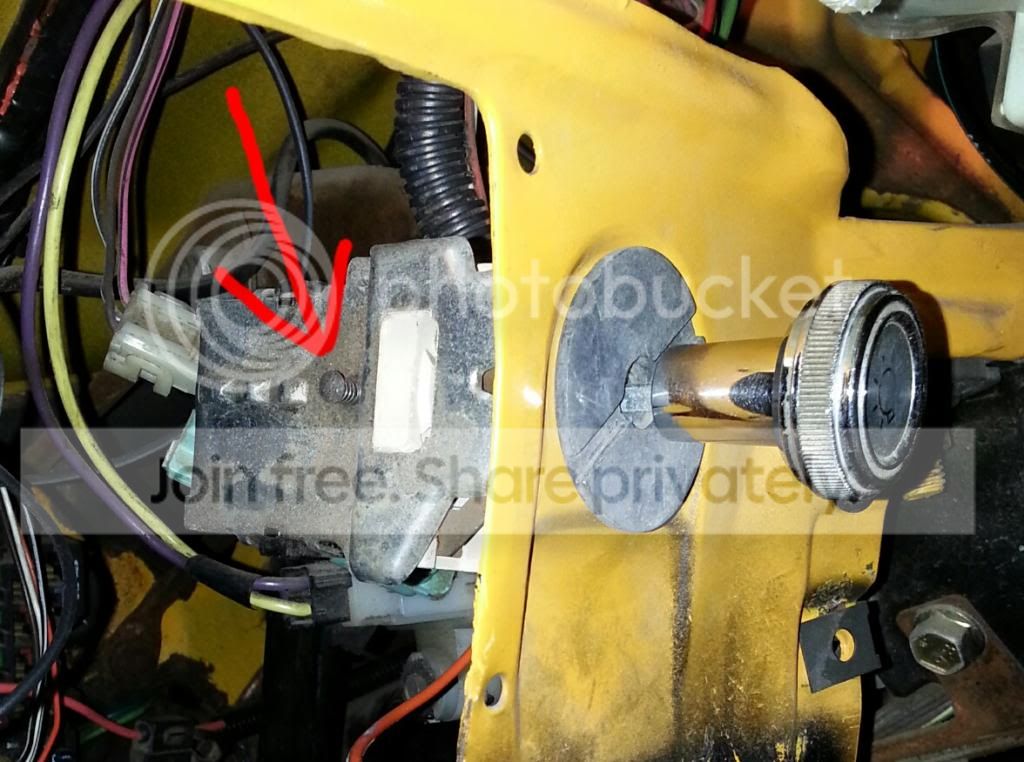
It does take some fiddling to get it out; just long enough to be just about ready to give up.
Then spin off the "nut" indicated below.
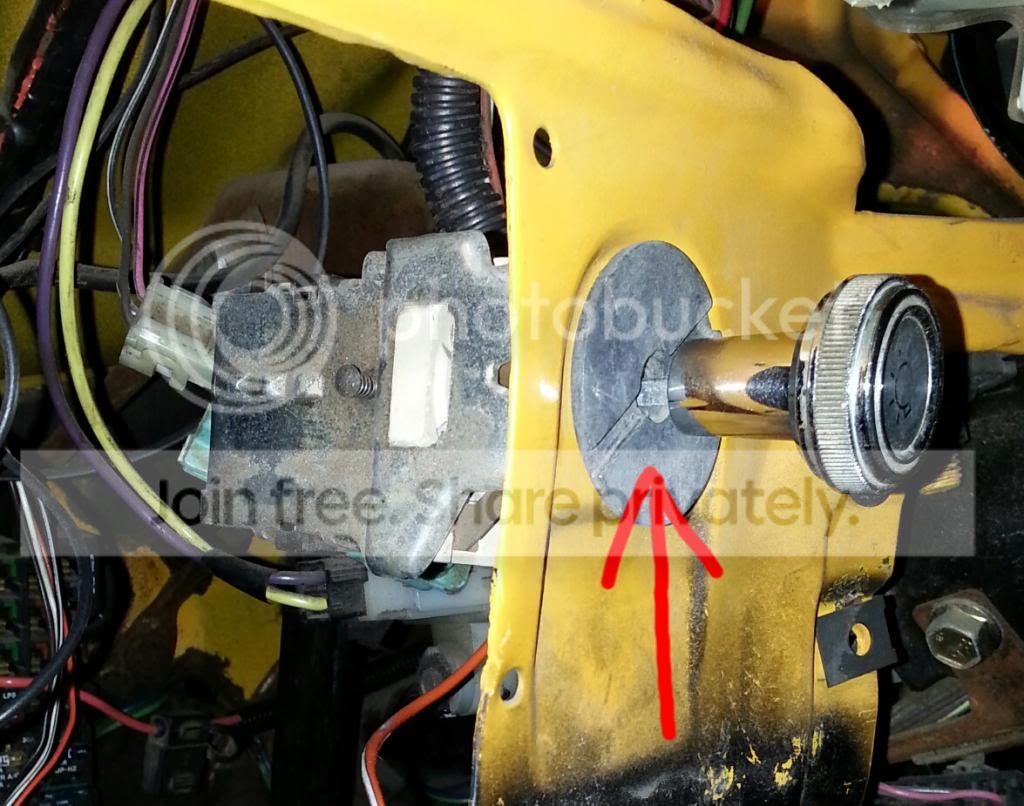
The wiring connector unplugs from the switch without any special steps. To remove the bad wire, you must access it from this side.

I have a tool that will allow the connector to be removed.

On the picture below you can see the little tine that sticks up and holds the connector in the plug housing.

The tool is inserted to push that tine down allowing the plug to be pull out.
When I did a bunch of wiring in my K5 I found a type of plugs I really like. They are called Packard 56 connectors. By unplanned coincidence they are also the same type of connectors used these trucks. It has been very handy for repairing wiring and also changing wiring connectors.
The trick to this connector is that it has 2 wires. They do make special connectors for this purpose, but I don't have those. I've had good luck getting 2 wires to work in the standard connector.

Here's the old connector compared with the new.

And the new connector with the wiring.

Plugged it back in the electrical plug housing and everything is working good. I pulled the new power source from a battery connection on the fuse block. I added a 20A circuit breaker for protection; the original power source had a 20A fuse.
I love your truck, it is inspiring me to get off my butt and work on my own '86 crew. I'm going to do build sliders just like you did.
I had a similar issue with a burnt wire and a headlight switch on my truck. I ended up installing a relay to run the headlights off of. The stock wiring pulls the full power to run the lights right through that switch. The other bonus was the headlights were brighter after adding the relay.
I had a similar issue with a burnt wire and a headlight switch on my truck. I ended up installing a relay to run the headlights off of. The stock wiring pulls the full power to run the lights right through that switch. The other bonus was the headlights were brighter after adding the relay.
Thank you! I plan to do a relay for the headlights as well. At some point.... LOL!
Do you know if those pins are the same ones on the fuse block? Do you use a special crimper for these?
Very nice repair, those pins will come in handy!
Very nice repair, those pins will come in handy!
The fuse block connectors are different. They have kind of a double hump that the fuse blade slides into. The end that crimps to the wire is probably the same style tho.
I tried several different crimpers and ultimately found that cheap was not the right choice. I'll dig up the info here in a short.
I tried several different crimpers and ultimately found that cheap was not the right choice. I'll dig up the info here in a short.
Below is my collection of crimpers:Do you use a special crimper for these?

The crimpers on the left were the first I used. I found them online for $30. They are ratcheting and they have a cool feature that requires you to fully crimp the terminals before the ratchet mechanism will release allowing you to open them again. This ensures you fully crimp the terminals for a good connection. The jaws have dies that can be changed for different types of terminals. In addition to the dies for the Packard 56 terminals (essentially open barrel terminals) I have a set of dies for the regular terminals you buy at the parts store with the insulation on them.
The ratcheting crimpers worked okay for the female terminals. The dies have 2 stages so that it crimps the terminal to the wire core and insulation at the same time (more on that later). However these crimpers cannot do the male terminals, they won't even fit in the dies. And sometimes I found the successful crimps to be a little loose. I would say these crimpers work best on the regular parts store terminals.
After some further Internet searching I found the second set of crimpers (going from left to right). These are available on Amazon or from a Matco Tools truck for about $35. I found several people that had used them for the Packard 56 terminals so I thought they would work for the males since they have 5 different size options. Unfortunately they did not work. Again worked great for female, but not male terminals.
A co-worker had the 3rd set of crimpers with the orange handles. He had gotten them with a terminal kit for Honda motorcycles a few decades ago. These actually were able to crimp the male terminals. However I couldn't find them to purchase anywhere. Additionally it takes a lot of pressure to crimp the male terminals so much so I was afraid the crimpers might break - not good considering they're not mine.
Finally I found a posting about the pair of crimpers on the right. These are actually made by Delphi purchased through American Autowire. American Autowire makes wiring harnesses for hotrods. They sell the crimpers so you can make necessary changes to some of their universal harnesses. Unfortunately these are $90 crimpers. However they are very high quality and work great. If I'd known this was going to be the price to use the Packard 56 terminals in the beginning I probably would have tried to figure out something different. This was one of those "live and learn" moments.
On to the function, the images below show the openings in the crimper. You can see one side looks like butt cheeks. This part curls the open barrel of the terminal back into the wire to crimp it.


First thing to do is to strip about 3/16" of insulation. You can see where the first crimp will capture the bare wire and the second crimp will capture the insulation.

Now the wire is crimped. You can see the curl much more pronounced in the female terminals. The male terminals fold over more than curl.

Then you crimp around the insulation.

The little tabs sticking out at the end of the male terminals help keep them aligned in the housing. The female don't need them.

The other benefit to having all of this stuff is that I was able to wire up my own relay bases. This makes for much cleaner relay installations.

So in the picture above the labels are on the relay bases. These are permanently affixed to the truck and the relays themselves just plug into the bases.
Aside from the cost of the crimpers, it is pretty inexpensive to get all of the components.
- Relay bases are 68 cents each
- Female terminals for the relays are 20 cents each
- Female terminals for the Packard 56 plugs are 18 cents each
- Males are 16 cents each
- Housing for a single female terminal is 12 cents
- Housing for a single male terminal is 17 cents
- Housing for 6 female terminals is 43 cents
- Housing for 6 male terminals is 37 cents
As I mentioned, I was also able to use these terminals to modify existing factory wiring. So all in all I think it was a pretty good investment. Just wish I hadn't wasted so much on the wrong crimpers.
You do have to buy in bulk but still spending less than $10 on an item. And now that I have them, I use them a lot.
Very nice write up, I need to pick me up a good pair of crimps. Definitely going to save this for the future.
Definitely going to save this for the future.Thanks. I kinda enjoy wiring stuff now. But it is still time consuming.
Took a page from Avery4jc's build and added some storage with 20mm ammo cans.
Made them lockable by welding one of the latches.


Before welding you have to cut off the lip that the lid kinda fits into.


Completely cut off:

If you don't, you won't be able to open the lid far. With it cut off the lid will flip completely open.
BEFORE trimming:


AFTER:


Added a padlock tab, painted them matte silver, and bolted them to the bed.


I also finally got the co2 bottle mounted.
.jpg")
.jpg")

Did the angle to minimize how much it sticks up out of the bed. They recommend going no more than 45° off vertical and I ended up around 60°.
Another thing I've done is change how the tire carrier rests on the bed. Got rid of the cross bar that was always in the way. Added bars to the carrier with 90° bends that hit the fenders with bump stops.


That way the bed is completely open for loading. If the bumper bars prove to be a nuisance when the carrier is down I will make them removable.
Made them lockable by welding one of the latches.
Before welding you have to cut off the lip that the lid kinda fits into.
Completely cut off:
If you don't, you won't be able to open the lid far. With it cut off the lid will flip completely open.
BEFORE trimming:
AFTER:
Added a padlock tab, painted them matte silver, and bolted them to the bed.
I also finally got the co2 bottle mounted.
Did the angle to minimize how much it sticks up out of the bed. They recommend going no more than 45° off vertical and I ended up around 60°.
Another thing I've done is change how the tire carrier rests on the bed. Got rid of the cross bar that was always in the way. Added bars to the carrier with 90° bends that hit the fenders with bump stops.
That way the bed is completely open for loading. If the bumper bars prove to be a nuisance when the carrier is down I will make them removable.
Last edited:

